Monday, July 30, 2018

Christmas Stocking Card

Another fun design from Creativekuts.com, love this adorable shaped card.
Cardstocks are from my Stash, Kraft and Black from Recollection's
I used Cuttlebug Simply Charmed squares embossing folder to add some texture & dimension.
The pattern Papers are from HOTP Christmas Sweets
I used pink glittered cardstock from The Paper Studio Stack
I added clear wink of Stella sparkle pen to the white poof on the cap.
The adorable face stamp is from Peachy Keen Smitten Mittens
I used pink glitter chalk on the cheeks and an orange gel pen to color nose.
For the inside I used some more of the fun heart and star embellishments and stamped the sentiment in a pretty Boysenberry Pigment ink.

I am entering into these fun challenges:
Die Cuttin Divas Ch #379 ~ Christmas in July
Simon Says Wednesday: Anything Goes
Mod Squad Challenge - Christmas In July
DL.ART JULY 2018 Linky Challenge
CARDZ TV ANYTHING GOES CHALLENGE #57
Jo's Scrap Shack - FFC #244 Always Anything Goes with Lawn Fawn!
HIMCR #363 - Any Holiday! (Christmas in July)


Thanks for stopping by to see my project today.  Have a wonderful day.

Friday, July 27, 2018

Surprise Snowman Pop-Up Card

Another fun SVG file from www.creativekuts.com I love the surprise Inside!!!
 
I used some pretty pattern paper from HOTP.  I kept the front very Simple using a Tree shaped sentiment stamp from HOTP Fancy Christmas Greetings Stamp Set.  Using my stamp press I stamped in a green ink then stamped again using Versa-Mark and heat embossing with clear powder.  It looks so much better in person!  I also used a holly and berries die cut from HOTP 9 Tiny Christmas Things + Shadows Die Set to decorate the front.  I added red foil for the berries.

and now for the awesome Surprise inside.....
I love him!  he is so cute!!!
What a fun interactive card to send someone a Christmas hug with!
I used same HOTP pattern paper from the front.
I used glittery white cardstock on the mitten cuffs.
everything else is cut from recollections card stock.
I drew on the mouth and eyebrows with a black gel pen.
I used red & white Bakers twine for Banner.
I decided to add a sentiment stamp to the back for signing my card.
I also added a candy cane die cut from
HOTP 9 Tiny Christmas Things + Shadows Die Set
cut from red foil paper
 
I will be entering into these fun challenges:
Simon Says Monday: Christmas in July Blog Hop!
Die Cuttin Divas Ch #379 ~ Christmas in July
Simon Says Wednesday: Anything Goes
Mod Squad Challenge - Christmas In July
DL.ART JULY 2018 Linky Challenge
CARDZ TV ANYTHING GOES CHALLENGE #58
Jo's Scrap Shack - FFC #244 Always Anything Goes with Lawn Fawn!
HIMCR #362 - Christmas in July!
Cut It Up - Challenge #153 - Christmas in July

Thanks so much for stopping by.

Snowflake Ornament Card

Love working on Christmas in July cards and of course had to go with my favorite color purple for this beauty.  This is a very cool svg file from Cheryl over at www.creativekuts.com  I love how the front of the card is a cutaway in the form of the ornament shape.
Front pattern Paper from HOTP Sugar Plum Artful Card kit
I used purple glitter glue to accent each snowflake in the paper.
The purple Ornament/Bauble cut from Neenah Gravity Grape
Snowflake cut from The Paper Studio - The Glittered cardstock stack
backed in a light purple embossed cut and raised with foam squares
I used a matching foil die cut from sugar plum for center of snowflake
again topping with purple glitter glue
Ornament topper is cut from Grey Bazzil cardstock
Card Base from 110 Neenah white

For the inside I used the texture embossed purple for the background
Strip of matching pattern paper down center
rectangle backer of Neenah Gravity Grape
rectangle backer of darker purple cardstock from stash
white rectangle Neenah 110, stamped with Violet ink
stamp -   Christmas Winter Sentiments Stamp set
Banner from new die set, inked edges with violet
stamp - Christmas Stamp Set - Crafters Companion
Snowflakes die cut - Snowglobe Cutting Dies - HOTP

I am entering into the fun challenges:
Simon Says Monday: Christmas in July Blog Hop!
Die Cuttin Divas Ch #379 ~ Christmas in July
Simon Says Wednesday: Anything Goes
Mod Squad Challenge - Christmas In July
DL.ART JULY 2018 Linky Challenge
CARDZ TV ANYTHING GOES CHALLENGE #58
Jo's Scrap Shack - FFC #244 Always Anything Goes with Lawn Fawn!
HIMCR #362 - Christmas in July!

Thanks so much for stopping by to see what I am up to.

Tuesday, July 10, 2018

Sailing ship inter-active scene card


Hi there crafters, back again with an interactive card today.  Unfortunately for me the ship I used is a little too high so you have to actually move it with your fingers to get it to rock back and forth... but I still love how it turned out.    I watched a tutorial video from May May made it and just had to make my own version with the supplies and dies I had on hand.
For my card I used a 6 1/2 x 5" top folding card base.  Those awesome stitched waves are from a die set from Craftin Desert Divas - Outdoor Landscape Dies.  That sailing ship die is so phenomenal but apparently doesn't quite work for this technique although this same card without the rocking action would be super cute too.  I cut the ship three times once in a heavyweight white for the back section, I cut it again in brown and then I cut it one more time in white to snip off the sails and flags.  I colored the flags with a spectrum noir marker before attaching to the ship.  Now looking at it on the card I wish I would have made the little areas with the closed sails white as well but I want the ropes and the masts to be brown.  I have a die set of three cloud sizes and I decided to use the medium and small for this card.  The little tiny birds are from a Die as well that goes with the beach shack.  The sentiment is from a stamp set called party like a pirate.

We recently went on a cruise with another couple and I thought this would be a cute card for them.

I will be entering into these fun challenges:
Simon Says: Summer Fun!
CARDZ TV ANYTHING GOES CHALLENGE #54
FFC #241 Always Anything Goes

Thanks so much for stopping by my craft Room.  I hope to see you again soon.


Christmas coffee to-go

This was a fun and easy project to make.  Yay!  Getting some Christmas in July cards made.  Thank you Cheryl from www.creativekuts.com


I decided to go with the traditional white to-go cup with a Christmasy pattern paper wrap,
This pattern paper came from Pebbles - Welcome Christmas paper stack.
This could be done in so many different varieties of card stock and pattern paper, so fun!
I used my Cricut  explore pen to write the Merry Christmas sentiment as it came with the file, but you could stamp any sentiment.  I also used the Cricut Explore to draw the design at the bottom of the cup that came in the file too.  I covered the snowflake in white glitter and added a clear glitter gum drop to the center.
For the inside that pulls straight up out of the cup I decided to use green card stock for the base.  I stamped the sentiment from Cardz TV - Merry Everything stamp set with memento tuxedo black ink.  I stamped a heart wreath in green and colored the bow red with spectrum Noir marker at the bottom.
That stamp is from Vintage Snowman Stamp Set - PSA Essentials
This would be a great card to slip a gift card into, especially one from their favorite coffeehouse!

I will be entering into these fun challenges:
HIMCR #360 - Christmas Colors in July!
CARDZ TV ANYTHING GOES CHALLENGE #55
FFC #241 Always Anything Goes

Thanks so much for stopping by to see what I'm up to in my craft-cave!
(as hubby calls it) lol

Thoughtful Bowknot flower card

 Oh my goodness it has been so long since I posted on my blog or had any time to really sit down and craft.  I tell you what, I think I will spend the next two weeks in my craft room if I can get away with it.  It really needs a good cleaning too but I really want to play!!!  It's been too long!  So glad I had some time today to make a fun card based on a sketch over at Tuesday morning sketches.
I pulled out this sheet of pattern paper a while back for a different project and didn't end up using it so I thought I would make sure and use it today.  The purple & teal seemed like a fabulous color combo to me.   I cut the flower pattern paper with my stitched rectangle die.  I used one of my spellbinders card creator dies to back that with teal card stock.  I grabbed a CTMH pattern scrap of teal with white pattern on it and cut that into a strip, I then used Die-namics Stitched Scallop Basic Edges 2 to make the scalloped white card stock layer for that to go on to.  I used a Spellbinders Labels Twenty-Three die for the purple label shape that I also backed with teal,  and I ran that through with my cuttlebug Swiss dots embossing folder.   I die cut the bowknot flower out of  teal and white card stock alternating the layers.   This die was such a pain to get the thin card stock out .... I really need to play with it and figure out what works better for release.  As an afterthought I decided I wanted to run white twine around the teal pattern layer and remembered I had a die that might work perfectly,  I just wish I would have thought of it before I attached the Swiss dots label down.  Oh well it still looks OK.   So for that die I cut the middle section out so that it would fit properly the way that I wanted it to.  I used a stitched scallop oval for the center, I adhered the teal layer directly to the card and popped up the white layer with the  sentiment.  The sentiment stamp is from hot off the press - Thank You! stamp set.  Using my stamp press, I first stamped in purple then I stamped over it with VersaMark Ink.   I then heat embossed it with clear embossing powder.  At this point I added the bowknot flower trimming the tales of the ribbon to fit the card and added a purple gum drop to the center.
For the inside I again used my stitched rectangle Die to cut the same CTMH pattern paper as the strip I used on the front.  I again used the same spellbinders Labels Twenty-Three die to cut the white sentiment layer.   Using the same hot off the press Thank You! stamp set, I stamped the sentiment in purple only this time.   I decided to grab another flower die for the flower on the inside as I didn't intend to fight with the bowknot die anymore today. Lol  I cut it from the same purple paper that I used on the front of the card and backed it with the same teal that's on the front of the card, I added some clear wink of Stella to the center and used my white gel pen to add some dots.

I am entering into these fun challenges :
Tuesday Morning Sketches #461
CARDZ TV ANYTHING GOES CHALLENGE #54
FFC #241 Always Anything Goes
Scrapy Land {Challenge #93}
DL.ART JULY 2018 Linky Challenge
Challenge #100 - Anything Goes using dies by companies carried at the DRU Store

Thank you so much for stopping by today to see what I am making.  I hope to have another card for you either later on today or tomorrow.


Wednesday, April 25, 2018

Pretty flowers collar fold card

Such a pretty card and so easy to make with the awesome svg file Collar Fold Card from www.Creativekuts.com
This one should be in her store by June I am making this early for her sample card for the Card Train.

I just love these flowers and the card cut too... I will be using both many times in the future I'm sure.  That beautiful DSP is from Couture Creations, Vintage Rose Garden. 
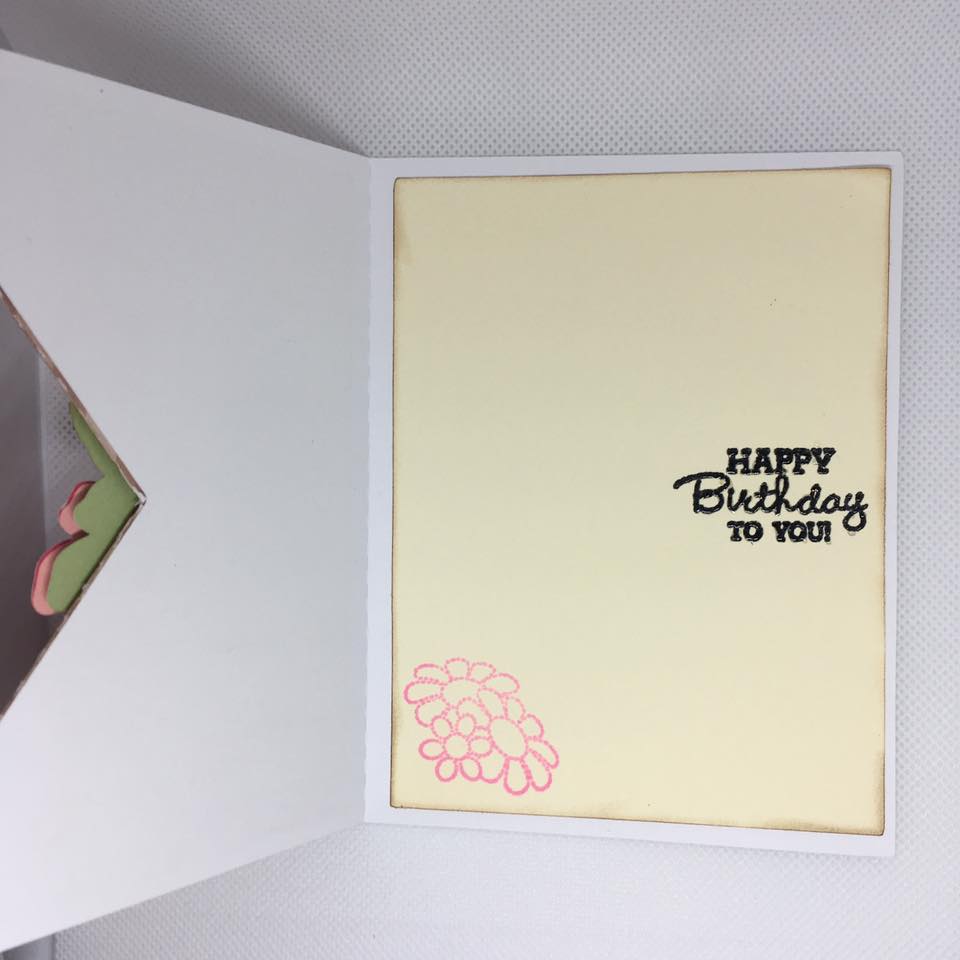
I stamped Happy Birthday To You!  That is from HOTP Flower Frenzy Stamp Set.  I stamped in Memento tuxedo black ink and then again in versa-Mark and then heat embossed with clear embossing powder.
I simply stamped some pretty stitched flowers from Crafters Companion Hexagon coordinating Stamp Set in pink Pigment ink on the inside to finish it off.
I am entering into this fun challenges:
Simon Says Monday: Flower Power
CARDZ TV ANYTHING GOES CHALLENGE #43
Jo's Scrap Shack - FFC #230
Always Happy Birthday Challenge
Simon Says Wednesday: Anything Goes

Thanks so much for stopping by I hope you enjoyed my project.

Saturday, April 21, 2018

Birthday Balloon Girl Cutaway Card

 Hi crafty friends, it feels so good to be back in my craft room and creating.   Life got busy and then just when things seem to be calming down I got sick for a week.   I am so happy to be over that and back!  Look at these adorable little cuties!!!
I just love this adorable little girl die & I can't wait to get more to add to my arsenal.   I have learned a few tricks I will implement with this doll the next time I make her.  The doll on the left I decided to use my SNC to Cut a solid face piece so that I could use my peachy keen faces to stamp - I used the PK Princess face in 5/8" for doll on Left.
OK onto my card!   So I decided to use the doll on the right with just the eyes for this card.  I based my colors on the color challenge over at Your Next Stamp this week plus I used a couple of my new YNS dies & a stamp to create this card.  For the card base I used a heavy weight white card stock cat @ an A2 size card folded at the top.  I cut the pink DP from Colorbok - Light Bright to cover the whole card front but I only used tape runner at the top.  Laying my entire card flat in my big shot I used the YNS Curved Scallop Edge Die to cut through both layers of the front portion of my card at the bottom  making it a cutaway card.  I wanted the white loops to show through below so I trimmed all of the loops off of the pattern paper before adhering it down the rest of the way onto the card front.  There may be an easier way to do this but this worked for me.  After positioning my little girl where I wanted her I wanted to give her a string of balloons to hold.  I cut a set of large balloons with the string but then I decided they were too big for the card so I cut the big balloons off and went ahead and used the strings.  I then used the Mini Balloon Trio Die Set from YNS instead that I popped up on foam squares atop each string end.  I stamped the sentiment "It's your day" from a YNS stamp set called Autumn Animals  I first stamped in a purple violet ink and then stamped again with versa-mark adding clear embossing powder and heat set.  I then used my scallop stitched oval die to cut out the sentiment.  I added some pink chalk for blush to the little girls cheeks and added a few purple gems for the bows in her hair and on her dress.
For the inside of the card  I used some pretty pink pattern paper and then I covered the bottom portion with a purple card stock scrap  that I had to cut at an angle because of what was left of it.  I wanted to make sure I had enough though to cover the bottom under the cutaway so that it would show through from the front when the card was closed.   I decided to cut another unusual curvy piece with the Curved Scallop Edge Die to lay at the intersection of the two layers and simply trimmed off the edges even with the card base.  I decided to cut some more mini balloons to place on that white section and also added a couple of hearts that I die cut from a different set.  I stamped the sentiment "Wishing you a Beautiful day" from HOTP Lacy Things stamp set. I also stamped a pretty Happy Birthday underneath in the violet Purple ink.

I will be entering into these fun challenges:
YNS - Sketch and Color Challenge #87  (Color)
Mod Squad Challenge - Happy Birthday with a Balloon
CARDZ TV ANYTHING GOES CHALLENGE #43
Jo's Scrap Shack FFC #230 - Anything Goes
Always Happy Birthday - April Challenge: Birthday Anything Goes (optional Balloons)
Die Cut Diva's - Anything Goes

I had so much fun making this card I hope you enjoyed viewing it as well.  I hope you all have a super lovely weekend and I hope to be back with some more cards later this week.

Sunday, March 25, 2018

License Plate Card

I had so much fun creating and making this card for our grandson who is turning 15.
I started out with a white rectangle card base that I used my corner rounder to round all 4 corners 1/4 inch.  Next I cut a mat in grey that I added 4 small holes to and added the adorable screw brads.  I cut two small rectangles for the stickers one in grey for the month and one in red for the year.  I used my Cricut and Cricut pens to write California in red using Brush Script BT font, it only wrote the outline so I filled it in with same pen.  I also used the same processs to write the month and year in black using Cricut Sans font.
For the HB2U and star I cut 4 times and layered up to give the embossed up look.  I again used Cricut Sans font to write 15th in black on the smaller layered star.  I added wink of Stella clear glitter pen over each of the blue letters, the star, & the month and year stickers. I used walnut stain distress ink to ink the edges of the month & year stickers & the star.
For the inside I used Cricut black pen to write in the personal sentiment & cut the mat out of white.  I used walnut stain distress ink to go around edges.  I used HOTP For the Guys stamp set for the background map stamped in walnut stain distress ink.  I stamped Happy Birthday in Memento Tuxedo black ink and I stamped enjoy the ride in blue both from same For the Guys stamp set.

I am entering into these fun Challenges:
Simon Says Monday: Road Trip
CARDZ TV ANYTHING GOES CHALLENGE #40
FFC #226 Anything Goes
DL.ART MARCH 2018 LINKY CHALLENGE

Thanks so much for stopping by to check out my latest project.

Friday, March 23, 2018

Easter Wishes Floral Oval Card

For today's card I wanted to create just a simple and pretty Easter card
After cutting the A2 sized card base in a heavy white card stock.   I then cut a background mat from some pink striped pattern paper from Lawn Fawn - Let's Polka in the Meadow
I then used my Simon says stamp bundle of stitched shapes large stitched rectangle die to cut the yellow and white lattice pattern paper to layer over that.   I used an inside outside stitched oval die to create the frame.  Using my Cricut explore I created the sentiment by using the Cricut Alphabet Font & writing with my Cricut black pen Easter Wishes onto pink card stock.  Having it cut out a larger oval so that I could then use my inside outside die  to cut to fit the opening in the frame.  I love how I can use my Cricut and my metal dies together to give myself so many other options!
Easter Eggs from a stamp set that I stamped in hot pink pigment ink and heat embossed clear.
Flowers are from Cricut - Kate's ABC's
Tiny buttons are from Cricut - Paisley that I cut at .30
I brushed over the tiny buttons with my wink of Stella clear glitter pen, too bad that never shows up in pictures for me!  but it is glittery.   For the yellow parts of the flowers I took yellow puffy paint and went over the entire piece for each one and then sprinkled with recollections extra fine glitter in yellow.   For the largest flower center I added a pink gem.
For the inside I used some fun pink flowers designer paper for the background layer.  I used a stitched rectangle die to cut the sentiment mat.  Sentiment stamp is from Lacy Things Stamp Set - HOTP, stamped in Memento Tuxedo Black ink.
The Bunny Rabbit is from a new stamp and Die set colored with my Spectrum Noir markers:
IG1, IG2, PP1

I am entering into these fun challenges:
Fantabulous Cricut Challenge #322-Easter
Tuesday Morning Sketches #445
HIMCR #344 - Tic Tac Toe!  (Button - Glitter - Flower)
Dies R US Challenge #93 - Frame It
Simon Says Wednesday: Floral Frenzy
Mod Squad Challenge - Ready For Spring
DL.ART Thankful Thursday Challenge #225 "Flowers"
CARDZ TV ANYTHING GOES CHALLENGE #40
FFC #226 Anything Goes
Challenge 144 - Easter

Thanks so much for stopping by and having a look at my project today