Sunday, July 31, 2011

Cupcake Birthday Card


Wow I did the Blog Hop this morning over at
Birthday Sundaes...it was so fun and inspiring.
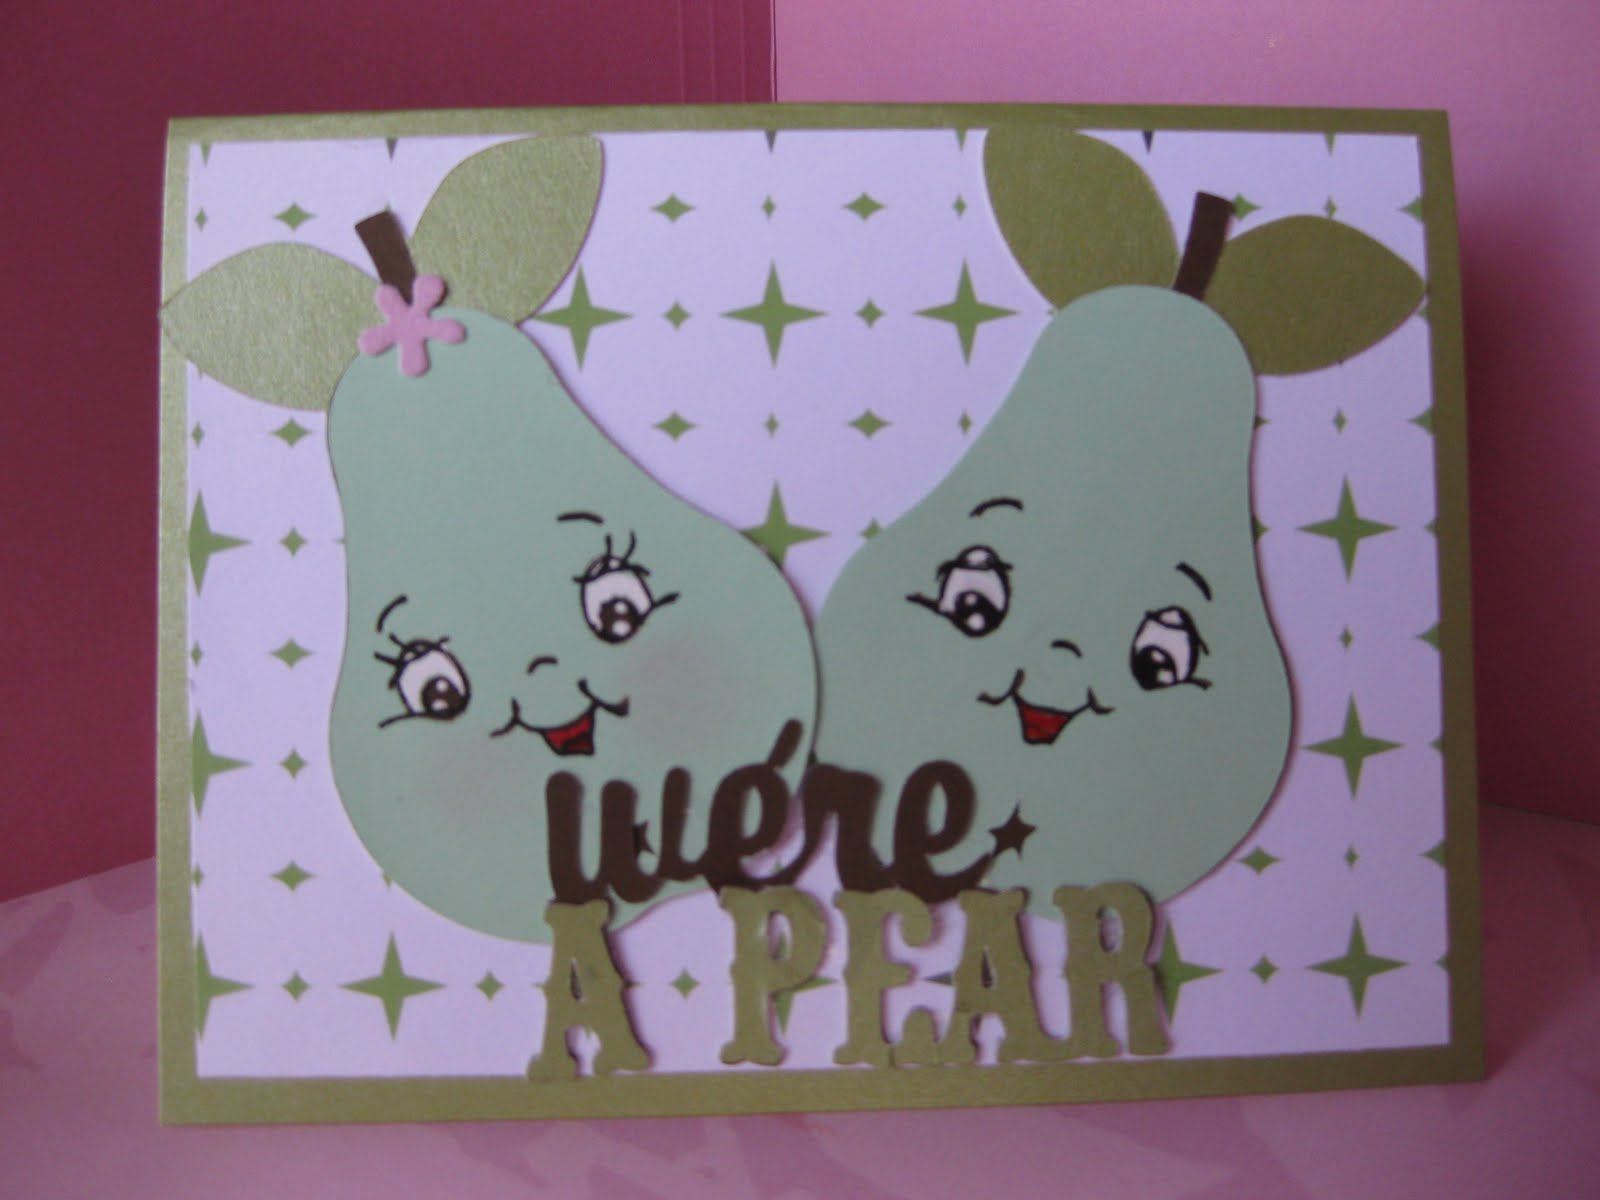
Here is the card I am entering into the  Challenge,
the design team really had some great cards...I couldn't
wait to get busy on my own, now thats a great hop...lol!
I got to use my new Imagine cartridge, Better
together, on my E2.  I loved this cupcake...it's perfect.
I used my cuttlebug D'Vine Swirls folder for the top of the cupcake,
then I went over that with some pink stickles.
I cut the Candle from my new Doodlecharms Cartridge,
I then added some gold stickles to the flame.
The awesome tag & frame are from SVGCUTS, Liesl's Lacy Oval.
You can find their banner above this post, just click on it
to go check out their files...they are all awesome and a bunch
are free.  The sentiment's are from a stamp set by Hampton Art
called Foot longs, this was the cupcake set.  I also used them to stamp cupcakes on the inside.
Also the little red heart stamp is from this same set...I used red ink and then went over it with Red stickles.  The buttons are by Recollections and they are popped up.  I use my new white Gelly roll pen to dot around each scallop on the tag frame.  Oh I also used the red stickels on the cupcake's mouth.  What a fun card!  I think I will make one similar to this for my upcoming card swap.
Recipe:

Cricut Imagine , Better Together - Cup Cake

Cricut Doodlecharms - Candle

Svgcuts - Leisl's Lacey Oval

Card Stock - The Paper Company

Background Paper - OTC

Background Cut File - Penny Duncan

Other Papers - OTC & Pink Bazzil

Cuttle Bug Folder - D'Vine Swirls

Pink Buttons - Recollection's

White dots on Tag - White Gel Pens

Stamped Sentiment & Heart - Footlongs Cupcake set

Inked edges -Tim Holtz Distress Ink, Walnut Stain

Bling Red, Gold, Pink Stickles

Have a wonderful & Crafty rest of your Day!
Hugs, Eva :0)

Saturday, July 30, 2011

Back To School Book Marks

Hello my crafty friends.  Here is the final project for
the Back to School items, Sorry it took me so long.
This is another great file from My Sweet Tater,
please go find her files @ My Scrappin Hens
I recieved my Doodlecharms Cartridge yesterday that
I won from Gigi over at the The Cricut Bug  during the Whimsical
Wednesday blog hop in July...It was awesome. 

So I wanted to add a little charm to these Back to
School Book Marks from my new Doodlecharms Cartridge.
I chose the apple as you can see for my charm.
I added each childs initial on their apple. There is one little girl and the rest are all boys so one got a pink ribbon, this will be her first year of school...awe...Love my Grandbabies.  So for the two
little kids I used the Book Marks with the crayon boxes and for the older two kids I chose to use the book stacks.
I hope they like all of their back to school goodies.
I find this whole set just adorable!
Thanks again MJ for your awesome designs.
before I laminated & added my embellishments
There are two more older boys I am making these for,
I just have to laminte them and I am waiting for other items
to stick in there with them so I don't waste...lol.  Woo Hoo, I got
to use my Your Story Laminator on this project...lol.

If you want to see the other 2 items that match these book marks, please scroll down in my blog to the previous 2 posts. 

Thanks for looking, if you like my blog please feel
free to follow, I love meeting new Crafty Friends.

Have a Wonderful & Crafty Day, Eva :0)


Friday, July 29, 2011

Lunch Box Notes - Back to School

Hello Crafters, I am back again with another fun project.  This is #2 of 3 Back to school projects I am working on.  What a wonderful surprise it is to find a little note in your lunchbox from your Mom, or even from your Dad for that matter.
After I added my sentiments and Front of envelope shown
Before I added my sentiments and Back of envelope shown
 This Note Card & Envelope set are just so adorable.  I had so much fun making them.  You can write your message in by hand, stamp a cute sentiment or even use your computer to design and print your message.  I used my computer and printed mine on plain white paper.  You could also use a colored paper...pink for a girl, blue for a boy.  I chose to use my cricut...using the center point feature and cut out the square shape from my accent essentials cartridge at 2.5 inches with the real dial size on...Perfect...lol.
I then pasted it to the cute little notecard.  On one of
them I also stamped a little pink heart in my sentiment.
This is sure to put a smile on any kids face.  You could also
use this for a teacher note and even slip in a gift card for her.
(you would need to score the envelope flap just a bit higher)
So Head on over to Scrappin Hens and check out
My Sweet Tater Designs for this kit plus tons more.

I will be back with some matching Book Markers later on...
Until next time...wishing you a wonderful crafty Day!

Eva :0)

Back to School Treat Pouch

I will be adding a couple of more projects later on to go with these cute little Back to School Pouches to make an adorable set.
 These are printed on white card stock.

These are printed on plain white printer paper
You can add whatever you want to these cute little pouches...I will probably add little name tags and give out to the kiddos.
What a cute little set this is, once again you an find these and many more files to print out on your printer.  Then you just cut them, Score them, paste them and use them...Easy Peasy!!!
Go check it out at Scrappin Hens by My Sweet Tater.

Color Your World - Blog Candy!!!

Cheryl over at She Stamps has some great goodies for you,
go check out her site to win this awesome prize package

What can you win? 1 lucky winner will receive the following:
  • Coloring Techniques for Card Making” – this wonderful book walks you through coloring with watercolors, colored pencils, and alcohol inks.
  • 5 sheets of Classic Crest paper from Neenah in Solar White. This smooth card stock is great to use with markers or pencils.
  • 9 Copic Sketch markers in the colors B05, B23, B26, YR61, YR68, V04, V09, G02, G09. This would be a great start for a Copic collection or to fill in if you already are using Copics.

Because she had such a great response she has added even more candy for a 2nd winner
 Included is a Cosmo Cricket UPcycle mini deck, package of Heidi Grace ribbons, package of fabric designer brads, spool of bakers twine, and Petite Posies clear stamp from Technique Tuesdays
Head on over there and chek it out

Good Luck!!!

Thursday, July 28, 2011

Guess Who Says Happy Birthday Owl Box - My Sweet Tater

Can't get enough of these cute cute files from My Sweet Tater.
This one is my Fav so far...Love it!!!

Oh My Gosh Isn't this just way too cute?  I am loving these files.  All of you just hop on over to
Scrappin Hens to pick up your print and cut files
for this adorable 3x3 Box.

All I did was print it out on white cardstock, cut it out,
used my bone folder to crease the fold lines, used my hot glue
gun to glue it all together and then I just added a cute little
ribbon with a simple knot tie.  I love it!!!
here is a shot of it open with goodies in it before I added the ribbon.

Happy Birthday Tri-Fold Card & Envelope - My Sweet Tater

Another cute file from My Sweet Tater. 
I inked it up with pink but it was very cute as is.
The envelope that matches is wonderful.  You can add text before you print it out but I am not sure yet who it is going to so I will just add labels to it later. 


Here is the matching envelope...So stinkin' Cute


Go Check out My Sweet Tater files at Srappin Hens

Christmas Pinch Box - My Sweet Tater

In a recent blog hop I did I was lucky enough to meet MJ from My Sweet Tater, she designs the cutest files...they are so quick and easy too.  You just print, cut, score and adhere them together for most of her files.  you can then add extra embellishments if you want but most of them are so adorable already that you don't really need to.  They are great...I did this one from one of the free files I got on the blog hop.  You can go check out more of her files at the Scrappin Hens Store.  They are so so cute, I will be getting many more of her files for myself and showing them right here.
(Click on piture below to go to Scrappin Hens)
Christmas Pinch Box
I will fill these up with little Christmas Treats for the kids
this christmas...ooh these would be great also for classroom treats for all of the kids in your childs class.
Here is a closeup of the back all ready
to add your names from your gift list.

Have a Super Great & Crafty Day!!!

Hugs, Eva :0)

Wednesday, July 27, 2011

Sympathy Card for a Friend

Unfortunatley my Husband lost his Best friend a couple of Days ago...This Man was like a Father to him and meant sooo much.  I feel so Sad for his wife that he left behind.  I made this card for her in this sad sad time...I know there is nothing I can say that will help her right now but I hope this card will bring some little comfort even if it is just a bit.
inside
I used one of my Kits from Card Maker Kit of the
Month Club - called the Simple Comfort Kit.
The stamp that I chose from this Kit for the inside sentiment is so beautiful.
(May Love, Time and Memories soften your sadness and bring you peace)
I used my Zing embossing powder from American Crafts to heat
 emboss this inside sentiment and the glue pad is from Palette.  Everything else is from the kit.  

Tuesday, July 26, 2011

My Silverware Caddy was featured on Paper Playtime & my recent wins...Yay!!!

Ahhhhh...I am so excited.  This totally put a smile on my face.  I am pretty new to the whole blog thing...but I am learning quickly and quickly getting addicted...lol.  Comments and followers and awards mean so much to each of us.  I love not only creating things but also sharing them with others.
I got to post this new badge on my sidebar...woo hoo...so Proud...lol.
Photobucket
(click on Picture to go check it out)
I did not win the challenge but it felt so awesome to be featured

Also ...other great news for me, I did a Bloghop for the very first time ever on July 7,
it was the Whimsical Wednesday Blog Hop.  It was so much fun...I loved all of the Banners the DT made.  And I also won Blog Candy from this Hop which should be arriving soon...
I won the Doodlecharms Cricut Cartridge...Yay...from Gigi over at the Cricut Bug.  I am so excited to be getting this cart.  You really should go check out her blog and all of the designers for Whimsical Wednesday for that matter.  So I am now positively hooked on blogging and blog hops and challenges too.  I love-love-love it.
 
So on that note let me tell you about my latest blog candy win...Yay for me again!!!
it was a buch of fun too with lot's of cute projects, I won from Lisa at Designs of a  Scrapaholic  some awesome packs of Glitter Diecuts...thanks Lisa...how fun.

so now I need to get some creativity going this morning and I hope you all have a wonderful and crafty day...Hugs...Eva  :0)

Blog Anniversary Giveaway -- from Pink Bling Crafter

Come check out her blog, become a follower and leave a comment to win these awesome goodies
The lucky WINNER will win all the goodies on the picture which includes: Crushed Curry card stock, Birthday Bakery Clear Stamp Set, Punch Spiral Border, Fleurettes, Ice Cream Parlor Ribbon, Couduroy Buttons, mini clothes pins, brads, buttons and I will include some twine not pictured.http://pinkblingcrafter.blogspot.com/2011/07/blog-anniversary-giveaway.html

Blog Candy Giveaway - HUGE LOT!! C'mon lets help Michelle reach her goal!! :)

Michelle over at Scrappin' For Kenzie is having a HUGE Blog Candy Giveaway!! Hop on over there to become a follower - for a chance at all of THIS
 (clicking on the picture will take you to her giveaway post)
This is a huge win for some lucky follower...get over there and help her out...less than 20 followers to go...Good luck everyone :0)

Monday, July 25, 2011

Blog Candy to win from Visions of Paper


go check out the Christmas in July blog hop and make sure you leave a comment and become a follower to win this blog candy...hurry it is happening today :0)

Friday, July 22, 2011

We're A Pear Card - Peachy Keen Stamps

Recipe
Cricut Cart - "Just Because Cards"
Peachy Keen Stamps - Wide Eyed kids
Paper - Oriental Trading Company
Pink flocked Flower - Stash

Entered into these challenges:
Peachy Keen Stamps Challenge - Let's Face it Friday - So Punny!

Summer Shaped Thank You Card

I love flip flops and so does the person I will be giving this card too.  Just a cute little Thank you card to show my appreciation to someone very special.

the flip flops are the top layer of an svg file I got from svgshop from their 3-d flip flop box, go get your free file at
they have plenty of other free files plus lots more to buy from their shop.
I also used some cute little green brads I got from OTC, I added some shiny gold flowers behind the which really made them pop.  the summer brad is also from OTC (Oriental Trading Company).
I used ribbon from them as well.  I used two cuttlebug folders on this card, Swiss Dots & Seeing Spots.

Been on Vacation all week...& Helping fellow blogger

Hello there...what a wonderful week we had in San Diego with perfect weather.   We went to Sea World, we visited Old Town and also got to go to the Wild Animal park while we were there.  It all was lots of fun but it is so nice to be home again too.  I have so much to catch up on in my crafting...lol.  I have had all of these projects running through my head while away.  Also the day before I left for vacation I recieved my first Cricut imagine cart, to use with my E2.  I have been so eager to try it out...today I will do just that, lol.  It is the Better Together cart.  Also waiting in my mailbox when I got home yesterday was my wonderful Paper Doll Dress Up, YAY!!!  and also another package which are some sampler packs of face stamps from peachy keen stamps...I am so excited, I don't know what to do first...lol.  I am also expecting 2 more carts anytime, which are Paisley, which I used my Cricut rewards to get and I won Doodlecharms from The Cricut Bug when I did the Whimsical Wednesday Blog Hop...It was my first Hop ever and I loved it...Such wonderful projects with so much inspiration...it was wonderful!!!

I also want to help a fellow blogger Lisa from - A Mermaid's Crafts to get more followers...you should go check out her awesome blog and become a follower...she is giving away the picturesque cart....oh how I would love to win that one too.  She just passed her goal of 500 followers, lets help her get 550 or even 600.
                                                                   
what a fabulous blog candy prize...go become here next follower and you could win. 
http://indymermaid.blogspot.com/2011/07/500-follower-cricut-cart-giveaway.html

Good Luck and I hope you all have a wonderful crafty day  Eva :)

Tuesday, July 12, 2011

Picnic Silverware Caddy made from a Beer Box

This side holds the condiments & napkins
This side hold the forks, knives & spoons
Ok, so this was a super fun project that will be very useful as well.
The base of the holder is actually a Mikes Hard Lemonade six pack box.
My Stepdaughter got me this adorable paper stack called "Summer Fun" from ATD for my Birthday in June.  I love this cute ant paper so much and thought it would make the perfect background for my Picnic Plasticware Caddy.  I also used lots of other scrap pieces of solid papers too to create my die cuts, including Pink Bazzill cardstock for the hat and watermelon.  The adorable Panda bears are from SVGCUTS, along with most of the other pieces I cut out using Sure Cuts Alot and my Pink Cricut Expression from a kit I purchased called "Panda Picnic Party", what a great kit.  On the box itself all of the die cuts are from svgcuts except for one.  The only one that is not is the laughing sun on each side of the box and for some reason I cannot find who that file is from, grrrr...sorry about that when I figure it out I will post here later.  It is soooo adorably cute though.  Now on the Mustard and Ketchup bottles...I designed the labels from a file called Fancy Label from SVGSHOP blog.  They have plenty of other cool die cuts in their store as well at svgshop.com.  I chose to only use the bottom layer twice for each label.  The background in black I used the Blackout Shadow Rounded feature and the top layer I cut as normal after adding in my text, using Ariel font for each label.  Ketchup in red paper and mustard in yellow paper.   The paper and dicuts I attached with Mod Podge gloss.  The bottom is a wood shadow box that I found at the dollar store.  I removed the picture hanging hardware.  I covered
the bottom wood section with green dots paper by Prima -The Breathe Collection.  I then added a grass border by Penny Duncan Creations.  I then made my own little box out of cardboard to hold my salt and pepper shakers and attached it to the side after covering in patterned ant paper.  I am going to use this new cute little Caddy this weekend when I have family over for a BBQ in the Backyard.  Here are other views of the Box
Condiments out of box

Salt & Pepper Shakers in holder

Salt & Pepper Shakers out of holder

Other side view
I have entered this in these Challenges:
Challenge # 50 - Summer Theme http://paperplaytime.blogspot.com/
Challenge #11 - Summer Theme  http://dreamvalleychallenges.blogspot.com/
Cupcake 150 - Cupcake Craft - #38 Summer http://www.cupcakecraftchallenges.blogspot.com/
Challenge #139 - Summer Time http://onestopcraftchallenge.blogspot.com/
Summer Themed Project http://crazy4challenges.blogspot.com/2011/07/crazy-4-challenges-c4c95.html
July first of the monthe challenge - Home Decor http://cardcreationsbyc.blogspot.com/2011/07/july-first-of-month-challenge-home.html

Sunday, July 10, 2011

Cricut Imagine Better Together - New Cartridge on its way. . . YAY


Cricut Imagine Better Together Art Cartridge
I am so looking forward to playing with this cartridge. 
Check out the handbook here
I of course can't use the patterns but the art is going to be great on my E2.
I love the little faces and some are independant so the possibilities
are going to be soooo awesome...lol.  I am looking forward to
sharing some creations from it very soon.  On that note I have
been busy with other things but I think tomorrow will be a
create something new kind of day...lol.

Happy Crafting Everyone...Hugs, Eva

Friday, July 8, 2011

Whimsical Wednesday Bloghop July 8, 2011

This is my first ever bloghop following an I am so excited.  Everyone come on over and check it out...You could win a gypsy, woo hoo.  Starts today 7pm Eastern time, 4pm for me here in Cali.
I will be posting my thoughts or projects from the hop soon...but I sure hope some of you will join me and come check it out for yourselves.

Wednesday, July 6, 2011

Lazy Days of Summertime Flip Flop Card

I am entering this card into the
For challenge #83 make a card with summer apparel
or an accessory, using any cartridge and colors you'd like.

Also entered into
Wee Memories Challenge #61 - Summertime
http://www.suchins.blogspot.com/
Fun-Fun Summertime Card.  I love the flip flops from svgshop, they are awesome!!!  This was from a box file but I chose to just use the top layer of the shoe for my card along with the 3-D straps.
Recipe:
3-D Flip Flops - svg shop
Sun Die Cuts - Just Because Cards (page 44)
Sun Brad - Oriental Trading Company
Lazy days Stencil - Just Because Cards (page 62)
Summer Time words - svg cuts
Cuttlebug - Spots & Dots
Inside:
All Through the Year Stickers - atd

I made a mistake and had the wrong info for my cut file on the flip flops
I actually got the Free 3-d flip flop box file from svgshop.com, I am so sorry for the mix up...here is the link if you are interested.
http://svgshop.com/blog/2011/06/20/free-svg-file-162-flip-flop-box/

Monday, July 4, 2011

Congratulations New Home Card

My last card for the current swap I am in.  The Category was Congratulations so I thought I would do a new home card using my awesome new Cricut Lite Handy Man Cartridge. 
Recipe:
Cricut Lite - Handy Man (House)
Cricut - Essentials (Smoke)
Card Stock - The Paper Company
Patterned Paper - atd Momenta
CuttleBug - Simply Charmed Squares (Roof)
CuttleBug - Forest Branches (Door)
Silver Brad - Door Knob, from Stash
Entered this card in the Challenge over at Wee Memories
Challenge #61 - Summertime
http://www.suchins.blogspot.com/

Birthday Present Card redo

I had to add something to this card that I finished on June 20, 2011 because it has always seemed to plain to me.  Now I am happy with it with these little birthday hats I added which I cut from the  Pooh and Friends Cartridge.
I also added a little bling in the center of the Birthday Gift that I found at JoAnn.
Recipe:
Paper - ATD Birthday Wishes
Die Cuts - Sure Cuts A Lot & Cricut
Cricut Cart - Pooh & Friends
Bling - JoAnn
Corner Rounder - 1/4 We R Memory keepers

Inside of card
I used my Craft Artist Platinum
Cut out with Zig Zag Blade on Paper cutter