Saturday, April 26, 2014

Graduation blog hop

 
Welcome to the Graduation Blog Hop, If you are already hopping along you should have came from Lori's awesome blog.  If you just stopped by my blog to visit and you want to start at the beginning of the hop please hop on over to Robin @ - http://create-a-latte.blogspot.com/


Today we have a small lineup packed with fun Graduation inspiration for you to enjoy.  Graduation is such a special milestone in ones life.  Rather it is from Kindergarten, Junior High, High School, College, a Trade School, Med School or any type of education to further yourself, it is a great achievement in a persons life and should not only be recognized but celebrated!!! 
Come see the fun projects I have to share with you today :)

I love making invites fun and this grad hat sure fits the bill for that.


showing the inside and top with the YOU folder embossing
 this is quite honestly my biggest seller for card cuts so far.  It is such a great cut and fold and then when you add embossing... wow and fun all at the same time.  These invites can become personalized not just by the color of the printed insert but also the color of the ribbon to match up school colors.  And then to change the embossed design to suit your needs, so fun
 
You can find these Star Embossed card shells in my Etsy store here
 
 
showing the underneath of the card and embossed with the stars folder


 I made this one for my sweet little Granddaughter last year for Kindergarten graduation along with a fry treat box filled with goodies :)
one with a handmade tassel


another invite with flowers & Swirls embossing folder and Black & Silver theme

 
I offer these as card cuts embossed in the folder you choose in my etsy store for those of you who don't have a cutting machine but would like to make these fun invites for your Grad.
 
I would also like to share a fun Graduation card and some other items I made for our Grandson who graduated 8th grade last year. this card looks like a cap and gown.


Some of the Decorations I created
 
these were some center pieces I created for the grad party and the center ones we filled with lots of candy as favor boxes for the guests (I made over 30 of these)
These were fun place cards for the food buffet line we served

it was a great party and everyone enjoyed my creations :)
 
there will also be some wonderful blog candy up for grabs so make sure you get in on that.
make sure you leave a comment on each stop along the way and be a follower of all 6 blogs to be eligible for this yummy blog candy. It is a Graduate page kit to help you along with your very own graduation projects :)
 
Here is the complete lineup in case you get lost along the way
2- Alicia O'Bryant - http://goldengoddessdesigns.blogspot.com/
3- Nana's Scrap Spot - http://www.nanasscrapspot.com/
4- Sharon Gerrard Cameron - http://piece-ofheart.blogspot.com/
5- Lori Johnson Apgar - http://scrappinmystressaway.blogspot.com/
6- Eva Scraps - http://evasscrapsncards.blogspot.com/ - YOU ARE HERE
 
I hope you enjoyed my projects and want to say thanks so much for hopping along with us today.  I am the last stop on the hop.  Just a reminder to follow all instructions to be eligible for the yummy blog candy.  Make sure to leave a wonderful comment on each and every stop.  I would love for you to follow along with my blog if you liked what you saw here. 
 
Thanks again and Happy Crafting :)


Tuesday, April 22, 2014

Grad hop this weekend


Hello my Crafty Friends, I just wanted to invite you to hop along a fun Graduation themed blog hop I will be in this weekend, I hope you can join us.  It will be a very small hop but filled with fun inspiration.  There will be some yummy Blog Candy up for grabs too so don't miss out on that.  The fun begins on Saturday April 26, @   http://create-a-latte.blogspot.com/

Thanks for stopping by and I hope you have a wonderful crafty week :)

Monday, April 21, 2014

Welcome & Themed Bow Boards

Hello my crafty friends and welcome to all of my new followers who hopped along with the hop over the weekend.  So happy to have made some new crafty friends.  Today I wanted to share a few Bow Boards I have been making lately... they are coming out so very cute I think.

Sofia the First themed Bow Board personalized :)
 
Sofia and the Castle background
Little Mermaid Themed Bow Board

Close-up of Flounder and Ariel and the shell background I created (This is the very first Bow board I made)
Close-Up of the Frozen characters

Frozen themed Bow Board


A fixer upper - I didn't create this bow board, I just added the Monster High Theme and added some flowers

I am having fun making these and I have a couple of more themes in mind right now as soon as I get my crafty space and adjoining dining room cleaned up so I have some work space again lol
 
I am supposed to be in another blog hop next weekend, I hope you will come hop through and see my projects... will be for Graduation this time.
 
Thanks so much for visiting my blog and I hope you leave a wonderful comment for me to read :)  Happy Crafting!!!

Saturday, April 19, 2014

Hippity Hoppity Easter's on it's way! Blog Hop


Our Blog Button

Welcome to our Hippity Hoppity Easter's on it's way! Blog Hop.

In this hop, you will see many fun Easter projects from many talented crafty ladies! We hope you enjoy our blog hop today!

If you have just hopped by to visit and want to join in on the fun..... hop on over to http://janetscreativeworld.blogspot.com/ where it all begins.

If you came from Thia, then you are in the right place!
 
For my project I created a few fun Easter things.  First I want to share my Easter Peep shaped card. 
 
This was a card from a kit I got a long time ago from Paper Wishes Personal Shopper.  I love their fun card kits but I am not a big fan of fussy cutting things by hand.  Recently I purchased the new Scan and Cut from Brother, oh my ... I am in love lol  Now I have been dragging all of those old kits out and letting this new machine do most of the cutting work for me.  I even cut the felt with my new SNC after ironing on the adhesive backing and used the deep cut blade, wow it cut like a charm!!!
such a cute quote for the inside, "Happy Easter to one of my favorite peeps!".  I don't know if you can tell but the inside bow is popped up on foam squares.
 
for my next project I would like to share with you my Easter Bunny Candy Bar wraps
These were a lot of fun to make and they really make such cute - sweet gifts!!!  I designed the wraps with some files from my buddy and old partner Cheryl from Creative Kuts2, but you can find many of her fun files at www.creativekuts.com I designed the bunny shape wrapper and first printed out the face and then cut around it with the wrapper cut, then added the ears and other layers and wrapped it around a Hershey bar.
 
 
On now for the very yummy part!!!
 
BLOG CANDY!!!
Look at this sweet offering you could win!
Our blog candy- Close To MY Heart Chocolate Affair Stamp Set. A set of candy stamps for the sweet Easter season!  17.95 value.
 Close To MY Heart Chocolate Affair Stamp Set. A set of candy stamps for the sweet Easter season! 17.95 value from CTMH - Janet Royer
AND
Blog Candy from Blue Moon Creation Crafting Station value $25.99
and wooo wooo
 Blue Moon Creation Station will also be giving away 3 digital bundles from her Etsy store
https://www.facebook.com/l.php?u=https%3A%2F%2Fwww.etsy.com%2Fshop%2FGetInkyStamps&h=BAQEFVTW3


Requirements for blog candy:  Leave a comment at each and every stop on today's Hop, if you are not already a follower of the talented blogs we would love for you to do so today.
Good Luck!!!  If you have problems becoming a follower, just refresh the page. (sometimes you have to do this several times when blogger is acting up)
a winner will be picked and posted on Janet's Blog on Monday

Here is the entire line up in case you get lost along the way!

Janet Royer- http://janetscreativeworld.blogspot.com/
Teresa-http://freshandrenewed.blogspot.com/
Denise S. - http://www.craftconfectionery.com/
Cathie W.-http://cathiescafe-scraphappy.blogspot.com/
Tricia - http://mysticalcardcreations.blogspot.com/
Beth~ http://thecraftyscrapyard.blogspot.com
Jessica: http://craftinandstampin.blogspot.com
Lori ~ http://scrappinmystressaway.blogspot.com/
Theresa - http://www.thescrapbookingqueen.com/
Amy E. - http://www.scrapthissavethat.com/
Debbie ~ http://craftydeb-ddscrafts.blogspot.com/
Amanda - http://cricktncrafts.blogspot.com
Sarah - www.sarahbiswabic.blogspot.com
Diana - www.daisylovecreations.blogspot.com
Thia- http://bluemooncreation.blogspot.com
Eva -  http://evasscrapsncards.blogspot.com/  - You are Here

Thank you for hopping along, we hope you have found lots of fun inspiration from our Easter Blog Hop.  I am the last stop on the hop and want to remind you to make sure you left a comment on each stop along the way to qualify for the blog Candy drawing.

Have a wonderful Easter Weekend :) 

Tuesday, April 8, 2014

Canning Jar Tags

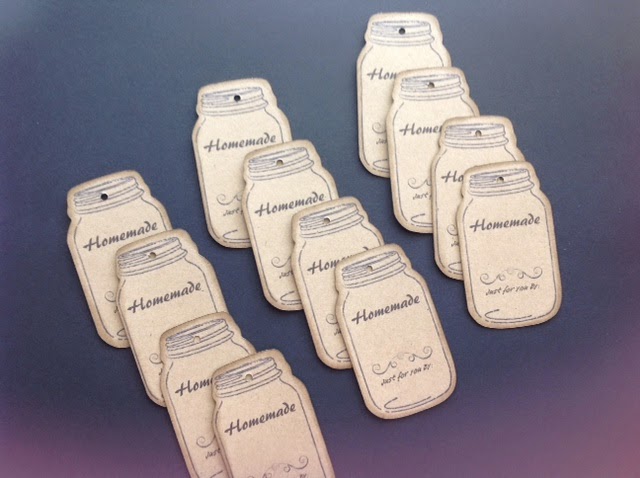
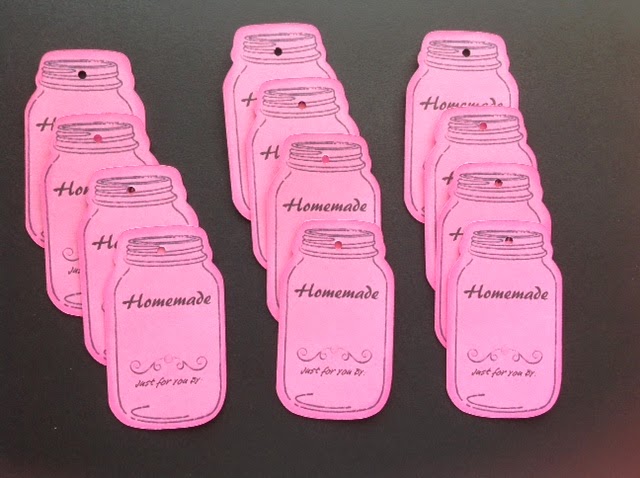
These turned out so cute, just how I visualized in my head.  I made a set of these as a thank you gift for a dear wonderful friend today so I just had to make some more sets in different colors to add to my Etsy store
Kraft

Lavender

Pink

Teal
 
 
Sets of 12 -
These adorable Jar tags are perfect for tying on to your homemade Canning Jars, just add the color of twine or ribbon to match your project through the hole at the top. There is room for you to write in the contents under handmade and then your name at the bottom. This set would also be a great gift idea for the Homemade canning person in your life. Tags measure 3" X 1 3/4"

Can add personal name for extra charge and always happy to change colors or design
All items come from a smoke free / Pet free home
 
Find these and many more items in my Etsy Store: 
 
Thanks so much for stopping by today... I hope you will leave me a comment... I love reading comments about my work :)

Thursday, April 3, 2014

Scan N Cut a personal Shopper kit card


Oh my Gosh, I am having so much fun with my new Scan and Cut.  Today I would like to share a Happy Belated Birthday card that was from a kit I got back in Jan of 2013.

  I was buying up the wonderful personal shopper kits on paper wishes.  They were so cute and I loved making them but I was so spoiled to my Cricut that to fussy cut each kit piece became tiresome so in a cupboard they all went to be forgotten about.  Until this week that is!!!
here is the link for their personal shopper card kits  http://www.paperwishes.com/personal-shopper/cm/monthly-cardmaking-kits.html
This is the Sheet from the kit for this card on my Sticky Mat, ready to Scan N Cut

Now I can have the machine cut all of the pieces for me!  WHAT?  Yes you heard me correctly!!!  scan the kit sheet in and let the Scan N Cut do most of the cutting work for you. 

here is how well it cut out the pieces
It cut around all of the pieces except for the full size elephant, I think the funky pattern paper was interfering with its recognition software.  But that is ok because I needed to cut him against a card blank anyway to make the shaped card.  I also cut the two inside pieces by hand with my exacto knife, the red circle in the trunk and the grey center in the flag for the straw.
Here is the finished card again, I love how it turned out!

Inside of card
This card is for sale in my Etsy store, you can find it here:  https://www.etsy.com/listing/184891678/belated-birthday-elephant-shape-card

Thanks so much for stopping by my blog today, I hope you will leave me a comment... I love reading them!  Have a great day!

Wednesday, April 2, 2014

My New Scan N Cut by Brother - LOVE

I am so flippin' excited this morning as I play and learn with my New Scan N Cut,  So I did a fun Easter hop this morning where I got to download lots of free digi art for digital scrapping, which I love to do also!!! ( here is the link if you like digi hops:   http://daisies-and-dimples.blogspot.com/

So looking at the beautiful digi art... it got me to thinking how I could print it out and Scan N cut it and use on my cards or layouts or any project like I do with my Cricut cuts or my svg files.  so here was the first page I did:

ok so this page cut beautifully except for the one flower... if the outside edge is not dark enough it will zone in on the dark spots, so not every stamped image or printed image will work.  If you look very closely at the flower that did not cut it actually cut out one inside petal... I added some black cardstock behind it so you could see it.  But overall it did cut the majority and I am so happy.  so on all of these cuts I had the machine set to cut a .04 border... Perfect!

 So using the same print out, I sent just the flower through again and cut it with no border this time.  It totally left a piece out that it did not recognize, but the adorable flower is still usable.
 Here, I decided to print another page of digi art plus throwing in that same flower again that it did not recognize well... only this time before printing I used my scrapbook program to ad a dark border around each image before printing.  I ran it through the scanner and it picked up all of the outlines beautifully again accept for the same flower.  I choose to cut the images with no border and yes again PERFECT!

This is the weird thing it did with that flower, but it can be glued in place together and you won't even notice it probably :)

I am so in love with this machine, so so SO Happy I decided to buy it!
For those of you who don't follow me on FB, let me post my 1st cuts with this wonderful machine I just received on Monday eve. 
Plus you can come like my page here  https://www.facebook.com/EvasScrapsNCards

 My first two cuts!!!   the Easter one is from the internal library on the machine
Then I went to the online software for this machine and cut two more layers to back it.  The middle yellow layer I cut with a .08 border then Green is cut at .16 border.
here is the link for the free online software:
 
This is Olaf from the movie Frozen, I found this as a freebie coloring book page, look how beautiful and precise it cut.  I believe I had it set to a .08 border for this one too.
 
on this sheet I decided to print out a page full of digi sentiments from http://www.birdscards.com/  Most of them it didn't recognize the outline as there are to many open paths, so on this one I chose to cut one of the internal shapes from the machine to cut it out, I then went back in with pink cardstock and cut the same shape 1/4" bigger for the background layer.
 
This one it recognized the outside perfectly so I cut this one at .08 border.  that is it for now, I will be eagerly learning as I go with this beautiful new machine and sharing my progress with you my crafty friends.  I will leave you with a couple of photos I took as I was unpacking it :)


Thanks for stopping by, hope to see you again soon :)