Sunday, September 23, 2018

Fall Happy Birthday Easel Card

Today I want to share a cute fall themed Birthday card I made for my hubby's Birthday today.  I got this cute center style easel card base from Cheryl over@ www.creativekuts.com
The striped pattern paper is from My Minds Eye and the basket weave Looking pattern paper... I'm not sure where that came from.  The big label mat is part of the card base file.  The leaves are from Cricut - Creative bug that I used my Cricut embossing stylus to emboss the veins… Love!  I went over them again on a foam mat after the Cricut machine to really make the veins stand out. I used scraps from my scrap bin for the different card stocks used on the leaves, the top one is a brown shimmer card stock.
That adorable squirrel and sentiment are from Nuts about you stamp set.  I modified by cutting off the acorn he was holding and put a pistachio nut in his hands because that is my husbands line of work.... Pistachios.  I used my Spectrum Noir markers to color the squirrel - EB1 EB2 GB8,  nose IG4, Colorista - pistachio for the nut.  The sentiment I heat embossed with clear acrylic over the brown pigment ink I stamped.  I used stitched label dies for the sentiment stack and that is popped up on foam tape to hold the easel in place.  My friend Cheryl over@ creativekuts.com was kind enough to make me the pistachio SVG so I could make this card fit for my hubby, thank you so much Cheryl, YOU ROCK!  I tied a simple bow from a tan sheer ribbon to place on the leaf bunch and then decided to cut two more pistachio nuts in a larger size to place on the bunch as well.
For the inside I used a square stitched die cutting from Kraft card stock.  The sentiment is from a card maker set  that I stamped with the same brown pigment ink.

I will be entering into these fun challenges:
Fantabulous Cricut Challenge #335-Leaves
YNS - Fun Friday – Challenge #98
CARDZ TV ANYTHING GOES CHALLENGE #66
Jo's Scrap Shack - FFC #252 Always Anything Goes
Craftyhazelnut's Patterned Paper September 2018 challenge
DL.ART SEPTEMBER 2018 Linky Challenge
BBTB2 - Anything Goes with a Cricut Cut
 
Thanks so much for stopping by to see what I'm up to in my craft room today.  Have a wonderful and crafty week.

Tuesday, September 18, 2018

Love Story Anniversary layout

I really enjoyed making this layout for my husband to commemorate our love for our 12th Anniversary.  I was putting into a shadowbox frame so I was able to layer things up nice and high.  I used several elements from paper wishes from the On Butterfly Wings collection.
I started off with the main background, a beautiful 12 x 12 scrapbooking paper from the On Butterfly Wings paper pack.  I really love this paper and it helped add a lot of details before I even got started.  I cut two large heart shapes with my Cricut - Hey Diddle Diddle Cartridge out of coordinating papers from the same pack.  
I took my craft knife and cut along the edges of the butterfly wings on either corner so that I could slip the hearts underneath just a little bit,  I love how this technique added even more dimension to my layout.  I used a spellbinders Nestabilities Fleur de Elegance Oval Die to mat our photo onto.  Using the On Butterfly Wings Paper Tole set, I went with the beautiful type writer label that is layered up with four layers of foam tape in the end.  Before adding any layers I used my Cricut Explore machine to write my own sentiment on the label.  "The best LOVE STORY is the one you write TOGETHER and I love ours the MOST"  I used Burtons nightmare font just because I really like the way that it looked, Cricut fine tip moccasin pen used to write.  This was a little bit tricky but now that I know this technique it will come in handy.  I measured the label and where exactly I wanted the writing to be.  In design space I used a rectangle shape to represent the label and placed my sentiment to write and attached together so the sentiment would write with a pen onto the designated rectangle to be cut.  I removed the cutting blade from my machine just so that I would not make an error.  I practiced on regular white card stock realizing that I needed the pen to write out the rectangle for the first pass so I would be able to line up my label over that rectangle.  Once I had the rectangle and sentiment written onto the card stock still on the mat I used repositionable tape and placed my typewriter label exactly in place over that rectangle and had my Cricut write the sentiment again.  I am very happy how this turned out and will be using this technique in the future when needed.  I don't think you can see the layering from this picture but there is the base label Layer that has the writing, then a typewriter with rose layer and then a single type writer and then finally the butterfly is on top of that with foam tape between each layer giving it such dimension. The little butterfly on top I have curled the wings and raise them up.  The love banner at the bottom and the tag that I tied the bow to are both from the On Butterfly Wings free download printable artwork at paper wishes.  For the love banner I used a stitched banner die to cut from the brown pattern paper to back that with for a shadow layer.  For the cute little tag I decided to add a bow but I didn't have the right color ribbon so I took some white crinkle ribbon and sprayed it with Perfect Pearls Mists - Interference Red and Glimmer Mist Vanilla Breeze.  I am so happy with the final color and it matches perfectly with my layout.  I added a flat back pearl to the center of the bow.  For the roses at the bottom of our picture I started with a dazzle from the On Butterfly Wings scrapbooking dazzle set.  I placed the dazzle on some coordinating pink pattern paper from the paper pack, I first tried coloring in the leaves with a green marker but I didn't like the contrast of colors so instead I found some light green rice paper in my stash and I lifted the leaf and bud section that I wanted green and placed that light green rice paper underneath and then continued to cut around the edges of the entire dazzle, this flower is also popped up on foam tape.  I decided to use some of my spellbinder dies from Moroccan Accents to make a dimensional embellishment using the same papers, a bottlecap, my 1 inch circle punch to fill the bottle cap with paper and then placed 2 heart dazzles in the bottle cap before adding a clear acrylic cap topper.  Pinching the tips of the pink diecut to form a dimensional space around the bottle cap.  I  then took two different sizes of black jewel dazzles and placed all around the elements on my page to bring it all together, making sure that I placed them on the body of every butterfly including the flat ones on my Beautiful background paper.   I really like how this also popped and added more dimension and really drew your eye to each and every element.

In the Frame
I will be entering into these fun challenges:
Simon Says Wednesday: Pop It Up
Crafty Creations Challenge #374 - Anything Goes
CARDZ TV ANYTHING GOES CHALLENGE #64
FFC #251 Always Anything Goes
Craftyhazelnut's Patterned Paper September 2018 challenge
DL.ART SEPTEMBER 2018 Linky Challenge
BBTB2 - Anything Goes with a Cricut Cut
Thanks so much for stopping by to see what I'm up to and my craft room this week.
Crafty hugs, Eva


Love You Blocks pop-up card

Today I'm sharing my Anniversary card that I made for my hubby, we have been married for 12 years now.  Every year I try to make him a special card usually on the more masculine side but this year I went with pinks and reds and hearts and love!   My friend Cheryl over @ www.creativekuts.com made this sweet card base for me because she's just awesome like that!
The gorgeous foil accented pattern papers are from Recollections Valentine's Day paper pad.  I used a different Valentine's Day paper pack for the pink cardstock that I backed the pattern mats with.  In keeping with the gorgeous foil accents in the pattern papers I decided to try cutting my red dollar store foil in the Cricut.  For the love you letters I used a font from my computer called Monterey BT that I cut in a shadow rounded style using SCAL.  I also got the heart for the letter blocks from SCAL – basic shapes.
OK for that gorgeous fancy heart I found that on Cricut.  It is from monogram motifs and it was a free file.  I'm not sure if it is free all the time, I do not have the monthly access so I check what is Free and what I've purchased most of the time first and I just searched Heart.  And to my surprise the search came up with that fabulous heart ... wow can you believe how intricate that is?  Gorgeous!  The heart is three layers, the bottom layer I cut from a deep red card stock the second layer I cut from the same pink card stock backing the liners & used my Cricut Explore to write the sentiment with my Cricut .03 black marker using the Fontastic Font DJ Smooth.  Then for the final top layer, that I cut the red dollar store foil paper with my Cricut explore... WOW!  I was so impressed how well and intricate it cut.  It took me three tries before I got the Settings right but that's OK at least all that was wasted was a partial piece of dollar store foil.  I ended up using the setting paper and cutting it two times.  I used that same red foil paper to cut a stitched label using my stitched labels die Stack.  I then decided to heat emboss Happy Anniversary using fine detail white embossing powder.  I honestly wasn't sure if it would work but it did and I was so pleased as I had never heat embossed on foil paper before.  The Happy Anniversary stamp is from Hot Off The Press - Stamp and Punch stamp set.
I added a pink loopy ribbon from my stash down the right side of the card and tied a bow out of the same ribbon and one out of a sheer ribbon & stacked them together with glue dots and placed a red foil flat back pearl in the center.

I will be entering into these fun challenges:
Simon Says Wednesday: Pop It Up
Crafty Creations Challenge #374 - Anything Goes
CARDZ TV ANYTHING GOES CHALLENGE #64
FFC #251 Always Anything Goes
Craftyhazelnut's Patterned Paper September 2018 challenge
DL.ART SEPTEMBER 2018 Linky Challenge
BBTB2 - Anything Goes with a Cricut Cut

I hope you enjoyed my card today and come back again soon to see what I'm up to in my craft room.
 

Tuesday, September 11, 2018

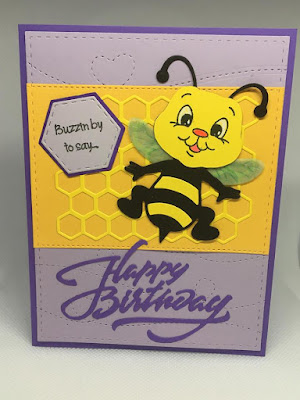
Happy Birthday Bee card

Hello Crafters, I have a Birthday Bee card to share with you today.  I used lots of dies including one for that cute Bee. 
I did alter it a bit..... I cut it twice in black and hand trimmed the head off of one of them because I didn't want to use the face of the die.  So I ran the head portion thru my ScanNCut after trimming off the antennas too.  After saving onto my machine I then cut it out in yellow and used a Peachy Keen -  Cute and Cuddly face stamp.  I colored in the eyes with my white jellyroll pen.  I colored in the nose with a pink gel pen and the mouth with a light red gel pen.  Then I adhered the yellow head directly on top of the black head.  I also cut the yellow portions to place in the open areas of the body.  I used vellum for the wings and colored those in a light blue with my Spectrum Noir marker AB2.  I used Simon says stamp bundle of stitched shapes for the light purple background mat.  I then took my stitched buzz trail dies from Lawn Fawn and ran stitched trails all over that mat.  I used another stitched rectangle die to cut the yellow mat.  Using a honeycomb die in a lighter yellow to place on top of that stitched yellow rectangle, making a cute backdrop for the Bee.  I used crafters companion hexagon dies to layer up in the 2 purples for the sentiment.  I used my Cricut to write "Buzzin by to say…"  with a black .03 Cricut pen in a fontastic fonts - DJ Smooth.  Finally I cut a Happy Birthday die out of the same dark purple as the card base.  Using up plenty of scraps for this one, which I love to do!
For the inside I used my Cricut to write the sentiment with the same font and pen "Have a Bee-utiful day filled with love & joy!"  I cut this mat out with my Simon says stamp bundle of stitched shapes - stitched rectangle die.  I used 2 Bee images to stamp from the crafters companion hexagon dies coordinating stamp set.

I will be entering into these fun challenges: 
Thank you for stopping by to see what I'm up to in my craft room today.   Have a wonderful and crafty day!

Friday, September 7, 2018

Boo! Ghost Dress-up Card

 Hi crafters, I made another Fall card this morning this time for Halloween.  Nothing spooky about this one!  This layout is based on the sketch over at Tuesday morning sketch challenge.
I used the Block stamping technique again this time for the purple background behind the ghost.  I found my watercolor paper and like the texture it added.  This time I used my brand new Spectrum Noir Aqua markers - purple bloom and petunia for the technique.  I also used the purple bloom marker to stamp BOO!  I used Spectrum Noir markers OR1 and Colorista Satsuma to color the pumpkin, RB2 to color the stem and Olive green for the little curly tendrils.  I also cut a small black circle to put behind the pumpkin.  For the ghost I colored black behind his eyes before putting him together and I used IG1 & the blender pen to do some shading on him.  The sign is written on with the Cricut using fontastic fonts – DJ fancy.  Cricut pens used are fine tip black for trick–treat and fine tip magenta for the word or.  I used fine tip Gemstone blue to hand dot the nail heads on the sign.
For the inside I used more of the same cardstocks and paper from the front using some of my Stitched Stax Rectangle Dies to cut them out.  Largest is from Simon says Stamp Bundle of Stitched Shapes.

A-2 card base -  Black Recollection's  card stock 
Pattern paper - DCWV
Ghost - Cricut paper doll dress up
Pumpkin -  Cricut paper doll dress up   (popped up on foam tape)
Sign - Cricut old west
Boo! Stamp - Frightfully Cute - Craftin Desert Diva's (purple bloom Aqua Marker)
Label -  wavy stitched frames - Ali
Drippy Goo Border - Martha Stewart punch 
Purple rhinestone gems - my Stash
Happy Halloween Stamp -Happy Celebrations -Craftin Desert Diva's (Memento Tuxedo Black ink)
Pumpkin Stamp - Pumpkin Day Witch Stamp (Wild Honey Distress ink)
Inking edges of elements - Walnut Stain Distress ink
 
I will be entering into these fun challenges: 
Fantabulous Cricut Challenge #334-Autumn
Thanks for stopping by my blog to see what kind of crafty fall project I was up to today.
I hope you all have a fabulous and crafty day.
 

Thursday, September 6, 2018

Fall Center Scene Stepper Card

Oh my goodness you guys I saw this incredible new to me card style on Pinterest and just had to try it.  I made the card base myself looking at other cards.  Next time I will widen the center area and make it more narrow on the left and right side to give a bigger area for the scene.  I kept this one pretty simple but I look forward to making many more with lots of layering.  I have lots of ideas swirling around now for this one.  LOL
I used a regular 65 pound Recollection's white cardstock for the base, in the future I will be sure to use my Neenah 110 pound.  I used brown Recollection's cardstock for the shadow layers and some very adorable Cricut pattern papers to decorate my mats and the inside also. They are both from Cricut Doodlecharms 6 x 12 mat stack.
The adorable little acorn with leaf on center stage is from Cricut - B is for boy cartridge.  I stamped his little face from peachy Keen stamps - Everyday Characters.  I chalked his cheeks with pink glitter chalk.  I cut a small slit on the platform below him and used a thin strip of acetate to slide into it to adhere him to & stand him up on, I just cut a piece from an old clam shell package.  I used a Die-Versions Whispers - Old Oak Leaves die to cut out the decorative leaves with acorns on either side.  I only wanted to use a small portion so I cut away what I wanted from each one.  I used a stitched flag banner die for my Happy Thanksgiving sentiment cut from kraft cardstock.  The stamp is from Lawn Fawn - Celebration Scripty Sayings.  I stamped first in brown pigment ink then again with clear VersaMark ink  and heat embossed with clear acrylic embossing powder.  The other green leaf is from the same Cricut cartridge – B is for boy, only this time I cut the solid leaf backing and used the negative space for the vein that was left over from the first leaf.  I added a few gold glitter gum drops down by the sentiment just to add a little bling.  Oops I almost forgot I also cut a Wavy Flag Fishtail Banner from Kraft cardstock to layer at the top.  I thought about adding the word FALL to the banner but I kind of just liked it like this so I left it alone.

I am entering into these fun challenges:
Fantabulous Cricut - Challenge #334-Autumn 
Thank you so much for stopping by I hope you enjoyed my project.  I really enjoyed creating this new to me card style and look forward to making more in the future.

Wednesday, September 5, 2018

Ink Block Stamping Pumpkin card

Hello Crafters,  I couldn't find my watercolor paper so my background warped a little bit but I had so much fun creating it with the ink block smooshing technique I don't even care,  I like it anyway.  I also followed the latest sketch over at Tuesday morning sketches for this fun layout design.
I used a long skinny acrylic block and smooshed distress ink onto it, using 3 colors each time.  I used Wild Honey, Weathered Wood & Fossilized Amber.  I stamped 3 times alternating the block each time.  I also put something heavy on the block each time I stamped and let it set weighted down for about 3 minutes each time to achieve the dark rich colors.  I love how the blue mixed with the other two colors and gave me greens also. I all blended so perfectly with my pattern paper that I had already chose.  
That pattern paper is from DCWV Stack called Four Seasons.  The frame is from Cricut Lacy Labels & the scalloped border is Cricut Straight From the Nest.  The shadow for the frame and the scalloped border are both cut with brown recollection's card stock.  I lined the border up with the line in the stamping so that you could still see all three blocks of color and the breaks in between.  I used foam tape to pop up the Duo of pumpkins die cut that is topped with brown flocking.  I added a bow over to the left that I die cut with my bowknot flower die, choosing only to use the bow and not layer it into a flower.  I cut it out of Kraft card stock and really like the way it looks like I tied a bow with a string.  I wanted to add some bling to the center so I got out my translucent dew drops.  The closest color I had was an Amber-gold color and it didn't stand out enough so I grabbed my B02 Spectrum Noir marker and colored it a deep orange before attaching to the bow with glossy accents.  I used my NEW Cardz TV stamp set Thankful For You to stamp Harvest Blessings with a brown pigment ink.  I Love love love my new awesome Fall stamp set!  It will get used a lot in the upcoming month or so.
For the inside I kept it really simple and did a Single Block Stamping with the same colors and added a brown flocked Happy Thanksgiving label to match the front label design.  I added a small pumpkin to the bottom and it is ready to go in my Fall Cards to go out to loved ones this year.


I will be entering into these fun challenges:
Fantabulous Cricut - Challenge #334-Autumn Lacy Labels & Straight from the Nest
Simon Says Monday - Stamp it On  Block stamping to create Background & Sentiment stamp
Tuesday Morning Sketches #469
Mod Squad Stamp Your Block Cardmaking Challenge
Simon Says Wednesday: Stamp It For STAMPtember Block stamping to create Background & Sentiment stamp
CARDZ TV ANYTHING GOES CHALLENGE #63
Jo's Scrap Shack FFC #249 Always Anything Goes
DL.ART SEPTEMBER 2018 Linky Challenge

Thanks so much for stopping by, I hope you enjoyed my project.