Sunday, April 7, 2019

A Little Birdie Card

I enjoyed making this background with a tiny heart stencil and my new Gel Press.
I used the stitched rectangle from Simon Says Stamp dies - Bundle of Stitched Shapes and backed with teal card stock for the background panel I created with my stencil - Tiny Spaced Hearts - SSS.
I used a stitched label die for the sentiment and backed with teal card stock.
I stamped & heat embossed the sentiment which is from my newest Cardz TV stamp set - For the Birds. 
The Bird is from Birds & Bugs Stamp set, I stamped on a light blue card stock then cut it out and went over the birdie with spectrum noir markers... I used Cyan, BT1, BT2 & True Black for eye and feet.
I also stamped and heat embossed music notes directly onto background for the birdie to sing.
On the inside I used the stitched rectangle from Simon Says Stamp dies - Bundle of Stitched Shapes again this time inking the edges in the same ink I used for stamping to simulate the teal shadow layer from the front without bulking the inside up more.
The littlest Birds sentiment is from Spring Sentiments stamp set.
Happy Birthday Stamp is from Craftin Desert Divas Happy Celebrations Stamp Set.
I also stamped another smaller bird, once directly onto the inside sentiment panel and another that I colored and cut out to paste directly over it.... that is from the same Birds & Bugs Stamp set.

I will be entering into these fun challenges:
Tuesday Morning Sketches - #497
Mod Squad Challenge - Stencil Your Background
Jo's Scrap Shack FFC Challenge #276
DL.ART April 2019 Linky Challenge

Thanks so much for stopping by, Enjoy the rest of your weekend.
Crafty Hugs, Eva

Saturday, April 6, 2019

Floral Purse shaped card

I love love love this adorable card style coming soon to Creative Kuts

I used this beautiful pattern paper from couture creations 6x6 paper pad called Vintage Rose Garden
This card was so easy to put together, the handle was a little bit fiddly to insert... but so worth it!
I love how this card stands and presents.  So for the metal looking links in the handle strap I cut 3 for each side out of  black cardstock and adhered together then I cut some out of  silver paper to give the silver metal look and adhered.  I cut the handle/strap twice also and adhered together.  I feel like these extra steps really helped to keep the handle standing tall, which I love.
I found a pink button in my stash and tied some green and white twine into a bow through it.
I wasn't quite satisfied so I found a stitched circle die just a bit bigger than the button and cut a piece of black card stack with the silver paper adhered to it.... perfect!  I used glue dots to adhere them together and to adhere to the front of the purse.  This added just the right touch I was looking for to bring some more silver into the project and made my button really pop a fancy new look.  I stamped and die-cut a flower and leaves from some of the same pattern papers.  I heat embossed the flower in pink then I used my spectrum Noir markers to dress them up a bit, I also curled and pinched the flower edges to add some dimension.  I used foam tape to pop the flower with leaves up and placed it in a spot to also act as a closure to keep the card flap in place when closed and standing.  What a cute card to display on the desk or mantle of the recipient.
On the inside I used more of the beautiful paper from the same paper stack.
I stamped Happy Mother's Day in Momento Tuxedo black ink, stamp is from Happy Celebrations - Craftin Desert Divas and then heat embossed with clear acrylic embossing powder.  I almost added another die cut dimensional flower to the inside sentiment panel, but this time I wanted it to fold flat to fit in an envelope so I stamped some of the same flowers of different sizes directly onto the inside panels.  I left the bottom panel very open for writing and signing.  To finish it off I added these lovely green glitter gumdrops from YNS to the center of each flower I love how this little addition really added so much to this project!

I will be entering into these fun challenges:
YNS -  Challenge #111  Florals - used glitter gumdrops
Cardz TV Anything Goes Challenge #86
Jo's Scrap Shack FFC Challenge #276
Crafty Hazelnut's April 2019 Patterned Paper Challenge
DL.ART April 2019 Linky Challenge

I am so happy how this turned out for my Sister/Mom, I may need to make another of these for my daughter.  Thanks for stopping by, have a wonderful day and weekend.
Crafty hugs Eva Scraps

Thursday, April 4, 2019

Recessed split panel card

I had fun with this card.... I want to try it again soon but next time with a pattern piece of acetate for the opening.
I picked out the pattern paper (Alice 6X6 Stack) first and then just found some coordinating pastel card stock colors.  I used a die set to cut and dry-emboss the leaves.  I stamped and heat embossed the flower and the Happy Birthday to you in purple...  they are both from HOTP Flower frenzy stamp set.
On the inside I used a stitched rectangle die to add a sentiment onto.  That stamp is from HOTP - Lacy Things.  The flower stamp is another from HOTP flower frenzy stamp set.

I am entering into these fun challenges:
YNSChallenge #110 Pastels
CARDZ TV Anything Goes Challenge #86

Thanks for stopping by to check out my project today, have a wonderful day.
Crafty hugs, Eva Scraps


Tuesday, April 2, 2019

Masculine Compass Birthday Card

I needed a masculine birthday card that holds a gift card inside.  I decided to go with the new sketch over at Tuesday Morning Sketches.  Keeping it very simple I picked some masculine papers from HOTP Boys to Men Paper Pad, pairing both of those pattern papers with some tan and blue card stock.
I used a stitched rectangle die to cut the plaid paper and backed it with a blue shadow layer.
I cut an oval for the sentiment stamp from tan and backed in blue, cut with a stitched scallop oval die.
I cut a circle from the second pattern paper and backed it with that hand stitched circle I cut with a die.  Both of the compass and happy birthday sentiments were stamped in black and then heat embossed with clear acrylic embossing powder.  Both of these stamps are from HOTP For the Guys
On the inside I cut some more of the pattern papers using a stitched Triangle die set  I also made a triangle pocket for those patterned papers to cover.  I used another rectangle die set, this time with a pierced edge rectangle die for the sentiment block. Both of these stamps are from HOTP Celebration Cardmaker stamp set.  The first stamped in black and the second stamped in blue Ink.
I placed a white scrap paper inside the pocket where the gift card will go when I get it.

I am entering into these fun challenges:
Tuesday Morning Sketches #497
Simon Says Wednesday - Anything Goes
Crafty Creations - Challenge #387 - Anything Goes
Cardz TV Anything Goes Challenge #86
FFC #275 AAG With Sparkle & Sprinkle!!!
Thanks so much for stopping by to view my latest project, hope to see you again.
Crafty hugs, Eva Scraps

Friday, March 22, 2019

Owl S Card

Oh my goodness what tiny little pieces this owl die has, but I really love the super cute outcome.
This is a very simple card technique by taking a regular A2 sized card and then scoring the front part of the card down the center and folding it back to create the S fold.  
 I simply used a Die-Namics scalloped stitched circle frame die and adhered only half of the circle on the left-hand side to the card and I did the same with the sentiment stitched oval.  I placed a pattern paper circle in the center of the scalloped circle and then added the cute tiny owl on a branch die cut.
I cut the leaves with a different leaf vine die that also embossed textures.   I snipped a few of the leaf sections and placed them behind the limb.   The background is stamped with stampin up wood grain stamp  and die cut with the stitched rectangle from Simon says stamp bundle of stitched shapes.  I cut and stamped two panels, I used a full  stitched rectangle inside. I simply cut the other in half for the front.
On the inside I duplicated the same circle from the front but this time stamping a sentiment.  I lined it up directly behind the front scalloped circle so you cannot see it when the card is closed.  I cut another half panel to go inside the front fold in the pretty green color.  All of the stamping is stamped in brown and heat embossed.  The cute owl in a birdhouse stamp and the especially for yoo hoo sentiment stamp are from Owl & Butterflies Stamp set.  Happy birthday to you stamp is from HOTP - Flower Frenzy Stamp Set.

I am entering into these fun challenges:
Simon Says Stamp Monday Challenge - Miniature/Tiny Things  
Mod Squad Challenge - Metal Dies/No Digital
Simon Says Stamp Wednesday Challenge - Cute
Jo's Scrap Shack - FFC #274
DL.ART MARCH 2019 Linky Challenge
DiesRUs Challenge #117 - One for the Ladies

Wishing you all a wonderful weekend, thanks for stopping by.
Crafty hugs, Eva Scraps

Thursday, March 21, 2019

Floral Sketch card

As soon as I saw the sketch over at Tuesday morning sketches the other day I knew that this was the card I wanted to make.  The design team had some great inspirational pieces over there.  Once I got the background and base layers done I realized this would be really pretty with seashells and swirls also but I already had my heart set on this floral stamp.  I am very pleased how it turned out.
The pattern papers for the background is from ms. sparkle & co. - Wood Grain... I just love that whitewashed wood look.
The floral stamp and sentiment are from HOTP -  Simply Susan stamp set
I stamped the sentiment in purple and I heat Embossed the floral stamp in black.
I colored with spectrum noir markers - Purple Bloom, petunia, fresh citrus, AB3, LV1
I decided to keep this one simple but I wanted to give it some extra touches so I dug out some of my sparkly gumdrops from YNS (Your Next Stamp)
Black for the flower centers and I decided to add two blue to the leaf swirl but I darkened the color just a little bit with my spectrum noir marker AB3 to match it a little closer.

I am entering into these fun challenges:
Tuesday Morning Sketches #495
YNS - Fun Friday – Challenge 109 - Patterned Paper
Craftyhazelnut's Patterned Paper March 2019 challenge
DL.ART MARCH 2019 Linky Challenge
Thanks so much for stopping by I hope you have a wonderful day!
Crafty Hugs, Eva Scraps

Sunday, March 17, 2019

Make a Wish Spinner Card

I had so much fun with this garden window making it into a spinner card.  I did cut away some of the elements that were crowding too much.
Curved Green vines cut and embossed - SB Shapeabilities
Flowers and leaves from birds and bugs stamp set colored with spectrum Noir Markers
Flower centers wink of Stella sparkle
Butterflies - HOTP  Lacy Things Stamp set, heat embossed in black colored with spectrum Noir Markers LV1 & Hydrangea Colorista
Make a Wish from Fairy Love stamp set, heat embossed in fine detail white

Inside fairies and sentiment are also from fairy Love stamp set and heat embossed in black and colored with same marker colors
The center butterfly is cut twice and sandwiched onto string to make the fun spinner.  Covered entire wings on both sides with Wink of Stella.

I am entering into these fun Challenges:
Simons Says Monday Challenge - Feminine/Girly
Mod Squad Challenge - Layered Looks
Cardz TV Anything Goes Challenge #85
Jo's Scrap Shack FFC #273 Always Anything Goes
DL.ART MARCH 2019 Linky Challenge
Thanks for stopping by, have a wonderful week.

Friday, March 15, 2019

Bunny Hole Easter Card

What a fun Easter/Spring gate fold card.  It makes me happy just to sit here and look at it.  ðŸ˜Š
This awesome card design is from CreativeKuts.com.  I used a pre-embossed Robins blue spots card stock for the base.  For the gate/fence looking background panels I used my stampin up wood grain background stamp in brown ink onto a Kraft card stock on all 3 panels.... two on the front and the large pretty cut one on the inside.  I layered up the green vines with little pink flowers and topped each flower with a tiny dot of yellow dimensional paint in the centers.  The little layered up bunny butt is just so cute and hard to see it in the photo but the tail has white flocking on it.
On the inside there is another layered bunny, this time a front view and holding a cute decorated Easter egg.  Pattern paper for the egg is from photo play - party girl.  I used a stitched label stax dies to add a fun spring sentiment stamped in pink.

I am entering into these fun Challenges:
Mod Squad Challenge - Layered Looks
Cut it up challenge #169 - Hello Spring
Simon says Monday - Feminine/Girly
Cardz TV Anything Goes Challenge #85
Jo's Scrap Shack FFC #273 Always Anything Goes
Die Cut Divas March Challenge
DL.ART MARCH 2019 Linky Challenge

Thanks so much for stopping by, have a wonderful crafty weekend.
- Eva Scraps

Slytherin HP Banner

Needed to make a Birthday Banner with a Harry Potter Slytherin Theme, this is what I came up with.

Using Cricut Design Space
both styles of Banner Panels are from Cricut - Birthday Bash Cartridge
I used Dark Green Card stock for back panels, I used a cream color card stock for the front layers... as close to a parchment paper color I could find.  I cut the letters out of the front panels to have the Green show through.
Text Font - Parry Hotter
Slytherin Shields - Print and cut feature that I added a black shadow layer behind and popped these 4 up with foam tape.
Used a cream color sheer Ribbon to thread through panels to create the 3 layered Banner for Lizzi.

I am entering into these fun Challenges:
Cardz TV Anything Goes Challenge #85
Crafty Creations Challenge #386 - Anything Goes
Jo's Scrap Shack FFC #273 Always Anything Goes
Die Cut Divas March Challenge
DL.ART MARCH 2019 Linky Challenge

Thanks for visiting my blog, Happy to have you back again soon.
Crafty Hugs ~ Eva Scraps


Thursday, March 14, 2019

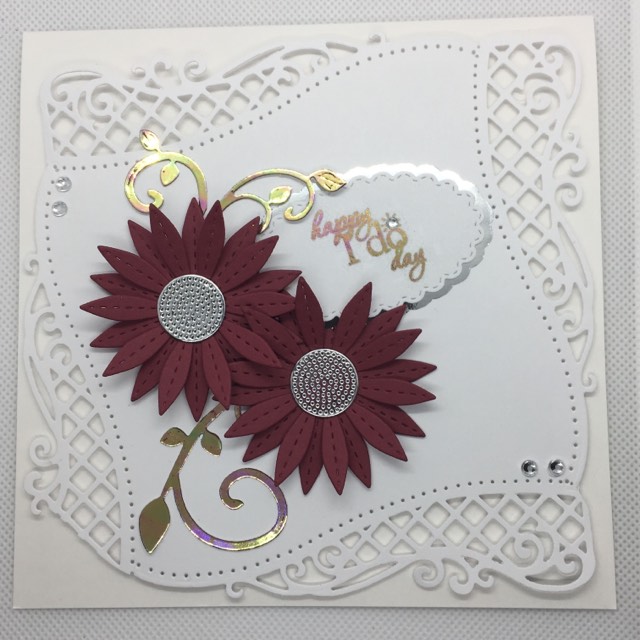
Fun with foiling wedding card

I am in love with foiling right now!  Wanted to share this 6" X 6" Wedding card with matching envelope I just finished.
Main white background panel - Crafters Companion Edge'ables Lattice Flourish Die
Simon says stamp stitched daisies – burgundy card stock w/ silver foil paper centers
Stitched scallop oval die for the sentiment,  Silver foil paper shadow layer (SNC)
Cheery Lynn mini fanciful flourish die-cut from toner sheet & foiled with silver rainbow foil.
I cut the flourish in half and used both pieces.
Sentiment with the same foiling.  I added a small clear rhinestone for the diamond ring on sentiment and added two more larger rhinestones on 2 corners of the mat.
The main mat/panel is popped up with foam tape and so is the top flower.
On the inside I used the same foiling and technique on everything.  I wish you could read it better.  It says:  "May your life together be full of Love and your love be full of Life"
I used my envelope (123) punchboard to make a coordinating envelope out of some pattern paper that I thought matched with the burgundy nicely. It is from The Paper Studio stack (I love this stack very much!!!) called The Classics.
For the front of the envelope I used some of my stitched shaped label dies to cut coordinating burgundy and pattern paper panels and then used the same foiling for their names and interlinked hearts.  It is hard to see the foiling on the names in this pic sorry.

I will be entering into these fun challenges:
Simon Says Monday: Feminine/Girly
Crafty Creations Challenge #386 - Anything Goes
Scrapy Land Challenge # 109 Any
FFC #272 Always Anything Goes
Die Cut Divas March Challenge
DL.ART MARCH 2019 Linky Challenge

I'm glad that you stopped by to see what I'm up to in my craft room, I hope you can stop by again soon.
Crafty Hugs ~ Eva