Thursday, September 28, 2017

Fall leaves Thanksgiving card

For this one I made a shaped card in Cricut design space using the frame in Cricut Ultimate Creative Sampler Cartridge.
I cut the entire card base from Ivory card stock and scored down the center to fold in half.  I used a deep burgundy red to back a pretty orange pattern paper that has a cracked vintage look to it.  I cut the three main larger leaves in fall colors from the Cricut cartridge Winnie the Pooh and friends.  Using my smallest die in the set  I cut the stitched fishtail flag banner from MFT  for my sentiment stamp.  The banner was still a little bit long so I trimmed it on the left side after I was finished stamping in the wild honey distress ink.  The Happy Thanksgiving stamp is from Celebration Scripty Sayings – Lawn Fawn.  I added a couple of plastic orange leaves with a golden metal Brad to cover the end that I trimmed.  I placed a golden metallic dew drop halfway down along the edge on either side of the card front where the design stuck out.  For the corners at the bottom I added just leaves ... at the top corners I added the scroll as well.  These are all cut from Spellbinders decorative accents, Victorian garden curved square die set.  Again I kept this card very simple and masculine for one of the guys on my list.

I will be entering into these fun challenges:
Fantabulous Cricut -  Challenge #310-Fall
Mod squad challenge – FALL COLORS
 
Thanks so much for stopping by, I hope you're having a wonderful day!

Happy Fall Pumpkin card

I decided to work on some Fall cards this week.  This one is simple and fun with lots of texture.  I cut a standard A2 size card out of Kraft card stock for a landscape style card that folds at the top.  Using lots of fall colored papers from my scrap bin and following a sketch & color challenge over at YNS... this is what I came up with.
Happy fall embossing border folder - Darice.  I cut that out with a stitched fishtail flag stax die from MFT,  I then put the fishtail and back into the die to cut it off straight cutting off the embossed Y'all with leaves too so that I could have stitching all the way around  in a rectangle shape in the size I needed.  I ran the gold section of card stock through my leaf swirls embossing folder which is also from Darice.  I cut the label out twice once from Kraft card stock and then from the golden pattern paper to layer on top.  This was cut from the spellbinders labels Ten die.  The pumpkin is from Cricut CM cheerful seasons cartridge.   I used an orange pattern paper for the pumpkin that has like a cracked paint look to give it some texture too.  To accent the label I added gold metallic dew drops to the center on either side.   For the other four spots that the label sticks out I added some golden dew drops there as well.  I accented each of the top corners of the Happy Fall banner panel with two golden yellow leaves I found in my stash that were cut from spellbinders decorative accents, Victorian garden curved square.  I kept this card very simple and masculine for one of the guys on my list.

I am entering into these fun challenges:
Fantabulous Cricut -  Challenge #310-Fall
Mod squad challenge – FALL COLORS

Thanks as always for stopping by to see what I'm up to in my craft room!   I hope you have a great day .

Wednesday, September 27, 2017

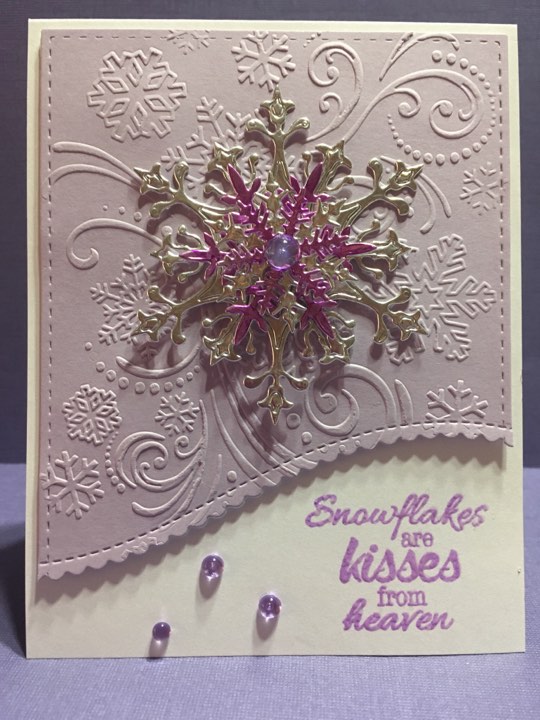
Snowflake Kisses card

If y'all haven't noticed by now... my favorite color is purple!   Pink is a close runner-up though lol.  I am really happy how this Christmas card turned out, it is perfect for my BFF because purple is her favorite color also.
I used an A2 sized card base - portrait style, fold at the top that I cut from heavyweight white card stock.  For the purple embossed panel... first I embossed with my Darice snowflake swirl embossing folder.  Then I used my Simon says stamp bundle of stitched shape dies using the largest rectangle to cut that panel out.  After that I used my MFT stitched scallop basic edges 2 die set to cut the fancy edge on the bottom.   
I also cut a similar size craft foam sheet to use as a backer to pop this whole panel up.   For the beautiful snowflakes I took a foil baking sheet and attached it to a heavyweight  card stock with a scotch glue stick  to repurpose it.  I used various snowflake dies to cut out four different snowflakes.  For the largest one I left all of the little innie pieces inside.  Two of the four snowflakes I colored with my spectrum noir PL4 marker to really make the snowflake stack pop and bring the colors all together!  I used glue dots instead of foam to layer them all up so the stack didn't get too thick.  I added a large purple dew drop to the center.   I thought this sentiment stamp, Snowflakes are kisses from heaven would be perfect for this card... I stamped with a purple heliotrope pigment ink and then went over that with VersaMark ink.  Then heat embossed with clear enamel embossing powder.   I added a few more smaller purple dew drops as accents near the bottom.
For the inside I used the same Simon says stamp bundle of stitched shapes rectangle that I inked the edges of with the purple heliotrope ink then I attached the bottom section of the panel cut from the front to the very bottom.  I used  another sentiment  from that same stamp set that I used for the front this time saying there's Snow friend like you,  using the same purple heliotrope Ink.  I took the center of the top snowflake from the front and placed it as the dot over the i in friend.   I stamped another sentiment underneath that says wishing you a merry Christmas in a darker purple violet pigment ink,  that one is from Inkadinkado penguin pandemonium stamp set.

Thanks so much for stopping by to see what I'm creating in my craft room this week.

I am entering into these fun challenges: 

Tuesday, September 26, 2017

Snowflake Slider card

This is another fun SVG card file from www.creativekuts.com that she will be offering as part of her November card train cargo.
I used a very light purple recollections card stock for the portrait card base that I folded at the top.  The pretty blue plaid with the purples and different blues in it plus the purple plaid for his cap & scarf and the snowflake paper on the slider layer are all from an old 4X6 Christmas paper stack that I got from Oriental trading Company years ago.  For the blue plaid layer I used my stitched rectangle die to cut that and it is from Simon says stamp bundle of stitched shapes.  The SVG file of course has a cut for that layer if you would like, I just happen to really like the stitched look on my cards when I can.  For the slider Layer I ended up using a dime instead of a penny because it was kind of a tight fit next to the edge of the track.  I also of course added lots of foam tape behind the snowflake panel to give the room needed for the slider mechanism inside to run freely along the track.  I sprayed both of the snowflake pieces with a sticky adhesive and then covered with a fine white glitter.  Then I added a little bit of purple glitter to the top snowflake before I adhered them together with foam tape.  I added a pretty purple dew drop for the center of the snowflakes.  What an adorable little snowman... the shirt paper is from DCWV scraps I believe.  For the snowman's lower body, hands, fur trim and ball on his cap I added clear wink of Stella glitter marker to all of those pieces for a nice sparkle and shine.   The adorable face is from Peachy Keen stamps - Basic Paper Dolls.  I added some peach colored chalk to the cheeks and dotted white gel pen in the eyes.
For the sentiment tag I stamped the sentiment "A snowflake is winter's butterfly" from a new Christmas stamp set that I recently purchased.  I really like that sentiment!   I used my embossing buddy over white card stock and then first stamped with a Pigment Violet purple color box cats eye ink.  I then cleaned my stamp and then inked up with clear versaMark & using my stamping tool I stamped exactly over the same spot.   I then used clear enamel embossing powder & then Embossed with my heat gun.   I love love love how this purple embossing turned out.
For the inside of the card I used my Stitched Scallop Basic Edges 2 die to cut two strips out of the matching blue plaid paper.   I used my Simon says stitched rectangle again for the white Layer,  then I added the stitched scallop blue plaid strips to the top and bottom and trimmed off the excess on either side for each piece.  I stamped the sentiment in the lightest purple (Heliotrope) to match up with the base of the card ... that stamp set is from a card maker kit from years ago I believe.  I also used a snowflake stamp from that same set first stamping in a light blue that matched with some colors in the card.  For that one I pushed kind of hard on the stamp.  I then lightly stamped over in the light purple with the same snowflake just barely kissing the first stamping and it gave it a nice purple inner layer.  I used one of my stitched scallop oval dies to cut out the sentiment and then inked the edges in the lightest purple (Heliotrope) before popping up on foam dots on one half and adhering over the slider layer then added my snowman in the same manner. 

I really had fun with this card, I love making and giving inneractive and different cards than just the normal.   Thanks again Cheryl for another fun card file.

I will be entering into these fun challenges:
Simon Says: Pop It Up
CARDZ TV ANYTHING GOES CHALLENGE #14
FFC #207 Anything Goes
DL.ART September Linky Challenge
HMCR #319 - Any Holiday!

Thanks again for stopping by today,  would love to get your comments ... I always love reading them!

Sunday, September 24, 2017

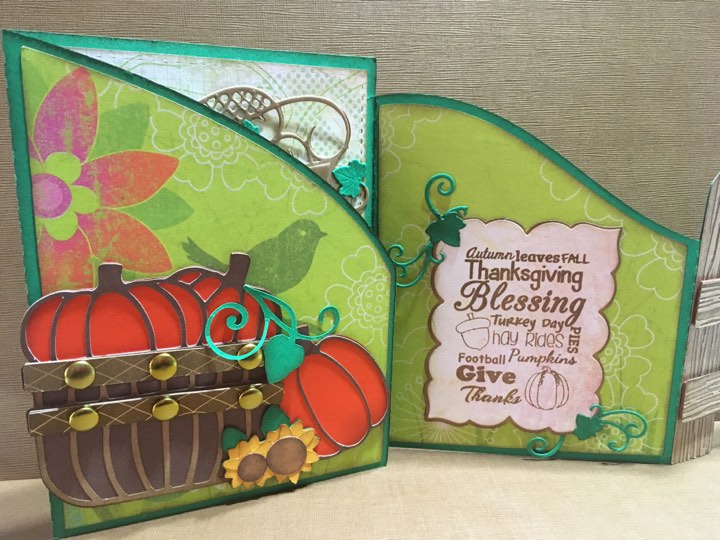
Grateful for you pumpkins fence card

Hello crafters.  Cheryl over at www.creativekuts.com sent me this awesome SVG card file and I went crazy and had a blast with it.
Originally I planned to put the pumpkin basket on the front of the card on the fence but the fence turned out so spectacular after I embossed it with the crafters companion wood grain folder,  which I added walnut stain distress ink directly inside folder before embossing Kraft card stock... I really didn't want to cover it up!  So instead I created a sign with one of my stitched ticket dies and stamped grateful for you from Crafters Companion -  Autumn Morning coordinating  Stamp Set.  I pierced a hole in each corner and added some  Brown and white bakers twine to hang the sign over the fence and attaching in place with glue dots under the sign.  I used one of the sunflower cuts from the card file to decorate here plus added an extra green swirl under it from a spellbinders die set.   For the pumpkin basket panel which is part of the SVG file that all layered together fabulously.  I love how easy it was with the outlines of the pumpkins in the basket very very easy to piece together.   After adhering the three main pieces together I then found some pretty gold foil accented Scraps and cut the bands  for the basket.   I used six large Brad's and popped up the bands with strips of craft foam I cut to fit under them.  I then attached the swirly leaves and the pretty sunflowers which I added gold perfect pearls to the flower centers including the center of the one on the fence.  
For the next three panels inside I used some of my dies to create pretty frames.   The large center frame and the matching one on the left panel are from Spellbinders Decorative Accents Victorian Garden Decorative Curved Square Dies.  The one on the right is from Spellbinders Labels Twenty-Three die set, I cut that out of a matching pattern paper and I created a shadow layer out of Kraft  card stock with my SNC2.   I used the small accent spellbinders die from Victorian Garden  to add the little green leaves and swirls everywhere.  I also took more of the gold perfect pearls and painted over the large kraft leaves on both of the spellbinders frames to add even more shimmer and shine.  
Both of the Stamps on the inside frames are from Craftin Desert Divas -  The left panel is from Craftin Desert Divas Hey Pumpkin Stamp Set and the right is from Craftin Desert Divas Simply Holidays Wordart Stamp Set.    All of the stamps are done with a brown pigment ink.
The pattern papers I used for all the panels are two different sheets from the 12 x 12 stack The Sasha Collection by Prima. 
I really love how the recipient of this can display it in several different ways completely stretched out like this or with the pumpkin panel and Fence showing like shown in my second pic above!  What a really fun cool card design.  Thanks again Cheryl for letting me play with this awesome file.

I am entering this card into these fun challenges:
Mod Squad Challenge - Leaves 
Simon Says: Pop It Up
CARDZ TV ANYTHING GOES CHALLENGE #14
FFC #207 Anything Goes
Cuttlebug Mania - Golden Harvest
DL.ART September Linky Challenge
HMCR #319 - Any Holiday!
Scrapy Land {Challenge #74}
Simon Says Monday: Shimmer and Shine

Thanks again for stopping by to see what fun I'm having in my craft room today.

Friday, September 22, 2017

Bee & Flower Easel Card

I created this card based on a sketch over at YNS.  
I decided to make it into an easel card after I finished the complete front.
I have been on a mission lately to use up some of my scraps so that is what I did for this card I went through my scrap boxes and found some papers that I thought looked good together.   I used one of my stitched flag banner dies for the pink Layer that I trimmed down to 5 inches long.   I used a stitched scallop oval die for the center mat and I made a shadow layer for it in black with my SNC2.
The Bee is an adorable SVG file from Cheryl over at creativekuts.com   I used some yellow shimmer chalk on the middle section of the bee to help accentuate his curved body lines.  I used a mini punch for the tulip the Bee is holding, I cut it twice once in green and once in pink and trimmed off the stem and layered the pink tulip on.  I punched one more tulip flower in red  and trimmed away everything but the leaf area to make the mouth for the bee.   From some of the same card stock that I used for the first card base layer I  stamped the word hello from a crafters companion Hexagon coordinating stamp set which I then cut out with a stitched ticket die and popped up on foam squares.
On the inside I cut another stitched mat  from the same ticket die set in a larger size this time after stamping like the flower & bee great friends are we  from desert Craftin divas - Lil Bit Buggie Stamp Set.  I then added some bling below the sentiment, One pink flower shaped rhinestone and too mini pink rhinestones to go on either side of the flower.   I popped that label up as well on foam tape to act as the holder for the Easel card.
I cut a yellow Mat with a pierced rectangle die so that I may add a written sentiment later on the inside.

I am entering into these fun challenges:
Sketch and Color Challenge #73 
Simon Says: Pop It Up
CARDZ TV ANYTHING GOES CHALLENGE #13
FFC #207 Anything Goes
Cuttlebug Mania - Golden Harvest
DL.ART September Linky Challenge

Thanks for stopping by today to see what I'm up to in my craft room.

Thursday, September 21, 2017

Stitched Banners Masculine Birthday Card

Last week was our anniversary, this week is hubby's birthday.   I wanted to make him a simple masculine card which is so very hard for me to do lol.
For the base of the card I used recollections Kraft card stock and cut at 4.25 X 5.50  portrait style card with the fold at the top.  For the next layer are used a light blue bazzil card stock and used my Simon says stamp bundle of stitched shapes - using the largest stitched rectangle die.   For the stitched banners I used two different sizes from that die set. I cut 4 in the 1.5" wide size  which I pulled scraps of paper that I thought went well together from my blue Scraps stash and I cut one in the 1" width size from Kraft card stock that I ran through my Cuttlebug  Candy cane stripes embossing folder.   I inked all of the edges with walnut stain distress inks. After adhering  all of the flag banners leaving the ends free so that I could curl them up, I added a brown ribbon with  Blue stitching.  Next I used  to circle stamps from 2 different die sets, the smaller solid one cut from Kraft  card stock I used my HOTP scallops and circles set.  I believe I use the smallest circle and then stamped it with cards TV going in circles stamp set - The happy birthday stamp.   Then I cut the larger stitched circle that From light blue bazzil card stock using the Simon says stamp bundle of stitched shapes -  using the larger of the two stitched circles from that set.   Are used foam tape on either side of the ribbon to attach the blue circle sentiments.   I ran some brown and white bakers twine through a blue button which I attached with the glue dots onto the center of the sentiment circles.   I used my piercing tool to curl up the ends of the flag banners.  And finally I stamped for someone special from HOTP birthday greetings stamp set  in a brown pigment chalk ink.
On the inside of the card I used some of the same die sets as the front and some of the same pattern paper is used with the addition of a solid blue to back the whole thing and I also used a pierced rectangle die to cut the ivory sentiment rectangle stamping that  with a fun sentiment from HOTP birthday cheer stamp set  using a brown pigment ink.

I am entering into these fun challenges:
Simon Says Wednesday -   Pop It Up
CARDZ TV ANYTHING GOES CHALLENGE #13
FFC #206 Always Anything Goes
Die-Cut Divas - September Challenge - Masculine/Men/Boys
DL.ART September Linky Challenge

I hope you enjoyed my card today, thanks for stopping by to see what I'm up to in my crafty space.

Wednesday, September 20, 2017

Written on the Tree Anniversary Card

What a fun simple masculine card!  I was inspired by one similar on Pinterest and thought it would be perfect for Hubby's Anniversary card this year.
For the card base I used some Recollection's teal blue card stock cut at an A2 size .   Next I cut a stitched panel out of kraft card stock with my Simon says stamp bundle of stitched shapes using the largest rectangle.  I then took that stitched panel to my Cricut Explore and set it up to write the words where I wanted them to be  with a black Cricut pen.   The fonts are from my computer.  Then I took the panel to my die-cutting machine and used a stitched heart die to cut out the words.  Next I took the other part of the panel and placed it in my Wood Grain Textures embossing folder by Crafters companion that I had already rubbed  Walnut stain distress ink directly to the folder.  I really really love how this embossing turned out.  I took the same ink around the edges of everything before it adhering everything together.   I wrapped some brown and white bakers twine three times around the Wood panel before adhering it to the teal panel.   I cut a couple of different button die-cuts, the stitch circle in brown the other in the teal blue.  I also cut a heavier backer to go behind the teal.  I tied a knot in the three layers of twine running across the card and then ran it up through my buttons to tie a knot there.   I tucked in some foam tape behind the teal button to give it some dimension.   I stamped the word forever on a small banner diecut to slip under the button with foam tape added to it as well.
For the inside I cut another stitched rectangle panel after printing out the sentiment I created on my computer.  I used walnut stain distress ink to go around the edges of that panel before I adhered it.

I made an envelope out of the same teal blue card stock, Neither of them look like the true color in these pics lol...using my 123 envelope punchboard from WeRMemory Keepers.  On the front I added two different Heart diecuts from the same set as before out of Kraft card stock. The stitched one, I had the Cricut Explore write on first.  Then on the back flap of the envelope I use the same Lacy heart die to simply emboss into the paper instead of cut.

I am entering into this fun challenges:
Simon Says: Pop It Up
CARDZ TV ANYTHING GOES CHALLENGE #13
FFC #206 Always Anything Goes
Die Cut Divas - September Masculine/Men/ Boys
DL.ART September Linky Challenge

Thanks so much for stopping by to see what I'm up to in my craft room this week.

Monday, September 11, 2017

Watercolor Roses Thank You card

I had no idea where I was going with this card other than the fact that I wanted to try out the no-line water coloring technique.  So I started out with a Tim Holtz watercolor paper card front in an A-2 card size.   I stamped the image  from  HOTP watercolor roses stamp set in the lightest distress ink color that I own which is old paper.   I then used other distress inks in two shades of pink and a green to watercolor my image in.

After the water coloring was finished and dried I decided instead of fussy cutting around the image I would just use the whole panel and I decided to cut it down with the pretty edgeables lattice Flourish die from  crafters companion.  I really liked how that turned out then I went and searched my stash and found a scrap of some pretty watercolor pattern paper in pink and green stripes.   I stamped "thank you" from the same HOTP watercolor roses stamp set before adhering the two layers together.

I took the other piece of the watercolor paper that was left over after diecutting and painted it all over with the same pink watercolors.   I then took my cheery Lynn exotic butterflies and die-cut from that water colored panel the 3 butterflies.   After adhering the butterflies down I simply added some green and lilac dew drops to accent and finish off my card.

I will be entering into these fun challenges:
Mod Squad Challenge - Lose the Lines
HIMCR #317 - Super Scrap Saturday!
DL.ART September Linky Challenge
Scrapy Land {Challenge #73}
Cuttlebug Mania - Anything goes with die cuts and/or embossing
Simon Says Wednesday: STAMPtember® Stamp It

Thanks for coming by to check out what I'm up to in my craft room.

Sunday, September 10, 2017

Feels Like Fall Leaves Card

Based on a fun challenge, I created this Fall card.  I decided to do both the color and the sketch with this card... Thanks YNS for the awesome fun challenge... so glad I recently found your site!!!
I embossed the base layer of the card with the basket weave folder by Darice, plus I inked the edges with brown pigment ink.  Using my spellbinders labels Twenty-Three dies I cut out the two pattern paper shapes from my Fall scraps... I then used my SNC2 to cut out a brown shadow layer for each shape.  I used one of my button dies that came in a set of six to cut out the three buttons in different Fall colored scraps of card stock.  I then used my SNC2 to cut out a brown shadow Layer for those as well.  Before adhering them together I ran brown and white bakers twine through the button holes and tied a knot for each.  I used two different leaf dies that I also dry embossed and sprayed with glimmer mist to bring out the embossing in a shimmery copper tone.  For the stamping I used an old stamp from a cardmaker set I believe and colored the leaves in with my spectrum noir markers, after backing with the brown shadow Layer I popped the sentiment shape up on foam squares.
For the inside I found a piece of Fall leaves pattern paper in my Fall Scraps bin and used the same spellbinders die as the front to cut it out.  I used brown pigment ink to ink around the edges.  I decided to do my stamping directly onto the green leaf inside and used stamps from Desert craftin divas - Hey Pumpkin stamp set.  I stamped both sentiments in a brown pigment ink.  I then stamped the autumn greetings again over the top of the brown with wild honey distress ink using my presicion stamp press from we R memory keepers.

I will be entering into these fun challenges:
Simon Says Monday: STAMPtember® Stamp It
Scrapy Land {Challenge #73}
YNS - Sketch and Color Challenge #72 –
Simon Says Wednesday: STAMPtember® Stamp It
CARDZ TV ANYTHING GOES CHALLENGE #12
FFC #205 Always Anything Goes
HIMCR #317 - Super Scrap Saturday!
DL.ART September Linky Challenge

Thanks for stopping by my craft room to see what I'm up to today.