Wednesday, November 19, 2014

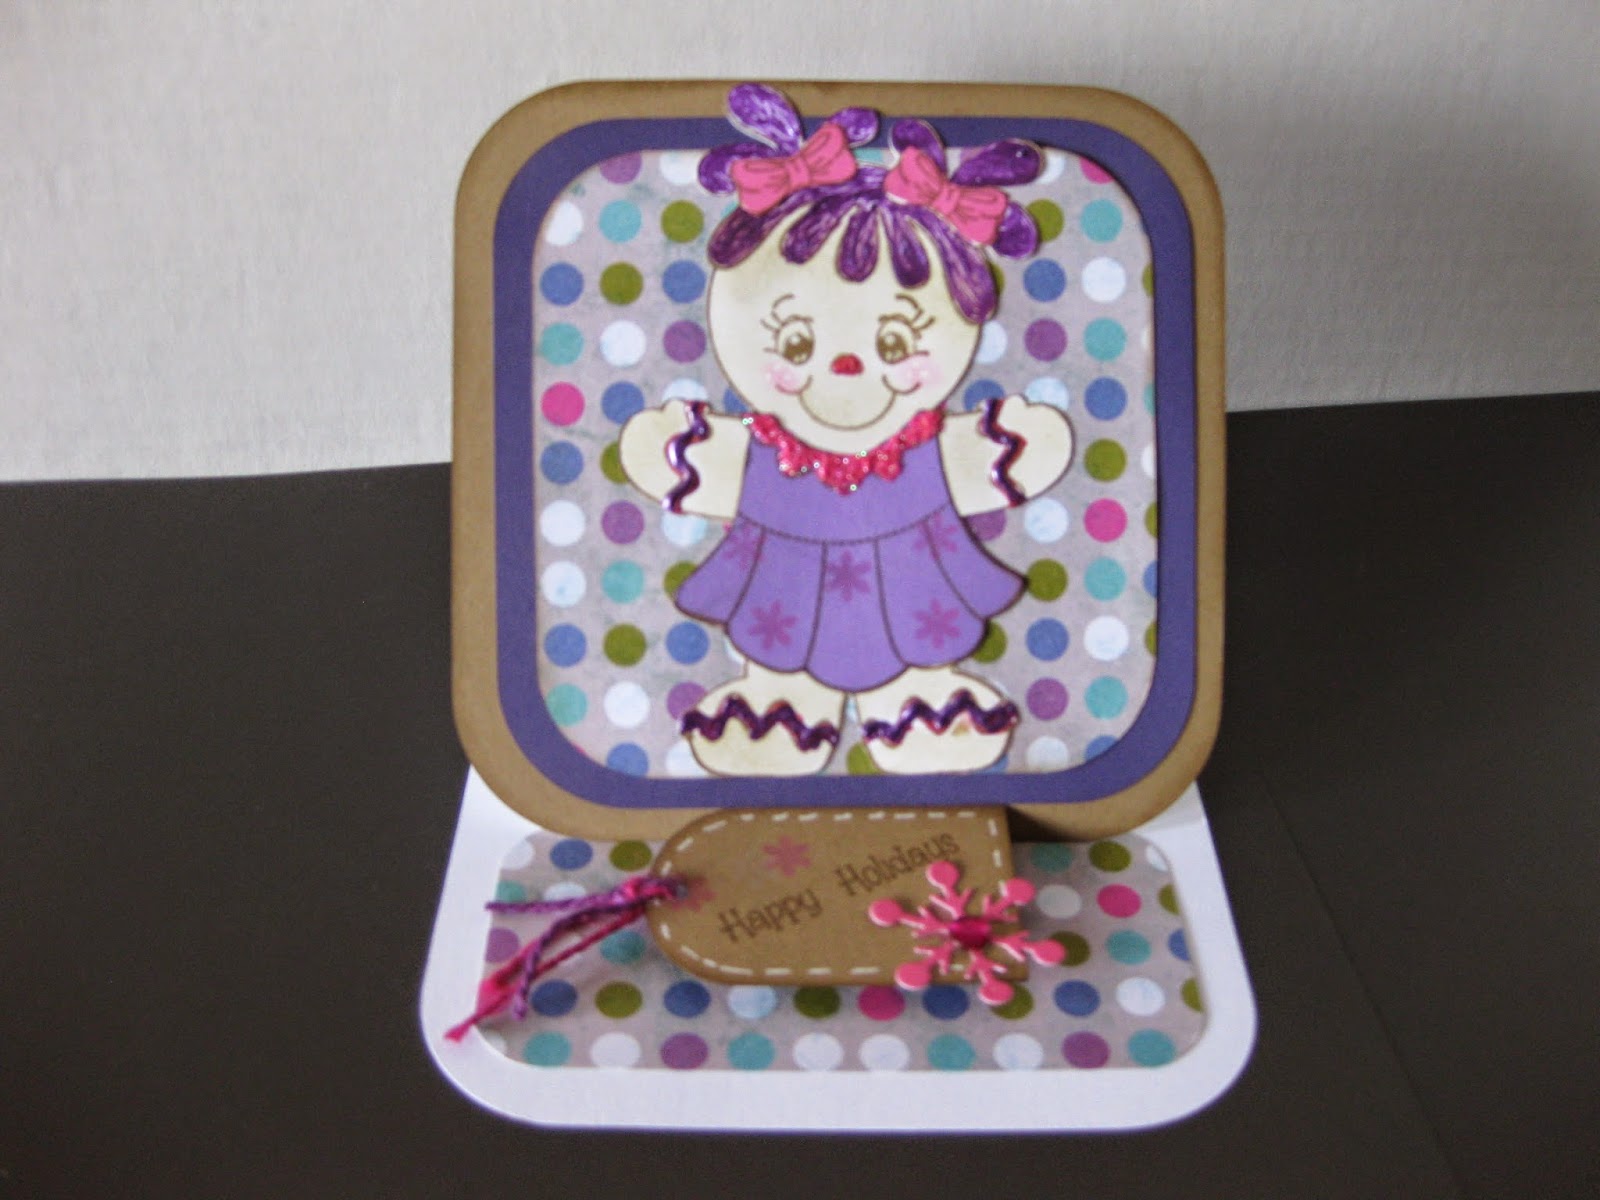
Gingerbread Girl Easel Card

This Easel card base was one I got from Shirleys Designs
 
I had to make one more card with this adorable Peachy Keen Stamp that I have Paper Pieced the Dress, Collar and the bows.  I stamped the entire body on white then rubbed it all over with  chalk to get her color.  The frosting hair and frosting squiggles are filled in with shiny purple puffy paint and the nose with pink puffy paint.  Cheeks are blushed with pink chalk with 3 dots of white gel pen on each and eyes are colored in with white gel Pen as well. And the white collar piece I used a almost pink puffy paint then sprinkled with pink glitter.
I cut the Tag from Cricut Very Merry Tags out of Kraft Cardstock, it is popped up on Foam squares to act as the holder when the card is open.  I used a white gel pen to dash around the edges and stamped with pink snowflakes.  I added coordinating colors of jute cord.  The sentiment Stamp is from Desert Craftin Diva's - "Happy Holidays" from Happy Celebrations Stamp set.  I also added a Pink Snowflake from My Craft Spot Die cut with pink bling in the center.  All of my layers are inked with Tim Holtz Walnut Distress ink.

I am entering in these fun challenges:

Desert Craftin Diva's - Linky Party - Create or Use a Tag 11/24


Thanks for stopping by to see my latest Project :)
 
Happy Crafting ~ Eva Scraps

Tuesday, November 18, 2014

Gingerbread Cutie Center Step Card

So of course as you can see... this entire card was centered around my new adorable Peachy Keen Gingerbread Dolls - Large Stamp (PK-417)  that I recently ordered.  I stamped her on Kraft cardstock and cut her out.  I then paper pieced her... I stamped certain sections again like the dress area on the purple Polk a dot paper... the frosting hair on pink and then again on purple so I could cut out the bows and even the collar area in white.  I am not much of a hand cutting person but paper piecing this little cutie was so worth it :) I used a white almost clear puffy paint for the collar then sprinkled it with white glitter.  I also used pink puffy paint for her frosting squiggles, Pink gel pen for nose, white gel pen for eyes and cheek dots and a little pink chalk to rosy up those cheeks.

The card itself is a center step card I created myself, I also created the pink and purple bottom layers in Scal 2 then ran them through my Snowflake embossing folder.  The Beautiful Oval Behind her is from Spellbinders Opulent Ovals, The fancy border under the Baubles is from Spellbinders Frosty Forms.  The  Snowflakes are from My Craft spot Snowflake Border metal dies, Bauble ornaments are from Cricut Very Merry Tags, front Merry Christmas sentiment stamped on a Spellbinders Banner Die is from Craftin Desert Diva's called Happy Celebrations.


inside stamps are from Cardmaker and I tried to coordinate the inks with colors I used on the front of the card.  "May Magical Moments and Happy Memories Surround You With Joy this Christmas"  I just love that awesome sentiment.  Oh and all of my piecing's including the inside mat are all inked up with Tim Holtz Walnut Stain Distress ink.  Also I added some bling to the bauble ornaments and the snowflakes.

I am entering in these fun challenges:
Bitten by the Bug 2 - Anything Goes - 11/23
Jo's Scrap Shack - Anything Goes - 11/21
D.L. Art - #144 Anything Christmas - 11/25
Die Cut Diva's - Any Holiday - 12/1

Thanks for stopping by to have a look at my latest project... Hope to see you again soon!
Have a Happy Crafty Day,
~ Eva Scraps

Sunday, November 16, 2014

3 Dimensional Fun Thanksgiving Frame

This was so much fun to make and will house a Beautiful Photo of my Grand Kids when they come for Thanksgiving in a couple of weeks!  I will hang this in my dining Room for a little fall Décor this year and every year after :)  Let me apologize for the reflection on the glass, this was almost impossible to get a decent picture of... UGH!!!

I used an 11X14 Frame with some fun Fall Paper out of an extra large Heidi Grace Paper Pad that is 12X18 inches cut to fit as the Background.  
The adorable Turkey in the pot is from Treasure Box Designs called I'm Cooked.  I splattered the pot with white paint (what a mess but like the outcome)  I placed all of the tail feathers how I wanted them and then placed some scotch tape on the back to keep them positioned and ran them through my Cuttlebug Swirls Folder.  For his sign I used my Cricut Brown marker pen to spell out YIKES! then went over it dashed style in white Gel Pen, I ran the sign through Cuttlebug Forest Branches sideways to give it a wood look and on his wings to give them a textured look.  Also used my white gel pen to accent the eyes.  For the fire and wood under the pot I used cuts from Cricut Potpourri Basket Cartridge.  I had to do some customizing and cutting to get the fire out in front of the pot.  Still thinking I may play with and fix that better still :) 
For the Brown Frame mat I used one of my Martha Stewart Punch Around the page sets, Optic Dots.  then I cut a piece of Orange Recollection's cardstock and the a piece of Fall Words Pattern Paper from DCWV The Halloween and Fall Stack to fit the Frame.

The Adorable Squirrel And Acorn Nuts are from Too Cute by Jessica, Nutty For Fall.
I used my Cuttlebug Simply Charmed Squares Folder for embossing the Acorn Tops.  I used my white gel pen to accent the eyes and nose on the adorable squirrel.  I also blushed his cheeks lightly with a peach colored chalk and added 3 whisker dots to each cheek with a brown colored pencil.  I wrapped a light colored sheer ribbon at the top of my frame tied in a simple knot and added some raffia to give a fall look.  I wanted to add a button in the center but did not think the glass would allow for that.  I placed all of that inside the frame and closed it up, but first slid my wide brown ribbon under the glass and again tied a simply knot in the center.  I took a piece of fun shiny orange ribbon and tied it around the brown knot with tails going in opposite direction.  Took some more raffia and cut it into sprigs and added that to the front of my ribbon knots with some Brown and white Bakers Twine.  I used the same twine to hang my adorable tag from.  The Orange tag is a cut from Cricut Very Merry Tags, I added that custom topper I made myself in brown that I also ran through the CB Simply Squared Embossing folder to match with the acorns.
 

The awesome Sentiment stamp is from Craftin Desert Divas called Simply Holiday's Word Art... I love this set and just received it yesterday :)  Plus I got the Free SVG background layer for the stamp from CDD on FB too.  What a fabulous touch it gives and I was able to pop it up on Foam dots to give such dimension.  I used my water color pencils to color in some things on the stamped image and then used my water brush pen to blend it together a bit.  Oh back up the bow that sticks out, I used a spellbinder's die for the pretty medallion then I added a beautiful Pumpkin I cut from Cricut Thanksgiving Cartridge

I am entering this project into these fun Challenges
Craftin Desert Divas Linky Party - # 44 Create or use Tag on Project 11/23
Bitten By the Bug 2 - Fall Pumpkin Challenge 11/16
Die Cuttin Diva's - #91 Lets Talk Turkey 11/16
Scrappy Moms - Terrific Tuesday Challenge Let's Go Nuts 11/17
Decorate to Celebrate - #88 Anything Goes 11/25
Cut It Up Challenge -  #58 Let's Talk Turkey  11/26
Jo's Scrap Shack - #66 Anything Goes 11/21
Hiding in My Craft Room - #174 Think Fall 11/21
Little Scrap Pieces - Show it Off Saturday Linky Party 11/21
My Sheri Crafts - #146 Turkey Time 11/21
Die Cut Divas - Any Holiday 12/1
PDE Linky Party - Pilgrims, Indians, Turkey's or Scarecrows 11/24

Thanks so much for stopping by my little Crafty corner of the Web to check out my Project.  Have a wonderful and Crafty Day!  ~ Eva


Monday, November 10, 2014

Gift Box with tag and metal snowflake

So I have been so busy this week but trying to get this fun gift box made for the Challenge over at My Craft Spot from last week.... I think I am just making it under the wire as they already started their new challenge this week.  Last month I bought this awesome gift box svg from My Craft Spot after viewing all of the wonderful DT projects in the sneak peeks and blog hop (I fell in LOVE).  I wanted to use it in this fun use something metal challenge and here is what I came up with.

 I made the gift box and added dotted lines at the fold lines since I don't have a score tool on my machine.  I absolutely adore this little gift box... It can be used for so much more than just Christmas too.
 The tag came in the same cut file also with the Gift box and so does that beautiful bow on top.  I used one of my fun Tiny Tags Christmas Stamp Set for the December 25 stamped in versamark and then heat embossed in white.  That is also a My Craft Spot Product as well as the awesome snowflake I used from the Snowflake Border Metal die set I got last year from My Craft Spot.  I cut the snowflake out of a Monster Can ( I cut the actual snowflake border out too but have not used it yet) I used the shiny metal side for the front and decided to color it in with a purple sharpie.  I then added it to the fun tag and there you go... what an adorable gift box for some lucky person :)
Here is a view of how I attached the bow to the top of the box with a purple metal brad.

Here is the awesome snowflake Border from that set that I plan to use on something very soon and a few more of the single flakes that I did some coloring on.  the bottom one shows the back  with the monster can label view :)

I am entering in these fun Challenges:
My Craft Spot - #156 Metal

Thanks for stopping by, I hope you enjoyed my project.
Happy Crafting Eva Scraps

Wednesday, November 5, 2014

Fall Place Cards / Nugget Holders

This was a fun project and a great asset to not only let my guests know where to sit at the thanksgiving Day Dinner table, but also gives them a little treat for after the feast.  I designed the nugget holder myself in Scal 2.


I also used Gypsy wanderings for the cute leaf on each and then stamped them with cute peachy keen faces and one of them is a Treasure Box face stamp (the green one on the far left).  Each holder itself is embossed with CB swirls I also added a fun orange fancy spellbinders cut from ironworks accents around the hole before I added the ribbon...what a nice touch it added.  Each holder has two tags attached with a brad.  The mini tag has either a stamped "for you" or a cricut cut "for you" cut from Cricut Alphabet Cartridge.  The bigger tag is embossed with CB squares folder from the simply charmed set with the stamped leaf popped up on foam tape on top of that tag.  Each one has a hand written name tag tucked in behind the tags mad from Spellbinders ribbon banners die.  Inside each place card is a yummy Snickers peanut butter squared.

I am entering this project into these fun Challenges:
Cardz TV Stamps - #3 "All in our Places" - place cards
Cut it up challenge - #57 Tags Tags Tags
Little Scrap Pieces - Show it Off Saturday Linky party


If you look closely in the center vase/candle holder in the background you will see a past creations of cute little Turkeys with real feathers inside to make a fun decor piece for the center of the table.
 Thanks for stopping by, I hope you enjoyed my fun Fall project :)
Happy Crafting, Eva Scraps

Tuesday, November 4, 2014

Thankful For You Leaf Card

Thankful For You fun Fall Center Step card.

I used several Cricut Cartridges for this one. The back leaves cut from CM Cheerful Seasons the front Leaf from Gypsy Wanderings, which I stamped the with Peachy Keen wide eyed kids face stamp. "Thankful" also from CM Cheerful Seasons... "For You" is from Cricut Alphabet.  plus a spellbinders Moroccan Accents die for that fancy edge on either side of the main center section.  Some cuttlebug embossing done, birds and swirls on side orange pieces and Anna griffin border from Climbing Rose set on bottom orange piece.  That Gorgeous brown pattern paper is like a raised velvet pattern... It is fabulous in person! On the side sections I placed Metal Brown Flower Brad Buddies with an orange flower brad in the center of each.  I tied a pretty gold cord around card with a brown button attached but it was missing something so I added a bushel of raffia behind that. 

I am entering into these fun challenges:
Peachy Keen Stamps - Thankful Theme
Lil Red Wagon - Krafty  used Kraft paper on Center leaf and fancy edges
Hiding in My Craft Room - Fall Colors
Craftin' Desert Diva's - Brown & Orange
Fantabulous Cricut - Anything Goes
Simon Says Stamp - Anything Goes

Thanks so much for stopping by today, I hope you enjoyed my project... I sure enjoyed making it :)

Happy Crafting, Eva Scraps


Monday, November 3, 2014

Creepy Spider Halloween Card

So I really Challenged myself for this card using only Manual Die cuts or pieces of them.

Card is a 5 X 5
Paper - DCWV Eek-a-Boo Stack
Purple Fancy Corners X 4 - Spellbinders Fantastic Flourish 2
Spider Build
Top is a popped up Paper Artist Scallop Circle
Stamped with Peachy Keen Fall Face Parts Med
Heat Embossed with Silver Tinsel
Gel pens for eyes and mouth
Bottom is 2 Paper Artist Circle Die (legs in Between)
Legs are from Spellbinders Fleur de lis Doily accents the fancy corners times 4
I cut the two ends of each swirly corner and used for legs
then used what was left for corner accents
Sentiment is Stamped with Peachy Keen Fall Face Parts Med
and heat embossed white
Small hand tied purple bow adhered to top with a Zot

I am entering into these fun challenges:
Cuttlebug Mania - Itsy Bitsy Spider with manual die cuts only - No Electric 11/10
Die Cut Diva's - Any Holiday 12/1
My Sheri Crafts - #145 Black Magic Halloween 11/6
Jo's Scrap Shack - Happy Halloween 11/7
Scrappy Mom's - Happy Halloween 11/3

Thanks for stopping by to see my Project.

Happy Crafting, Eva Scraps

Sunday, November 2, 2014

Harvest Flower Gift Box

A cute little treat box for some Fall goodies.

I used the Flower top box from Cricut Tags Bags Boxes and more cut in Kraft card stock for the box.  I made a simple wrapper for it in some pretty fall stripe paper.  I cut the Harvest from the Cricut CM Cheerful Seasons.

I cut this awesome flower from Cricut Bloom cartridge and curled up the petals to give it some definition and only attached it to one half of the flower top box so you can still get inside to the treats.

I am entering into these fun challenges:
Bitten By the Bug 2 - Cricut Gift Box Challenge
Hiding in my Craft Room - Fall Colors
Die Cut Divas - Any Holiday with Die cut

Thanks for stopping by to see yet another of my fun creations. 
Happy Crafting ~ Eva Scraps

Happy Fall Y'all Scarecrow Center Step Card

I started this card thinking of the basic plan and then just kept digging out cartridges to add details lol.


Center step card - SVG Attic
Scarecrow and tiny crows and grass - Cricut CM seasons
Sign - Cricut Pooh and Friends
Corn Stalks, big crows, center pumpkins - Cricut Simply Scarecrow
Front 2 Pumpkins - Creative Kuts

Embossing
Cuttlebug D'Vine Swirls
Cuttlebug Forest Branches

Peachy Keen Sweet on you Face Stamps
White gelly roll pen
Pink chalk cheeks
Purple chalk girl eyelids
Blue paint eyes

I am entering this card into these fun Challenges:

Craftin' Desert Diva's - Brown & Orange 11/9
Hiding in My Craft Room - Fall Colors  11/8
Lil red Wagon - Kraft Paper  Kraft Paper on Sign and Corn Stalks 11/5
Die Cut Diva's - Holiday plus Die Cut  12/1


Thanks so much for stopping by, be sure to leave me a comment before you go.
Happy Crafting,
Eva Scraps