Monday, November 30, 2015

Merry Christmas Vintage Truck Card

Hello to all of my Crafty Friends Stopping by to see my project today.
I must tell you I scrap lifted this card from Mary over at Cardz TV.  Oh my gosh as soon as I saw hers I fell in love.  Of course my card has different papers and a couple other small changes but for the most part it is very close to the one she made and shared in her video.  I love Mary's Cards so much and her videos are always great too.  You can find her video that inspired this card by clicking HERE
 
Items I used:
Red Recollections Card stock for Card Base - top fold 4.25" X 5.5"
My Christmas Papers are from Authentique Believe collection including Green for Tree which is cut from Cricut - Winter Frolic
The green dotted paper is a scrap from my stash
Red Truck Cricut - Just Because Cards is also cut from Red Recollections card stock
The silver accents I wanted to look like chrome and are cut from this foil sheets pack I picked up at DT (Dollar Tree) Boy I need to go get some more of that :)
I also cut a second door Handle from silver foil to use for the back bumper piece, in the video Mary colored that on along with the headlight she added.  I also cut an extra small circle (tire rims) but out of Grey like the window and cut it in half to use for the front headlight.  I went over it with a silver Cricut marker to give it some shine.
There was a tiny sliver piece that I didn't see Mary use, I added it to the front edge of the window to give another chrome accent... not sure if it was supposed to go there but I liked how it looked lol. 
I cut the wooden rail out of Recollections Kraft card stock.
I popped up the 2 fenders on foam tape.
I drew the door on like Mary did and also around lots of my cut pieces to accent them better using my Spectrum Noir - EB2
Merry Christmas stamp is from Desert Craftin Diva's - Happy Celebration Set & is stamped with Memento Tuxedo Black Ink.
On the Inside I used some of the same papers to accent the top of my white sentiment mat
plus I cut another tree Cricut - Winter Frolic at 1 1/2" this time
I also inked the edges of all my pieces with Tim Holtz Walnut Stain Distress ink
Sentiment Stamp is from Crafters Companion - Sheena Douglass Christmas stamp set
& is stamped with Memento Tuxedo Black Ink.
I also made an envelope to match!  Using an envelope cut from Just Because Cards (Page 68) and sizing it to fit an A2 card... I do this on the computer (Dimensions 10" X 7.25") so not sure it would work from the cartridge cut on Cricut expression or lower.  I also trimmed off the flap cut in a matching pattern paper to add more cuteness to the envelope by just attaching to the flap only.

I am entering into these fun Challenges:
BBTB2 challenge - HANGING OF THE GREENS (Tree - Winter Frolic)
Little Red Wagon - #317 That's How I Roll ~ Transportation
Fab N Funky - #283 Christmas
Simon Says Stamp - Anything Goes
DoubleClickSkittles Challenge - Christmas or Blue & White
PDE Linky Party - Anything Goes
Jo's Scrap Shack - Anything Goes
Hiding in My Craft Room - #227 Any Holiday
Little Scrap Pieces Show it Off Saturday Linky Party
My Sheri Crafts - #171 Christmas Spirit (Vintage)
Craftin Desert Diva's - Christmas

Oh my gosh you guys, I had so much fun making this card!  I know I will be making several versions of these this year to get sent out!  Thanks for stopping by to see what I am creating.  Hope you all had a wonderful Thanksgiving weekend.

Happy Crafting ~ Eva Scraps

Wednesday, November 25, 2015

Happy Fall Owl Mesh Wreath

Finally I finished my Fall Mesh wreath for Thanksgiving.  Just in time to take it down in a couple of days to get ready for Christmas decor lol.

I found the wreath frame at DT about a month ago.  I found the wide multi colored mesh at WAl-Mart.  I really liked the pretty colors from Orange and yellow that flowed into purple and pink.  I found the very pretty shiny orange mesh on clearance at Michaels the following week... I put all of that together with pipe cleaners and left them sticking out all over the entire wreath waiting until I could find some pretty wired fall ribbon.  That was not so easy on our small town as everything fall got pushed out of our local stores to make room for Christmas.  Ugh I was so frustrated.  So my Hubby and I had an eye appointment last week out of town and I thought ok perfect I will go find some pretty fall wired ribbon to finish up when we are done.... Nope, that didn't work out too well because  I had not p,annex on getting my eyes dial acted and not being able to see afterwards lol.... Oh well!  So I had no choice .... I went and searched my stash in hopes of finding something to work.  I ended up finding some spools of burlap wired ribbon ... One in green and the other in pink... So that is what it got lol
For the center part I found the cute Fall leaf chalkboard on clearance while in search of my fall ribbon, lol. I  thought the reddish purple glitter would match well with the colors in the wide mesh.  I decided to color up the cute Fall Owl Digi-stamp from Desert Crafting Diva's with my spectrum noir markers.  I cut it out with my ScanNCut 2 before I colored it in.  I wanted to have it say Happy so I went to my Cricut and did the word Happy and then added to more shadow layers to go behind and mesh with the way Fall is matted with colors.  I wasn't that happy with the letters I cut to go on top for the word happy... Ugh the more I looked at it the more I said no way in my mind.  So I decided to go around the letters with coordinating puffy paint... Ugh FAIL!  So I decided to dig out some fall chipboard letters and added those to the fall mats instead.  I may add some things to it next year when I can find fall stuff again but for this year (a Couple of days... Lol)  it will work.

I am entering into these fun challenge:
Simon Says Stamp Monday Challenge - Thanks/Thanksgiving
CARDZ TV CARD DESIGNERS CHALLENGE #6 "THANKSGIVING"
DL.ART THANKFUL THURSDAY CHALLENGE #168 THANKSGIVING

Thanks for stopping by to have a look at my project.  I want to wish you all a very Happy Thanksgiving!  And of course Happy Crafting - Eva Scraps

Tuesday, November 24, 2015

Get entered for $1200 worth of Craft Products

Hey to all of my Crafty Friends in the USA
Get entered to win this massive giveaway!
 
https://gleam.io/ZKUOb-8RZNcJ
Woooo~Hooooo what a fabulous Crafter's Prize!!!


Fall Acorn card

Another Fall card, this one is for my Awesome Hubby!
I used Kraft card stock for the front layer adhered to a 110 lb. white card stock card base for a 4.25 by 5.5 portrait card.  The top layer of orange I ran through my Cuttlebug to emboss with the Darice Fall leaves swirl folder... Love that folder for fall!  At the bottom I used some fall plaid pattern paper from my stash.  The center strip is a Green burlap wired ribbon.  The acorn with leaf is cut from Cricut Autumn Celebrations cartridge.  I embossed the top acorn cap with CB simply squared folder.  The sentiment is computer generated.  I added a bow of Rafia around the stem and I die cut the 3 brown swirls from my new Spellbinders set - Jewel Treasures.
For the inside I used some paper scraps from the front and cut 3 more brown swirls to embellish.  The Happy Thanksgiving sentiment is stamped from Craftin Desert Divas - Happy Celebrations stamp set.  The bottom acorn leaf swirl is from a stamp set in my stash that I got in a cardmaker kit years ago, sorry I don't know the name.

For the Envelope I used my WRMK 123 Punch Board and some Fall Pumpkin Pattern Paper. 
*** Envelope Punch Board Users:  Here is a very cool link I found to help with all envelope sizes on the envelope punch boards!!!  http://imjustlovinit.blogspot.co.uk/p/crafty-envelope-punch-board-calculator.html

I am entering into these fun Challenges:
Fantabulous Cricut challenge -#265 Thank you/Thanksgiving
BBB2 - "Thanks" Challenge
Simon Says Stamp Monday Challenge - Thanks/Thanksgiving
Scrappy Moms -  Terrific Tuesday Challenge - So Thankful for You!
DoubleClick Skittles Challenge: Thank you or Thanksgiving!
CARDZ TV CARD DESIGNERS CHALLENGE #6 "THANKSGIVING"
Dies R Us Challenge #37 - Thankful
Little Scrap Pieces - Show it off Saturday Linky Party
HIMCR #226 - Be Thankful!
Jo's Scrap Shack FFC #115 "Gratitude"
DL.ART THANKFUL THURSDAY CHALLENGE #168 THANKSGIVING
Cut It Up Challenge #84, Inspired by a Book, Movie, or Song (Inspired by Children's Song - I'm a Nut  Here is the link:  https://www.youtube.com/watch?v=qcojQ_MLiSU)

Thanks for stopping by to see my project.  Hope to see you again soon.
Happy Crafting ~ Eva Scraps

Sunday, November 22, 2015

Ice Skate Tags

I love tags and had so much fun making these Ice Skate Tags for my Swap Group.

The main Tag with Layer is from Cricut - Very Merry Tags 
 Blue Card Stock - Recollections
Light blue Pattern Paper - Sandy Lion /Found pack at dollar store
I Stamped snow Flurries for back ground and Heat embossed in fine white powder
Small White Tag and We wish you a Merry Christmas sentiment (JustRite Stamps)
stamped in Mermaid Lagoon Distress ink and cut out with a border on my ScanNCut2 
The Ice Skate is from Cricut - CM Cheerful Seasons Cartridge
Snowflakes stamped in distress ink and added puffy paint to accent for the laces.
Bottom Snow Flake is die cut sparkly blue foil paper and skate blade is cut from silver foil paper.  Both from same stack - Holographic foil sheets - found at DT.
And from my stash I added these blue metallic 3-D snowflakes to each foil flake.
Blue Sew easy floss for skate bow and hanger for tag

I am entering into these fun Challenges:
Craftin Desert Divas - Make it Sparkle Linky Party

 Happy Crafting!  ~ Eva Scraps

Saturday, November 21, 2015

Snow Man Shaker Fuse card

I love snowmen... I am not a big fan of the snow in real life lol, but Snowmen are my favorite Christmas décor!!!  I fell in love with this simple Fuse Tool shaker card.  I added a stamped sentiment "Merry Christmas" from Craftin Desert Diva's (CDD) from their Happy Celebrations set which can be found by clicking here.  This is such a fabulous stamp set to have for card making through out the seasons and card giving occasions!

I didn't stamp it too straight unfortunately but oh well still love this card.  This one I adhered to a green stripe card stock and love the way it turned out making the edges look... so cute!  Reminds me of how the old postcards were.  I also added some dew drops on either side of the Merry Christmas Sentiment.

I wanted to point out that I cut down the shaker cards.....  they originally come as a trifold card but I like to cut apart all three panels so my kit stretches further.  I just use it as a card front on a regular card stock base.  The material is like a soft plastic and very flimsy... so for me not only does it need the card stock base to firm it up... but I get three card fronts out of one card!!!  Or I can use the extra fronts to cut shapes out of to add more fuse-able pieces to my other card fronts.

Here are both of the shaker cards I made with the red snowman fronts adhered onto Green Stripe Card stock bases.  The second card I used Green Brads instead of the dew drops.  There are 6 shaker card fronts in this kit... 2 each of 3 designs.  Plus 6 more regular cards, once I cut them in Half I can double it!!!  I hope you enjoyed all of my Shaker cards from this fuse kit over the last several days.  I used up all of the shaker fronts but I will be making more fuse cards soon with what is left in my Holiday kit.  I am sure I may even turn some of them into my own shaker designs!!!

I am entering into these fun Challenges:
Craftin Desert Divas - Make it Sparkle Linky Party

Have a Wonderful and Crafty Day! 

Friday, November 20, 2015

Fuse Christmas Tree Shaker card

Another fun Christmas Shaker card made with the Fuse.  This time it is an adorable Tree shaped Shaker.  It is so fun and easy to put these cards together.


I love my Fuse Tool by We R Memory Keepers.  I bought the full kit during the summer with the purple fuse tool from HSN and had fun playing with all of the goodies I got.  Recently, because I chose Auto ship when I ordered... I received the Holiday fuse kit.
I wanted to point out that I cut down the shaker cards.....  they originally come as a trifold card but I like to cut apart all three panels so my kit stretches further.  I just use it as a card front on a regular card stock base.  The material is like a soft plastic and very flimsy... so for me not only does it need the card stock base to firm it up... but I get three card fronts out of one card!!!  Or I can use the extra fronts to cut shapes out of to add more fuse-able pieces to my other card fronts.  
Here are both of the shaker cards I made with this style of Fuse card fronts adhered onto blue Card stock bases.  There are 6 shaker card fronts in this kit... 2 each of 3 designs.  Plus there are 6 more regular cards, when I cut those down I can double it... woo hooo... lol

I am entering into these fun Challenges:
Craftin Desert Divas - Make it Sparkle Linky Party
Simon says stamp Wednesday challenge - Simon says Christmas
DL.ART November Linky Challenge - Anything Goes

Happy Crafting ~ Eva Scraps

Fall owl center step card

Here is another fun center step card I made using another adorable Digi-stamp from Craftin Desert Diva's (CDD).  Oh my gosh this owl is so cute and was so fun to color with my Spectrum Noir pens.

The Count your Blessing stamp (Hey Pumpkin Set) is also from CDD as well as the sequins. The background behind the owl is done with Wild honey distress ink painted on as a water coloring... I mixed a little walnut stain to add the dimension... Just a little bit though.   The bottom flourish is from Spellbinders (Shapeabilities Die D-Lites - Flourish Trim)  as well as the flourishes on each side panel (spellbinders metal tags and accents).  At the bottom the small leaves are cut and embossed from a  Spellbinders die ( Jewel Flowers and Flourishes Shapeabilities) and then I rubbed the raised embossed veins with a very light blue ink.   I also added 4 orange buttons from my stash. For the side panels, I wanted something to go over the flourishes besides the sequins that I added to each swirl so I decided on a Cricut leaf cut from A Child's Year cartridge.  On the top layer I cut from a fun fall paper with tiny leaves on it.  I used my brown Cricut marker to draw out the veins and the outline of the leaf... I really like how it turned out.  I also cut a blackout layer a little bit larger in Brown to layer it onto.  The papers used for the two side panels and the bottom strip plus all three flourish cuts and the leaves were all cut from my Fall Paper Scraps stash.... I love being able to utilize my scraps for new cards!!!  I think that is about it for this one.... Thanks for stopping by to see what I am up to in my little crafty cave.

I am entering into these fun challenges:
Cardz TV Designers Challenge - #6 Thanksgiving
Craftin Desert Divas linky party - Make It Sparkle
Bitten By the Bug 2 - Thanksgiving with Fall Leaves  (used Cricut A Child's Year cartridge)
Fantabulous Cricut Challenge - #264-Anything Goes! (used Cricut A Child's Year cartridge)
Die Cuttin' Diva challenge - #242: Thanksgiving
Simon Says Stamp Monday Challenge - Thanks/Thanksgiving
PDE Linky Party - Anything Goes - 3rd Week Nov
Jo's Scrap Shack  Fun~day Friday Challenge - Gratitude
HIMCR #225 - Super Scraps Saturday
MY SHERI CRAFTS CHALLENGE #170 - Happy Thanksgiving
Dies R Us Challenge #37 - Thankful
Scrappy Moms Terrific Tuesday Challenge - So Thankful for You

Happy Crafting ~ Eva Scraps

Thursday, November 19, 2015

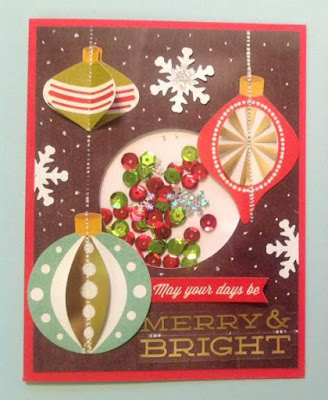
Holiday Ornament Shaker Fuse card

I love my Fuse Tool by We R Memory Keepers.  I bought the full kit during the summer with the purple fuse tool from HSN and had fun playing with all of the goodies I got.  Recently, because I chose Auto ship when I ordered... I received the Holiday fuse kit. 


I am in love with the whole dang kit!!!  so I decided to make some Shaker cards for Christmas out of some of the fun designs included. 
I wanted to point out that I cut down the shaker cards, they originally come as a trifold card but I like to cut apart all three panels so my kit stretches further.  I just use it as a card front on a regular card stock base.  The material is like a soft plastic and flimsy...  so for me not only does it need the card stock base to firm it up... but I get three card fronts out of one card!!!  Or I can use the extra fronts to cut shapes out of to add more fuse-able pieces to my other card fronts.  For this card, as you can see the brown card front in photo above is just plain, so aside from the fuse-able bauble ornaments and words I fused on... I also added a few large snowflake sequins adhered with glossy accents and lots of dots with my white gel pen to look like snow.
Here are both of the shaker cards I made with the brown fronts adhered onto red Card stock bases.  There are 6 shaker card fronts in this kit... 2 each of 3 designs.  I will be back soon to share more of the others with you.  I also must say... I love the sequins they added with this kit!  So shiny and bright plus the cute little silver snowflakes are a great added touch for my Christmas cards.  I am so very Happy with these shaker cards and the Fuse tool is so fun to play with.  Thanks for stopping by to look at my work.
 
I am entering into these fun Challenges:


Happy Hedgehog Fall Center step card

I had so much fun creating this card.  The adorable hedgehog is a free Digi-Stamp right now over at Craftin Desert Divas (CDD) plus they have many other cute ones to choose from at a low price. 

I am getting better with my Spectrum Noir Pens I think.  I didn't have a bright yellow marker for the sunflower in her hair so I used one of my sharpies in a large colorful set I picked up at wally-world.  I also used distress ink (Wild Honey) to color the orange background behind her, I masked the image for this technique.  The Happy Fall Y'all stamp is from CDD Hey Pumpkin Set (click here to find this set).  The Label is from Cricut Wrap it Up Cartridge which I added 2 small orange brads to.  The Sunflowers are just dimensional stickers.  The leaves with acorns and the banner pole (not sure what to call it, lol) are cut with metal dies.  I also added some sequins from my stash then added a pearl to the center of each with fabric puff paint.  The tiny sequins are from CDD, Corn Maze (Sequins found Here).

Oh and the card base itself is a wide center step card I created myself, I love this card style.  Thanks for stopping by to take a look at my project.  I hope you all have a wonderful and crafty day!

I am entering into these fun Challenges:
Craftin Desert Divas - Make it Sparkle Linky Party
CARDZ TV 3-D DESIGNERS CHALLENGE - #5 "THANKSGIVING"
Fantabulous Cricut Challenge #264-Anything Goes!
Die Cuttin' Diva's - Challenge #242: Thanksgiving
Jo's Scrap Shack - Anything Goes
Simon Says Stamp Monday Challenge - Thanks/Thanksgiving
DL.ART Thankful Thursday Challenge #168 Thanksgiving