Wednesday, June 29, 2016

Beehive shaped Card

I adore shaped cards, so when my friend Cheryl and I were trying to come up with some cute card ideas I told her I would love a honeycomb shaped card, so she made that for me (Which I shared in post before this one)  but then she also made this adorbs one and sent to me to play with.... OMG!  I loved it as soon as I saw it!  So easy to put this one together!

Beehive Shaped Card file @ creativekuts.com

So I added a few extras like the twine flight trail.  She had a cute bee included with this file but I wanted to use my Cheery Lynn - "Tiny Things With Wings" Bee die-cut.  for the bee's...I cut the bottom layer in white and adhered the black cutout layer on top leaving the black eyes in because I thought it looked better in this case.  I colored in the wings and body with my spectrum noir markers on both bigger bees.  The smaller bee and heart are HOTP Dazzles(I used the same marker to color in the bee body). The sentiment stamp is from Craftin Desert Divas - Lil Bit Buggie set - Just Bee-Cause
The flowers, leaves and buttons were included with the card file.

For the inside:
I cut the inside layer from the card file out of White Card Stock which I inked the edges with Walnut Stain distress ink.  for the Sentiment I stamped the You're So Sweet from HOTP Thank You! Stamp Set.... once on yellow cardstock that I used my SNC2 to cut around the shape leaving a small extended edge around the whole thing.  I stamped again on white card stock and used my SNC2 to cut that as well only this time I choose to cut a preloaded pattern and went with a Circle.  I was able to scan in the white stamped image and then size and move the circle exactly how I wanted it over the "SO" circle and then cut.... I love that Machine!!!  I then took my Spectrum Noir Markers to color in the SO Circle with colors matching up with the front of the card.  I also stamped a couple of flowers in Red Chalk ink with the from the same stamp set.  I added a dotted trail and placed another Bee Dazzle like on the front and again colored with my spectrum noir markers.

I of course made a fun matching envelope with my WRMK 123 Punch Board just with some yellow paperthat was similar to the front of the card and stamped it with the adorable Bee stamp from Craftin Desert Divas Lil Bit Buggie Stamp Set. 

I am entering into these fun challenges:

Thank you for stopping by to see what I have been making.  Have a wonderful and crafty day!
~Eva Scraps~

Honeycomb Shaped Card

so here is the Honeycomb Shaped card.  When I asked Cheryl to make this card file for me I told her I wanted to be able to use it with a new stamp set and die cut set I recently received from crafters companion magazine.  Wow she nailed it, I was even able to size it to fit my die cuts perfectly, so some of the hexagons I cut with her file and the stitched ones are cut with my new dies.  The large yellow stitched ones I also stamped with the floral hexagon stamp from the crafters companion mag stamp set in stampabilities - bright pink pigment ink.

I thought it would be fun to go with yellow and black and throw lots of pink in there too.  I really like how it turned out.

Honeycomb Shaped Card @ Creativekuts.com

I loved playing around and layering this card up to create some fun dimension.  The Bee's are again Cheery Lynn die Cuts - Tiny Things With wings.  The center beehive and the flowers are all dazzles from HOTP.  I colored them all in with spectrum noir markers.  All of the pattern papers are from my new Lawn Fawn 6x6 stack - in the meadow

For the inside I used a flower and bee stamp from same crafters companion set as I used on the front. I colored in with spectrum noir markers.  The adorable sentiment stamp is from Craftin Desert Divas - Lil Bit Buggie Stamp Set.

I am entering into these fun challenges:
Jo's Scrap Shack - FFC #144 "Anything Goes"
Show it off Saturday Linky Party
DL.ART THANKFUL THURSDAY CHALLENGE #183 "SUMMERTIME"
Simon Says:  ANYTHING GOES

Thanks for stopping by, have a wonderful and crafty day!
~Eva Scraps~

Friday, June 24, 2016

Awning Card with Sweet Cupcakes

This is an Awning Card SVG & is so Versatile!  The Cupcakes, cake stand and label are all from Cricut. I asked Cheryl from www.creativekuts.com to make this card file for me because I love the awning cards I see crafters posting to pinterest that they made with a word window punch. Wow Cheryl, you really knocked this out of the park!

The card base itself is from Kraft Card Stock  I used Cricut Create a critter for the outer 2 cupcakes. For the cherries I used some shiny shimmery holographic paper.  The pink with white hearts patterned paper is scraps from Lawn Fawn, Polka in the Meadow.  I used Cricut Cake Basics Cartridge for the center cupcake, the frosting layer which I ran through my Xyron and added some shimmer with pink glitter. That adorable label is also from Cricut Cake Basics Cartridge.  I used Cricut Sweet Treats Cartridge for the cake stand. Cuttlebug Swiss Dots for the embossing.  I used Happy Birthday Stamp from Craftin Desert Divas - Happy Celebrations stamp set ... looks like it was made to fit into that label from Cricut Cake Basics Cartridge!

For the inside I used some of the same papers to coordinate from the front.  I used my WRMK corner chomper to round the corners.  I stamped with a cute Cupcake stamp set that's been in my stash from a discount store (99 cent) for years... sorry I don't know the maker.

I will be entering into these fun challenges:
BBTB2 - Gemini "Twins" Challenge (2 Sm Cupcakes - Cricut Create a critter Cartridge)

Thanks for coming by to see what I am up to today in my craft room!
Happy crafting and wishes for a wonderful day!
~ Eva Scraps


Thursday, June 23, 2016

Tri-fold Flag Card

I am loving this angled cut for this fun card.  Another great Card file from Cheryl over at www.CreativeKuts.com  You can find this card file here. (Will get link added for you later today)


This card is very busy with lots of embellishing from many sources lol.  I started with Recollections dark blue card stock for the base of the card.  The panels are cut from a K&Company paper pad called Americana.  I also purchased a matching embellishment kit that day and that is where the Glitter stars, bunting, star border and the circle art die-cuts come from, however I backed the circles with holographic scallop circles, the smaller is cut from spellbinders Ironwork Accents die and the larger scallop circle is from HOTP Circles & Scallops.  The fun Firecrackers are from Cricut Stand & Salute Cartridge.  I used yellow iridescent dimensional paint for the flame with red glitter in the center.  The adorable Fireworks are also cut from the Cricut Stand & Salute Cartridge.  I cut those from the same blue and red holographic paper and layered them together.
 
for the back panel I used a light blue paper for printing out the computer generated sentiment, then cut it out as a panel.  all edges of all pieces are inked with walnut distress ink using my round blending tool.
 
I am entering into these fun challenges:
 
 
I hope you like my patriotic project today.  I hope to see you again soon.
Have a wonderful and Crafty Day!
~ Eva Scraps


Friday, June 17, 2016

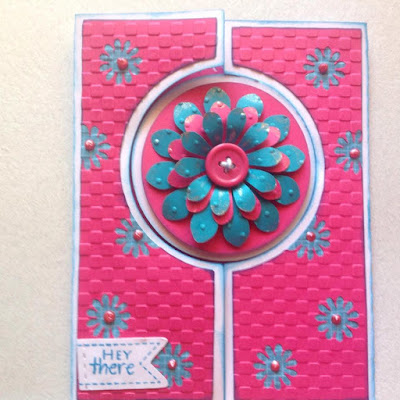
Flower Centerfold Card

Are you just loving all of these fun new card cuts I have been sharing this week?  I have had so much fun working with Cheryl's new card files from www.creativekuts.com

If you came by yesterday you got to see a completely different masculine take I did on this card.  Today I am trying to mostly just utilize the file itself... Which is a wonderful file just how it is!

Flower Centerfold Card @ CreativeKuts.com

This card can be super quick and easy or it can be jazzed up however you like.  I had fun with it by utilizing the flower cuts from the front and placing them on the inside scattered around.  On the inside I added blue beads in a bottle on each flower.  On the front I added a dot of pink puffy paint inside each flower.  On the center large flower stack, first I ran them all thru Swiss dots embossing folder.  I curled the edges of each petal.  I used wink of Stella to accent the tips of the all the petals and I added just a small stripe thru the middle of each petal on the top blue flower only.  I added some blue and white twine to a pink button for the flower center.  I also embossed front panels with CB simply Charmed squares.  The inside pattern papers are from Recollections - All Girl
The inside sentiment stamp Happy Birthday is from HOTP - Botanical Blooms
The small flag banner with stitching on the front is from Desert Craftin Divas as well as the Hey there stamp... Both are from Short & Sweet Tags

I am entering into these fun challenges:


Thank you so much for stopping by today to see what I have been up to in my fun creative craft room.  Hope to see you again soon.  Have a wonderful & Crafty day!
~Eva Scraps~

Thursday, June 16, 2016

Porthole Tri-Fold Father's Day Card

Yay! I finally got my Hubby's Father's Day Card made.  I used Cheryl's awesome new file - Centerfold Flower Card file from www.CreativeKuts.com and I left off the flowers and added a few other items to make it a masculine card.  I love being creative and making something beautiful into something else beautiful In a whole other direction 💜
If you stop by tomorrow you can see my centerfold flower card as the file was meant to be used with the flowers which you can buy Here - http://creativekuts.com/Center-Fold-Flower-Card-201639.htm
 
I created my own svg for the porthole by layering a silver circle on top of a smaller black circle, I added the 8 brads thru both of those layers... Then I added another black circle behind with foam squares in between each open Brad clasp to pop it up.  I then, as you can see only adhered it to the left side of the card.  The banner for the sentiment is a die cut from spellbinders that I used my ScanNCut to cut a shadow layer to back it... Love how that turned out!  I stamped the sentiment and only adhered the banner again to the left side of the card only.

Card file - Centerfold Flower Card - Creative Kuts
Black & Teal card stock - Recollections
Embossing - CB simply Charmed squares - inked folder first with walnut stain distress ink
Map pattern paper - Paper Wishes (inside)
Porthole silver cardstock - my stash
Teal brads - Recollections
Ship printable - crafters companion magazine CD (inside) Inked w/ mermaid lagoon & Old Paper distress ink
black scallop circle - HOTP circles & scallop circles dies (inside)
Banner - Spellbinders ribbon banners
Banner shadow - created with ScanNCut
Stamp - HOTP For The Guys stamp set
Inside sentiment created on computer (inside) inked w/ old paper distress ink

I will be entering into these fun challenges:
 
Thanks for stopping by, I always enjoy reading your comments.  Hope you have a wonderful and Crafty Day!
~Eva Scraps~


Tuesday, June 14, 2016

Father's Day 6 Pack Box Card

My Daughter requested I make a Father's Day Card for her to give to her Hubby.  I gave her some options and she chose this adorable Six Pack Box Card from SVG Cuts.  But then she asked if I could make it look like the kind he drinks.  Hmmm I really had to put my thinking cap on but I assured her I would get it done.  I am so happy with how it turned out.
For the back I die cut a tag so she will have a place to sign this fun card from her and the kiddos.
So I used the SVG Cuts Kit Sunday with Dad to create this Box Card, I love her files!!!
 
I googled her Hubby's beer brand so I could try to come close to making it look right but when I saw the cute bottle I decided to take that approach and cut them with my ScanNCut
 
So Cute!!!
I also used the logo from the beer box online to create the Label designs for six pack box.  I had to resize each to line it up in SCAL with Mary's adorable file.
I also reprinted the label for the XX and fussy cut so I could pop that up on foam tape along with the sentiment Banner to create more dimension.
 
Products Used:
SVG Cuts Kit Sunday with Dad Box Card File
Papers- Recollections
HOTP "For the Guys" Clear stamp set for the Happy Father's Day Sentiment Stamp
Cuttlebug Simply Charmed Squares for the dry embossing on Green Handle section
Metal Screw Brads from my stash
Tag on Back - Simon Says Stamp Stitch Dress Up tags
 
I will be entering into these fun challenges:
Jo's Scrap Shack - FFC #142 "Father's Day"
 
 
Thanks for stopping by, I always enjoy reading your comments.  Hope you have a wonderful and Crafty Day!
~Eva Scraps~


Nautical Square Sunrise Father's Day Card

 I am lucky enough to be a guest designer over at Die Cuttin Divas again, Yay!!!  Always such an honor, thank you Ladies.  What a fun and awesome Square Sunrise card file this is from Cheryl over at Creativekuts.com  I will be making more of these for sure!  I needed to make an awesome Father's Day card for my guest designer spot.  My ideas  to get started with this card were to use my new lawn fawn stamp set and Cheryl's cool card cut and A ship image from my CD collection. This is what I came up with:

Sunrise Square card file – CreativeKuts.com
Sunrise layer– Kraft card stock
Pattern papers – the paper studio, the classics
Dry embossing – simply  charmed, squares
Ship printed label– crafters companion inspiration CD issue 2, Spring edition Times Gone By
Scan N Cut 2 - to cut out the printed Ship Label
Blue brads – recollections
Die cut anchors – Cricut Splish splash Cartridge
Bakers twine – Blue & White sew easy twine
Happy Father's Day stamp – Law Fawn celebration scripty sayings
Stamped with – memento  tuxedo black ink
I kept the inside pretty simple by creating the sentiment on my computer and the layering it over some printable paper from the same CD ROM collection that I got the ship from for the front of the card.   I love how it has the look of a lightly Stamped background of all types of transportation and time.
For the inside of the card I used:
The sentiment – created on my computer
Printable paper – crafters companion inspiration CD issue 2, spring edition - Times Gone By
Card layer Die cut – Simon says stamp, Bundle of stitched shapes
Ships wheel die cut – Cricut Splish splash cartridge
Blue Brad – recollections
I made a matching envelope from some of the same paper with my WRMK 123 Punchboard.  I then placed a ships wheel die cut to use as an inking mask and then inked that area with my blending tool and walnut stain distress ink then removed the mask.

I will be entering into these fun challenges:
Simon Says Stamp - Fathers Day/For a Guy
Desert Craftin Divas Linky Party - Masculine
Fantabulous Cricut Challenge - Challenge #278-Celebrate Dad Cricut Splish Splash Cartridge
BBTB2 - Father's Day Masculine Challenge  Cricut Splish Splash Cartridge
DL.ART June Linky Challenge - Anything Goes
Jo's Scrap Shack - Fun~day Friday Challenge #142 - Father's Day
Die Cut Divas - Anything goes


Thanks as always for stopping by to see what I am up to in my fun new Pink Craft Room!
Have a wonderful and Crafty Day!
~Eva Scraps~

Thursday, June 9, 2016

Chickie Corner Sunrise Card

I had to use up my leftover Pieces from yesterdays Corner Sunrise card.  How fun!!!  I just love this card cut from CreativeKuts.com  You can buy the Corner Sunrise card Here  
This time I used my adorable Chickie stamp set from Craftin Desert Divas to embellish this Miss You Card.  Fussy cut Chickie by hand and colored the beak in with Spectrum Noir marker CR10.  I used spellbinders Fluer de Lis Doily Accents for the pink behind the chickie which is popped up on foam tape.  The white Scallop comes in the Corner Sunrise card file
for the embossing I used Suns & Flowers from Cuttlebug Create a critter set.  I sanded over the pink sections to show the white core.  Papers are all scraps from yesterdays project.  I also added 3 yellow gems from my stash.
For the inside I created the sentiment with my computer, printed out on yellow paper.  I used my Simon Says Stamp bundle of stitched shapes to cut it out and stamped the small chickie stamp in the corner.  Easy Peasy!!!

I am entering into these fun challenges:
Dies R Us - Challenge #50 Birds
HIMCR #253 - Summer Colors!
Jo's Scrap Shack - FFC #141 "Recycled Scraps"
Simon Say's Stamp - Challenge: Summer Garden

Thanks so much for stopping by, hope to see you again soon.
Have A Happy & Crafty Day!!! ~ Eva Scraps ~
 
Happy Crafting! ~ Eva Scraps~

Happy Corner Sunrise Birthday Day Card

I am totally loving these Sunrise cards from Cheryl over at CreativeKuts.com.  This one is the Corner Sunrise Card and can be found by clicking here.
I wanted to make this one fun and colorful and sunny.  The sunrise card base itself is fabulous to work with and so many possibilities!  She has a few different styles to choose from and they are all great!

Corner Sunrise Card - CreativeKuts.com
Dry Embossing - Cuttlebug Swiss Dots Folder
Sun Die Cut - Spellbinders Ironwork Accents
inking on sun - wild honey & cranberry Inks w blender tool
Face stamp - Peachy Keen Everyday Character
HB2U stamp - Craftin Desert Divas Short & Sweet Tags
stamped with Memento Tuxedo Black Ink
Flip Flops & Sunglasses die cut - Cricut Pack Your Bags
pink Flower gems added to flip flops from my stash
Papers are mostly a mix from my Scrap Bin

Here is a shot of just the awesome Corner Sunrise card itself after I embossed the solid orange pieces, so fun!  This card is already so cute you could use the included scallop piece to stamp a sentiment and call it good for a super quick and cute card.
 
For the inside I did some stamping from a few different sets onto an ivory layer I cut with my Simon says Stamp Bundled of stitched shapes die.
Wishing you a beautiful Day - HOTP Tags & Trims Stamp set w/ Memento tuxedo black ink
Happy Birthday - From my unknown stash w/ Picked Berry Distress ink 
Compass stamp - HOTP For The Guys w/ Wild Honey Distress Ink
 
and one more shot with an envelope I made on my WRMK 123 punchboard and again I stamped the Compass Stamp from HOTP For The Guys in w/ Wild Honey Distress Ink
 
I am entering into these fun challenges:
 

Thanks so much for stopping by today.  I have another style of Sunrise card to share with you on Tuesday.  It is done as a Father's Day card with a more masculine tone.  I hope you can come by to check that one out too. 
Happy Crafting ~ Eva Scraps