Hello Crafty Friends and Happy Valentine's Day to you all.
I am jumping ahead and working on a completely different special occasion card with my Card Swap Group today. Happy Father's Day
This card was fun and hard to make all at the same time, it seems I have to work extra hard at coming up with masculine cards, plus I have to search high and low for the right papers as most of my stuff is so girly I have found lol.
So the awesome, beautiful stop watch clock background is from svgcuts.com from a file called Alice's Cuddly Friends, White Rabbit has it :) that is a FREE file right now so hurry over there to get it for yourself :) I cut it from some metallic gold card stock and the embossed it with cuttlebug Textile folder. I then sponged it with StazOn black ink and love the engraved effect it gave :) the clock-face is from a printout that I then cut out with a circle die... then to make it even better I added a bling in the center to look like a diamond. very cool to be able to add bling to a masculine card without it looking just wrong :) The top two flag banners I cut and layered just using my paper trimmer and then cutting a V in the end with my scissors. The bottom one I cut in SCAL as two layers and added a shiny gold brad to match the stopwatch. The background of the card is embossed with cuttlebug clockworks folder which I inked with walnut stain distress ink directly on the folder before running through my Cuttlebug (it washes right off when you are done with running water).
Here is a view of all six of them for my swap group
Thanks so much for stopping by today. I hope you enjoyed my project. I would love for you to follow me for future projects, I always love making new crafty friends :)
Wow this is my 3rd post today... I am trying to catch up on sharing some of my makeovers with you all from the last few weeks :)
So here is a makeover on an old CD holder cabinet my Sister recently gave me
Now it will House my small clear stamp sets in cd cases
Here is the original view
Here is where it lives now in my craft room, I used Fabric that matches my bulletin Board located behind my desk, to cover the main portion using mod-podge to adhere it. on the drawer fronts I used some grey paper from the DCWV stack Black Currant which I adhered with my atg gun. I cut some bookplates for each drawer front and attached Brads to them and then adhered them to the front using my xyron for adhesive. I will be adding white lettering for the labels once I sort out all my stamp categories. I also cut some pretty flowers with my cuttlebug using a new die set I recently purchase called Jewel Flowers and Flourishes Shapeabilities from spellbinders. I again used my Xyron to add full adhesive and attach to the drawer fronts.
Here is one last photo showing where it sits under my cricut and beside my computer and it matches my fun flowery bulletin board.
Thanks for stopping by to look at another Crafty Makeover... I hope you enjoyed my project and have a fun and crafty day :)
Here was what I started with, but after covering the big pink lemonade can with my gorgeous pink and black fabric that matches lots of stuff in my Craft
Room, I realized it was going to be much too hard to pierce the lower set of holes through fabric than it would be to use scrapbook paper so I changed to a regular lemonade can which is a bit shorter than the pink lemonade can, but it still worked out perfect.
here it is finished before I added my tools. I went with a paper stack from DCWV called Black Currant... I love love love this paper!!! I used my Crop-adile to punch holes in each of the tin cans... I used 4 progressive soup cans for the top row and 4 sliced peaches cans for the bottom row. I just marked the holes on the lemonade can and pierced through with a piercing tool, then put a bolt though the cans and added a nut inside the lemonade can, if you look closely at this pic you can see some of them.
Here it is on my desk and my big ole ATG gun fits under it perfectly, YES! ... eventually I want to find a lazy Suzanne to go under it so it can spin .
Here is a better lit photo of it finished and filled. Thanks for stopping by, Hope you have a crafty day :)
Wow I haven't been on here in FOREVER!!! whew now that things are more organized around here maybe I can get back in the swing of things :).
So I wanted to share with all of you what I have been working so hard on lately My craft room reorganization Makeover is finally complete I still have some stuff to organize and put away in the dining room (that was my overflow area) but I am getting there yay.
I love my crafty space now... For those of you that know me, know how the rest of my whole big huge house can be spotless and my craft room is always a complete disaster.. lol not just crafty mess though it was just too cluttered with stuff that didn't belong in here.
So without further adooooo, tadaaaaaaaa here it is,
My new Cabinet make over on the left and my entertainment center full of crafty goodness
My Desk, Computer and 2 of my cutting Machines
My work desk where I do most of my creating when not on the computer
My Paper Hoarding Stash and another work station, this is also where I set out My Cricut Expression 2 when I use it and hook it to my laptop for the Cricut Craft Room
along with my new refurbished craft cabinet that is now black and pink and way way cute instead of the crappy brown it was when I bought it on Saturday.
Inside organization that houses lots of stuff but mostly my dies and then binders filled with my embossing folders
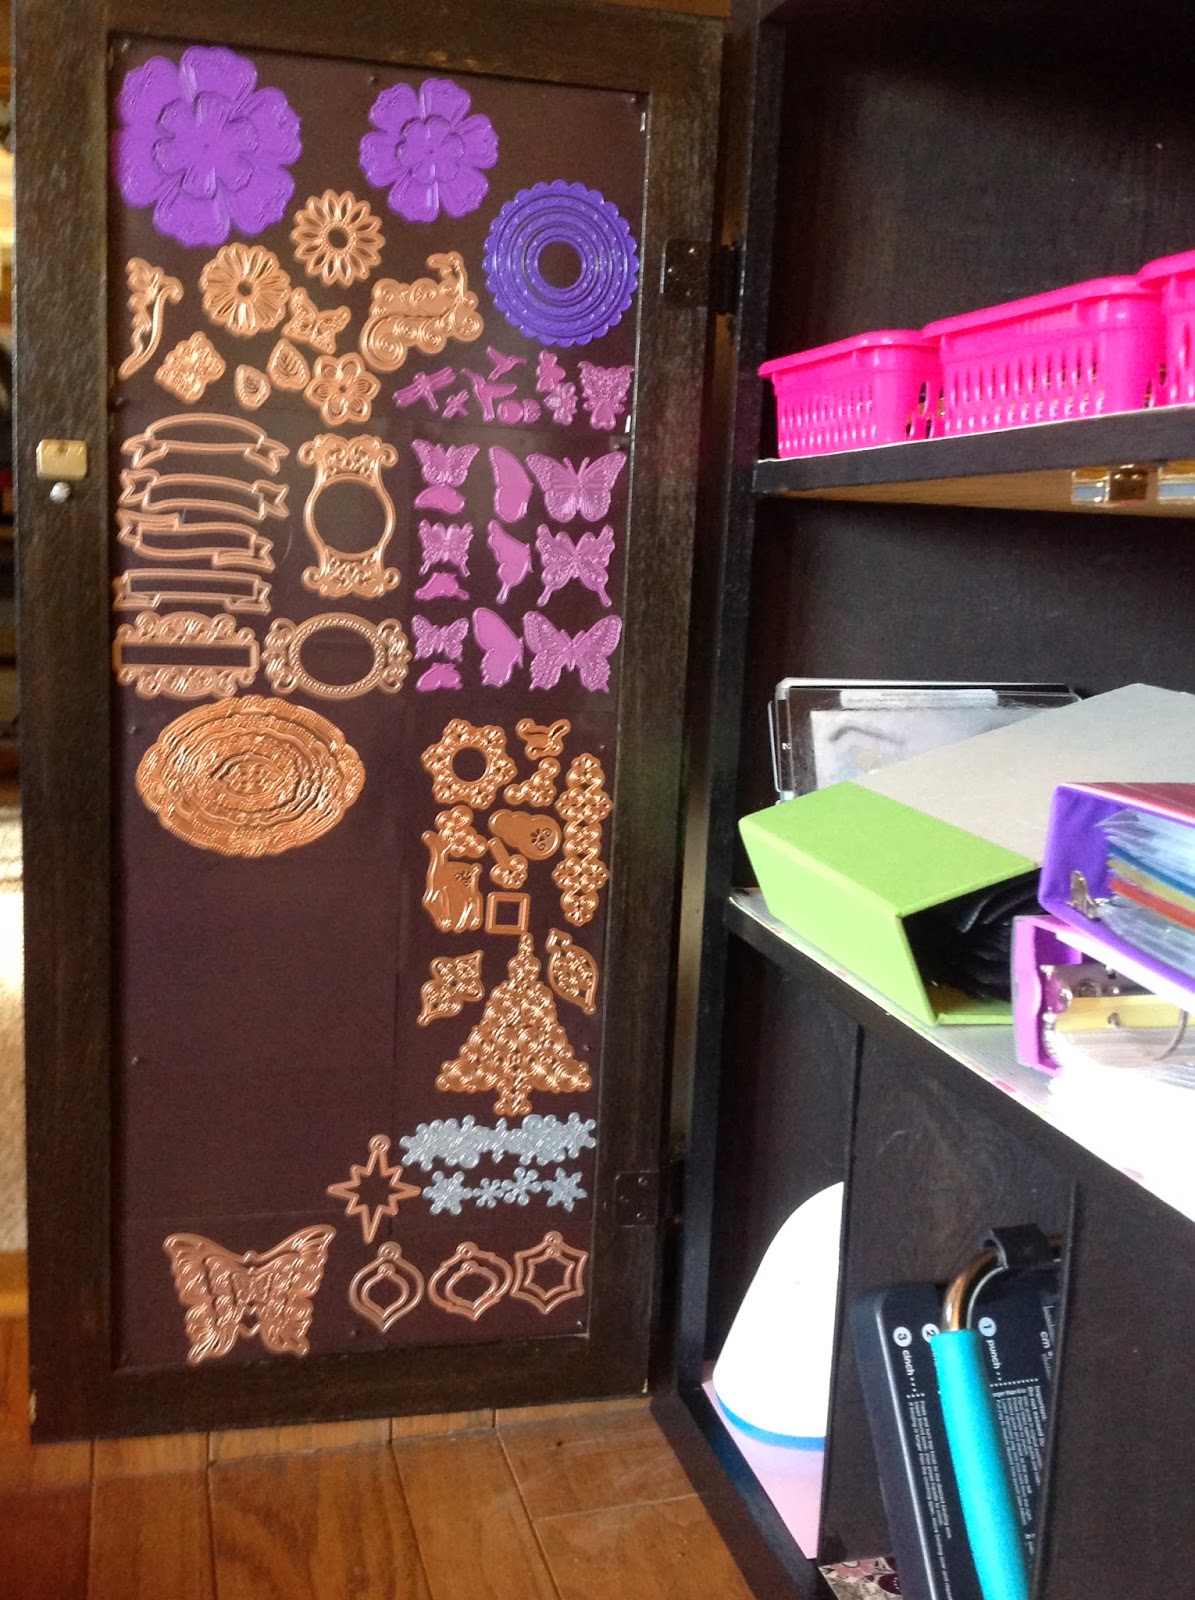
Here is a close-up of the inside door, I covered them both with magnetic sheets to hold all of my thin metal cutting dies for my Bigshot/Cuttlebug... This is so much easier than anything I have ever thought of before!!! LOVE!!! here is what I used, and they are rather inexpensive at Lowes
Ok so no idea how long I can keep it this way all clean and organized and "Purty" but today it is and I have pix to prove it... bawhahaha!!! I am so very happy with my new functional crafty space!!! Now time to make something and mess it up a little :D Thanks for stopping by and have a wonderful Crafty Day!!!
Today I want to share my Snowman Candy Bar Wraps. I saw these all over pinterest, most of them with a template to print out which is no longer available. So with the help of my favorite face stamps from Peachy Keen, I decided to make my own. They are so fun and I love the way they turned out.
I used PK-521 Winter Faces, some white cardstock, some other stamps for the snowflake buttons and the heart. I colored in with markers and chalk. I used some leftover pieces of flannel for the hats & scarf. a pretty jingle bell from my stash and I cut 2 of the smallest snowflakes from my new snowflake and border die set from my craft spot out of glitter foam to add the the brim of the cap.
The candy underneath on these are Hershey's Cookies & Cream. I will be making more of these for the craft fair in original flavor and more of this flavor too. I used a rectangle die cut on cricut for wrapper and the snowflakes on the caps.
Thanks for stopping by to look at my project, Please don't forget to leave me a comment, I just love reading what you all think of my work :) Have a Fabulous Day!!!
I love to make these little snowmen, they make such a cute Christmas decoration. I decorate with purple for Christmas even the lights on my tree :)
The main base is a flowerpot painted and turned upside down. Topped with a small glass bowl which I frosted the glass. Then I used the flower pot plate to go on top of the bowl as a lid and covered it with a flannel material and stuffed a plastic bag to pooch it up then tied it up and cut up a Pom Pom top. Then I added a pretty glittery snowflake ribbon to top her hat off. The face is cut from vinyl for the eyes and mouth. I didn't have orange vinyl so I just cut it out of card stock and just curved it with my pen until the stiffness wore out of it a little so it would adhere better to the bowl. The cuts are from a Creative Kuts filesnowman slider card. The beautiful snowflake border and all of the little snowflakes you see adhered everywhere are a new set of metal die cuts I just won from My Craft Spot on a blog hop I attended. I was so so very happy to be the lucky winner of these. Oh all accept for the snowflake on top of the hat the I stamped with an adorable Peachy Keen snowman face (love), this one was from SCAL2 library. Then I cut a bunch of the die cut snowflakes using purple glitter foam to add more dimension and sparkle and adhered them over the white ones and even added some tiny ones around on her cap.
Here she is with her little light on and her hat off
And one more all back together with her light on :)
Thanks for stopping by to look at my project, don't forget to leave me a comment please, I love reading what you all think of my work :) Have a Super Day!!!
Good Morning my Crafty friends. Over the last couple of days I have been working on some owl projects for my upcoming craft fair. All of these projects are made with NAPKINS. This morning I finished the owl card made up of scraps mostly from this mess on my desk from all of my Fall projects this week.
Here is the set:
First let me show you my owl candles, I love the way the turned out.
The candles are the battery operated ones, Mmmm they smell like vanilla. The Owls are from napkins that I cut down and peeled them down to 1 ply. I used my heating tool to slightly melt the wax and adhere the napkin piece to it.
I will try to do a tutorial for you on this technique sometime today (done now & posted below).
Here is my matching card, I used a piece of one of the napkins that was left over for my focal point. But Card base itself is my own design that I created an SVG file for. The pattern layer is from my scraps, the ribbon is also from my scraps. The yellow scalloped frame was left over from another card I made this week, it was cut from foam using a metal die. The stamped banner I cut by hand from scraps and then stamped with the sentiment give thanks and popped up on foam dots.
The inside of the Card I used both of the pattern papers from the front and stamped with a coordinating stamp from that same set.
Here is my desk filled with a scrappy mess before I started my card.
I am entering this card into these fun challenges:
This next project is a weekly planner, I made a new cover for it out of one of the napkin pieces. I used a technique where you take the layer of napkin and some Saran wrap and using an iron you adhere it together. I watched a video on U-Tube to learn that trick. I used some bling for the eyes and stamped the year and sentiment.
On the inside of the planner I once again stamped the sentiment, this time in orange and I also stamped a cute little Owl and colored him in with my colored pencils. I also added a ribbon to match inside for a bookmark.
Thanks for stopping by to look at my projects! Don't forget to leave me a comment please, I love reading what you all think of my work :) I hope you have a Wonderful and Crafty Day!!!
Thanks for stopping by to look at my project, don't forget to leave me a comment please, I love reading what you all think of my work :) Have a Super Day!!!
Hello my crafty friends, sorry I didn't get another card posted yesterday as planned. My internet was in and out and driving me crazy. Today I wanted to share this fall card with you.
This one was too easy and fun to make with the cute scarecrow coming from my sticker stash. I just love him on the bright yellow foam circle backed with an orange scallop circle cut with a metal die on my big shot. I used my cuttlebug Traffic Jam folder on the green border behind then inked with my walnut stain distress ink. the background paper is from DCWV. the banner is handmade and stamped with fall stamps from my stash. I also added a ribbon of raffia and strips of orange rice paper hand torn and a yellow button to top it of with raffia tied thru the button holes.
Thanks for stopping by to look at my project, don't forget to leave me a comment please, I love reading what you all think of my work :) Have a Super Day!!!