Wednesday, March 7, 2018

Green Monochromatic shamrock card

I had fun with this simple little card using my Cricut, stamps, dies and a sketch from Your next stamp.

I gathered many different green scraps of pattern papers and shades of solid card stock to keep with a monochrome theme for this one.

Shamrock blocks & shamrock inside - Cricut Designers Calendar
Face stamps Peachy Keen - everyday characters & Simple Sallies
I used green sparkle chalk to the cheeks & white ink dots inside eyes
Bow stamp sunny studios - Bundled Up (penguin)
(I added a green dew drop to the center of the bow
after adding glossy accents to entire bow)
Simon says stamp bundle of stitched shapes for large stitched rectangle (inside too)
Stitched flag banners for sentiment (Cut down)
Happy St. Patrick's Day stamp - Craftin Desert Divas
Stitched flower stack die
Have a lovely day stamp - Crafters Companion Hexagon stamp set

I am entering into these fun challenges:
Fantabulous Cricut - Challenge #321-St. Patricks Day/Green
CARDZ TV ANYTHING GOES CHALLENGE #37
Jo's Scrap Shack - FFC #223
YNS Sketch and Color Challenge #84 - Sketch
HIMCR #342 - Monochromatic Greens!
Die Cut Divas - Monochrome
BBTB2 - Show Us Your Shamrocks

Thanks so much for stopping by my blog.

Tuesday, March 6, 2018

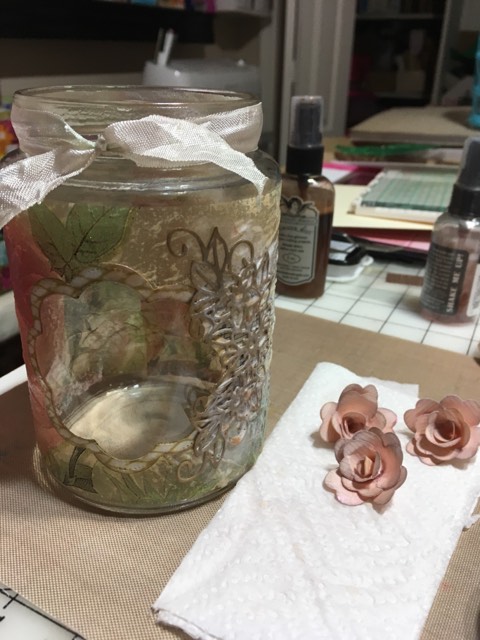
Decoupaged Candle Jar w/ Handmade Roses

So I love to up cycle things around the house, amazing how pretty a pickle jar can become. 
I made  this for someone very special in my life, my kids grandma.    The little photo faces I added in the center of each bottle cap are of my daughters children, which are four of her great grandchildren.

I was able to go on a road trip over the weekend and deliver it to her personally and I am so happy that she loved it.
To start off with I cut down a pretty napkin to the size I wanted to fit around the jar.  I then ran it through my big shot with a pierced flower die to cut out the center of the napkin.  After I separated the 2ply and removed the second plain white ply I wanted to add a frame in the center.   I then used the same die and the next larger one up and cut the frame out of scrapbook paper.   I adhered the frame to the napkin cut out with wet adhesive glue before I began to Decoupage  the entire thing onto the jar with mod podge.   After I let it dry overnight I then used another die, Sue Wilson - Star Flower Cluster  for the pretty flower spray.  I cut in a tan color and decoupaged that on as well after spraying with glimmer mist.
I then used a different flower die to create the 3D roses implementing the Tim holtz tattered flower roses technique.  I sprayed those with perfect pearls.   Here is a link to a card I made using this same technique on a previous card.
https://evasscrapsncards.blogspot.com/2017/09/3d-roses-birthday-card.html
I then added some crinkle ribbon around the top of the jar and added a bow to the front that I wrapped a little tiny premade rose in cream color around the center.   On either side of the jar I added some more crinkle ribbon hanging down that I hot glued underneath the ribbon that ran around the rim of the jar.   From each of the 4 ends I hung a flower that I created from a bodacious blooms flower die (HOTP)that I cut from a light pink card stock, with a pierced flower diecut stacked on top of that in a smaller size matching the frame from the front and then a designer metal bottle cap with a photo of each one of her great grand children that I topped of with a 1" epoxy dot.  I placed a candle inside the jar and voila.......
What a beautiful treasured keepsake came from an old pickle jar!

I will be adding to these fun challenges:
Simon Says Wednesday - Anything Goes
DL.ART Thankful Thursday - Anything Goes
CARDZ TV ANYTHING GOES CHALLENGE #37
Jo's Scrap Shack - FFC #223
Cut It Up Challenge 142 - ANYTHING GOES!
Dies R Us Challenge #92 - Use Pastel Colors


Thanks so much for stopping by and taking the time to leave a lovely comment.


Friday, March 2, 2018

Happy Easter Chick Card

Another fun design from Cheryl over at www.creativekuts.com This is going on her March card Train she hosts over on FB.


The fun pattern papers I used are actually from a Valentines Day Paper pad, Recollections I believe.  Happy-Easter-Lace-Card is the name of this cutie.  I added my center chick mat as a flap so I can lift and sign the card underneath.  The embossing on the purple is a pack I picked up already embossed.  I used a Peachy Keen stamp for the chickadee face, I tucked some real yellow feathers bow and top notch.  I also added an enamel dot on the bow.
For the belly band I used a stamp from Cardz TV - Farmyard Funnies  stamping Chick this out! on the label.  I also added a flower I die cut from Hot Off The Press called Bodacious Blooms, Love that set!  I added a white sparkle enamel dot to the center to add that perfect touch.  I decided to decorate an envelope to match and used some of the same papers and another bodacious bloom flower, this time I cut just a circle to lay flat for mailing to go in the center of the flower but added some clear wink of Stella to make it sparkle.

I am entering into these fun challenges:
CARDZ TV ANYTHING GOES CHALLENGE #36
Simon Says Wednesday Anything Goes
DL.ART MARCH 2018 LINKY CHALLENGE
HIMCR #341 - Any Holiday!
Dies R Us - Challenge #92 - Use Pastel Colors 
Jo's Scrap Shack - FFC #223
Mod Squad - BUNNY or Chickadee

Thanks for stopping by, Crafty Hugs! ~ Eva

Thursday, March 1, 2018

Candle cut-out Christmas card

Another fun Christmas card following along with the fun 12 months of Christmas Cards Train over at  Creativekuts posts on FB.  This file will be available in March @ www.Creativekuts.com
I ran the red and green layers through the 3 dots embossing folder (its from Sizzix Birthday #2 Emboss Folder Set) before attaching to the card base & lining up to the opening cut-out in the card.  All three candle cuts are pattern papers from my Christmas scraps stash.  I used a gold marker to color in the flames and then I went over them with clear wink of Stella to add to the sparkle.  The Merry Christmas stamp is from HOTP Christmas Fancy Patterns Stamp Set.  I added some red gems for the berries.
On the inside I simply stamped in green ink, "sending you tidings of comfort and Joy" from HOTP Fancy Christmas Greetings Stamp Set.  The candle shows through from the cut-out on the front to really make this card unique.


I am entering into these fun challenges:
CARDZ TV ANYTHING GOES CHALLENGE #36
Simon Says Wednesday Anything Goes
DL.ART Thankful Thursday Challenge #223 "ANYTHING GOES"
HIMCR #341 - Any Holiday!

Thanks for stopping by, hope to have you here again soon.

Friday, February 23, 2018

With Sympathy Bird Frame Card

For today's card I am sharing a Sympathy card based on a sketch over at YNS blog.
Sympathy cards are always tough for me so it really helps to start with a sketch.
I grunged up the edges with walnut distress ink to soften the bright cheerful colors and tone them down for the look I was going for.   The background pattern paper was just a scrap left over in my stash as are the two different blues that I used on the frame.   Both shades of purple card stock are from bazzil.   I used my corner rounder to soften the look and go nicely with the frame and border.

The bird frame - Cricut Cindy Loo cartridge
Border - Cricut Essentials cartridge
Words With Sympathy -  Cricut Wild Card Cartridge
For the inside I used my Simon says stamp large stitched rectangle die to cut the light purple Mat and then I used the corner Chomper on both right corners.  I cut two of the frame mats for my sentiment which I stamped with a cardmakers kit Sympathy stamp  and inked the edges with walnut stain distress ink.  I used a swirly flower diecut from my unbranded dies, cut from the dark purple as an embellishment for the sentiment.

I am entering into these fun challenges:
Fantabulous Cricut Challenge #320-Sympathy
YNS Sketch and Color Challenge #83
Simon Says Monday: Grunge It Up
CARDZ TV ANYTHING GOES CHALLENGE #36
Jo's Scrap Shack - FFC #222
DL.ART Thankful Thursday Challenge #223 "ANYTHING GOES"

Thanks so much for stopping by I hope you have time to leave a comment ...I love to read them.

Thursday, February 22, 2018

Birthdays are Good for You

I want to start building up my birthday card stash so I thought I would use a sketch for inspiration.  I found Tuesday morning sketches recently and thought their sketch challenge would be perfect  for this card.
I used a printed birthday circle and ribbon strip (bottom) from HOTP and matched up the light purple pattern paper for the background using one of their amethyst scrapbook paper pads.  I also used some of my cardstock scraps in coordinating colors.  
Spellbinders Card Creator Die set - Leaves a Fallin
(only outer layer from die set for card front, I didn't use the leaves inner layer)
Simon Says Stamp dies - Bundle of Stitched Shapes (Stitched Amethyst Layer)
HOTP - 8 Circles & Scallops (1 die, second to largest Scallop used)
Sue Wilson - Star Flower Cluster
Stitched Flag Banner Stack (1 die used and cut down for top ribbon layer)
I used some of the same elements from the front for the inside along with another of the printed sentiments blocks.  I am very pleased with how it turned out for a simple and casual Birthday card.


I will be entering into these fun challenges:
Tuesday Morning Sketches #441
CARDZ TV ANYTHING GOES CHALLENGE #35
Always Happy Birthday - CAS Birthday (Clean and Simple)
Scrapy Land {Challenge #84}  (Spellbinders & Sue Wilson Die used)
 DL.ART February Linky Challenge - Anything Goes

Thanks so much for stopping by :)

Happy Easter Layered card

This was such an easy fun Easter card to make.  So the hardest part was choosing my papers 😂  Once I found the background pattern paper I wanted, the rest was easy just picking solid colors to compliment it.
This absolutely awesome SVG card file is from www.creativekuts.com
I used my Darice Basket weave embossing folder.  I brushed over the fancy pink egg cut with wink of Stella.... ugh I sure wish I could get a photo showing it but no luck!  I added a cute pink flower gem from my stash to the egg and voila!
For the inside I used my Simon say stamp stitched rectangle die (bundle of stitched shapes) to cut the pretty matching pattern paper.  I used an unbranded set of pierced flower dies to cut the sentiment mats in coordinating papers.  I stamped have a lovely day with a Crafters Companion hexagon stamp set.  I stamped with green ink then heat embossed clear.  I also stamped an unbranded chick stamp down in the corner.


Thanks so much for stopping by my blog, hope to read your lovely comments.

I am entering into these fun challenges:
CARDZ TV ANYTHING GOES CHALLENGE #35
FFC #221 Always Anything Goes


Wednesday, February 21, 2018

Rainbow of Sunshine Shamrock card

I am on a mission to get things better organized in my craft room and start using some of my stored card kits that have been in hiding for years!   This cards elements are from one of those kits that's been in hiding ..... that I added my own twist with the help of some of my dies.
Isn't that pattern paper awesome? It is so colorful and bright, like a rainbow of sunshine gleaming LOL!!!  So the pattern paper papers, the sentiments and the shamrock are all from a paper wishes cardmaker kit (JAN 2013).   I didn't use the suggested sample card I just used some of the elements and went with my own card design.  

I used a white card base  with a solid golden yellow paper Layer over the top for the front.   I used my Simon says stamp - bundle of stitched shapes for the large stitched rectangle die to cut out the awesome colorful pattern paper layer.   I wanted to use the Shamrock right in the center of the color burst but it needed something more, so I used my unbranded pierced flower die to cut a mat for the shamrock out of green card stock.   I used my dandelion spectrum noir marker to go around the already golden yellow edge of the Shamrock just to give it a more finished look.  I then used an unbranded button die set for the button which I cut twice  I ran some green and white bakers twine through the center and went around the edges with same marker.  I then popped the button up in the center of the Shamrock with foam tape.   I wanted to use one of the pre-printed sentiment blocks so I backed that using a stitched flag die ... cutting it in some of the coordinating green gingham pattern paper from the kit.   I trimmed it down to fit where I wanted and placed the sentiment block onto the center and placed a green glitter enamel dot to the left of it. What a simple but striking card I think.
For the inside of the card I cut a large stitched rectangle mat in a light green card stock from the same Simon says stamp set that I used for the front of the card.  This time I also used the small stitched flag die from that same set to cut the small stitched flags out of coordinating pattern paper to tuck under the edge of the pre-printed sentiment block from the kit staggering them in length.

I am entering into these fun Challenges:
CARDZ TV ANYTHING GOES CHALLENGE #35
FFC #221 Always Anything Goes
HIMCR #340 - Buttons or Bows!

Thanks so much for taking the time to stop by my blog.  I love to read your lovely comments, I hope you have time to leave one for me.

Saturday, February 17, 2018

Beachy Tag Card & Tags

I decided to make some fun beachy themed tags with my scraps and dies.  I loved how they turned out so much I decided to use one of them to make a Birthday card.
I used Kraft  card stock to create the portrait style base.  I cut a blue layer with the large stitched rectangle from Simon Says Stamp dies, Bundle of Stitched Shapes.
I ran it through my Darice Nautical Anchor Background Emboss Folder and then lightly inked with walnut stain distress ink.  The next layer is a scallop stitched frame (Mama Elephant - Madison Ave)  I cut twice one in dots and the other in Kraft card stock. I then added the small stitched tag at the top for a sentiment, again using Simon Says Stamp dies, Bundle of Stitched Shapes.  I stamped Happy Birthday from HOTP Celebration Cardmakers Tool Kit Stamp Set and heat embossed with fine white embossing powder.  I then added one of the Beachy tags I created yesterday.
For the tags I gathered together some fun beachy looking scraps of paper that complimented each other and began cutting the different layers.  I used Simon Says Stamp dies - Stitched Dress Up Tags, using only the large die shape and none of the extras in this set.   I cut each one out of pattern paper and then 3 out of Kraft card stock to back each one.  Next I again used Simon Says Stamp dies, Bundle of Stitched Shapes for the flag layer.  I used the small double layer tag from Mama Elephant - Madison Ave.  I added two layers of twine through the hole.  I popped the small tags up with foam squares.  I cut out several beach die cuts from an unbranded nautical die set.
I used tiny blue brads to attach the brown die cuts.  I added a ribbon through the top of each large tag and tied on a button with the same bakers twine for the main tags.
For the inside I used the same Simon Says Stamp dies, Bundle of Stitched Shapes to cut the white layer that I stamped from HOTP Birthday Cheer stamp set and heat embossed clear over blue ink.  I added another die cut ( lighthouse) from the same nautical set used on the tags.

I am entering into these fun challenges:
CARDZ TV ANYTHING GOES CHALLENGE #34
Wednesday Simon Says: Add a Die Cut
FFC #221 Always Anything Goes
Dies R Us -
Challenge #91 - TAG You're It!

HIMCR #340 - Buttons or Bows!
 
Thanks for stopping by, I hope to be back with another project soon.

Thursday, February 15, 2018

X's & O's Card

Well I have finished up my Valentine's Day Cards but I just had to do this last one.  Then I decided to save it for my Anniversary card to Hubby this year because I loved it so much.
For the Front of the card I used a couple of different die sets.  The Beautiful Floral Lace Heart die - Couture Creations that I backed with a fussy cut black Heart layer.  I added a few red sparkle sequins with a black pearl dot in the center of each right in the center of a few flowers in the die cut.  2 stitched rectangle  die layers for the sentiment.  Love stamp is from my $ store stash, I stamped in red then clear embossed over it.  All Card stock is from Recollections, including the pattern paper which is from the Valentines Day stack.
 
Wow on the inside right?
The card cut itself is from www.creativekuts.com called XO card which I love!!!
I used an unbranded Stitched circle scalloped frame die for the inset cut on the left side.
backed with pink that I stamped the sentiment and hearts onto, then heat embossed clear over them.  These stamps are again from my $ store stash.  On the right side of the card I used an unbranded Stitched Circle die in pink and backed that with a black scallop from Paper Artist Die - 8 Circles & Scallops Die set, giving myself a place to hand write and sign the card.
 
I am entering into these fun challenges:
CARDZ TV ANYTHING GOES CHALLENGE #34
Wednesday Simon Says: Add a Die Cut
Scrapy Land {Challenge #83} (Couture Creations)
Die Cut Diva's - Love is in the Air
DL.ART Thankful Thursday Challenge #222 "Pink or Red"
Jo's Scrap Shack - Anything Goes #220
 
Thanks for stopping by, I hope to be back with another project soon.