Pages

Friday, December 9, 2016

Snowman Bendi card

Hello there crafty friends it's been a long while since I've posted here.  Today I wanted to share with you the first of several Bindi cards I've been working on thanks to some awesome new files created by my good friend Cheryl over at Creative Kuts.
She has an awesome deal for all of the Bendi card templates this weekend only!!! ....So if you are interested in these cards you don't want to miss this deal!   You can hop over to her Facebook group to check out the deal on the link below.
                                                     Creativekuts-on FB

What a super fun card to create and it displays beautifully!   Plus I love the fact that the tabs can be taken out of the Slots and placed in an envelope flat for mailing.
Envelope made with the WRMK Envelope punch board

I used the house-cut Bendi card template svg for my base - Creative Kuts
Base Card Stock is recollections and paper wishes for the DP card layers
The snow layers at the bottom - Craftin Desert Divas Outdoor Landscape Dies
(Ran snow layers thru Xyron and added extra fine white glitter from Walmart)
Diecuts Snowflakes - My Craft Spot
Stamping and embossed snowflakes - Carta Bella All Bundled Up Stamp Set
Snowman is included in Bindi card file set from Creative Kuts
Face stamp - Peachy Keen - PK-144 Smitten Mittens
Embossing on scarf and hat band - Cuttlebug simply charmed set
DP on heart - Lawn Fawn - Lets Polka in the meadow stack
Added chalk on cheeks
Assorted sized purple rhinestones for buttons and snowflakes

I am entering into these fun challenges:
CARDZ TV ANYTHING GOES DESIGNERS CHALLENGE #6
Simon Says Stamp Wednesday - Ice Inspiration
DL.ART Thankful Thursday Challenge #194 "Any winter Holiday"
PDE Linky Party - Ch# 150 All Cards
Little Scrap Pieces - Show it off Saturday Linky Party
Die Cut Diva's - Layers or Layer It
Connie can Crop Monthly Challenge #53 Baby It's Cold Outside
 
Thanks for stopping by to take a look at what I'm creating in my craft room today!   Come back tomorrow to see another fun Bendi card with the special twist, I know you will love it!

Crafty hugs, Eva Scraps

Wednesday, October 12, 2016

Spooky pumpkin Halloween card

hello,  today I went with another sketch from Mary at cardz TV.   I decided to keep it fairly simple today and used up some of my scraps.
The awesome crow/bat frame and the spooky pumpkin are both from Cricut Happy Hauntings cartridge. I popped the pumpkin up on foam tape and added some purple gems to the frame.  The boo stamp is an old one from my stash of scrapbooking sentiment stamps and from OTC.   I used my stitched label for my stamping but I used the long straight stitched die (Simon says stamp – bundle of stitched shapes) to cut the end of the tag off so it still has stitching all the way around.

I am entering into these fun challenges:
CARDZ TV SKETCH DESIGNERS CHALLENGE #2 ~ FALL - Used Sketch #4
Fantabulous Cricut Challenge #287-Pumpkins - Cricut Happy Hauntings cartridge
Scrapy Land {Challenge #51} - Simon says stamp – bundle of stitched shapes dies
Jo's Scrap Shack - FFC #159 "Anything Goes"
HIMCR #270 - Super Scraps Saturday!

Thanks for stopping by to see what I'm up to in my craft room.   I hope you have a wonderful and crafty day!  Eva Scraps

Monday, October 10, 2016

Gingerbread pop-up card

I had so much fun working with Cheryl's files over at CreativeKuts.com again last week.  I think this one was my favorite of this card collaboration.   It was definitely a lot of detail work and took quite a bit of time to make but I am quite happy with the outcome.

 For the front you just have this adorable gingerbread girl .... Love her!  I have of course leaned towards the non traditional colors as I normally do.  I had to dress her up in pink and give her light pink frosting hair!  Right? Lol. The face stamp is from Peachy Keen.   I used my white gel pen on her eyes some pink puffy paint for her nose and pink chalk for her cheeks.   The embossing on her dress is from the Cuttlebug simply charmed folder set.  The background paper is from the paper crate - snow days stack. The Merry Christmas stamp is from whimsical Christmas... I colored in with a pink spectrum Noir marker.    The teeny tiny gingerbread men were buttons from my stash that I removed the back hole or loop with my wire cutters. I went over sentiment stamp and pink frosting hair and foot  frosting squiggles with my wink of Stella clear glitter pen.   I wish you could see all the sparkle and shimmer... maybe I need to take a better close-up picture for you.

Isn't the inside pop-up just too darn cute?   I again used my Cuttlebug simply charmed embossing folder for the house and the little door mat.  Instead of doing the white snow dripping off of the roof chimney and hedges I decided to make it dripping pink frosting to stay with the theme from the front of my card.   I did add some clear dimensional paint over the pink frosting and added a clear fine glitter to it.   I also added that to the pink and purple brick walkway. The brown squares paper on each end is from the same paper pack as the front .... but the glitter polkadot pink and white paper is a scrap from my stash.   I used my Martha Stewart punch for the pink Loopy border along with my Victorian cut from my paper trimmer to add the cute pink borders on my card inside.   I then stamped a cute gingerbread man several times (6) on Brown paper which I cut out with my SNC2.  I used my white gel pen for his frosting and the dots on his tie. A pink gel pen for the little hearts on his mouth.  I used alternating colors of pink puffy paint for the buttons.   In between the gingers I added some more rhinestone bling from my stash.  Oh and a small pink rhinestone for the door knob. And one last addition I added a cute heart shaped wreath on the door that I stamped from a cute vintage stamp set in my stash which I colored in with my spectrum noir pens.

I am entering into these fun challenges:
CARDZ TV ANYTHING GOES DESIGNERS CHALLENGE #1
Show it off Saturday Linky Party
Challenge #106 - Pink or Breast Cancer Awareness
FFC #159 "Anything Goes"


Thanks for stopping by to see what I am up to in my Craft room
Happy Crafty Day!  Eva Scraps

Thursday, October 6, 2016

Snowman - Baubles pop-up card

Hello crafty friends.   Yesterday I was playing around with a new inside pop-up design from Cheryl at CreativeKuts.com   So I thought I would add some of my diecuts and do the front based on the sketch over at Die Cuttin Diva's This week.   I turned mine to the side so it would fit with my inside pop up.

Items I used:
Solid and striped papers are all from recollections
Pattern papers from my stash
Stitched Flag banners – Simon says stamp  - bundle of stitched shapes
Snowman diecut – spellbinders frosty forms
Shadow for snowman – done with scanNcut 2
Pink Chalk for cheeks & Strawberry Iridescent Polymark paint for swirl
Face Stamp - Peachy Keen Basic Paper Doll
Scalloped circle diecut – hot off the press
Embossing – cuttlebug snowflakes embossing folder
Let it snow snow snow! stamp – my craft spot tiny tags Christmas
Stamped sentiment – versamark and ranger super fine  detail white embossing powder
Rhinestone bling from my stash

Inside card:
Adorable pop-up design – creative Kuts
Fancy baubles – spellbinders 2010 Heirloom ornaments
Shadow for bobbles – scanNcut 2
Strips of pattern paper – Victorian cut on my paper trimmer
Sentiments stamp – Inkadinkado penguin pandemonium
Memento tuxedo black ink

I am entering into these fun challenges:
Die Cuttin Diva's - Challenge #286 ~ October Sketch
CARDZ TV ANYTHING GOES DESIGNERS CHALLENGE #1


Thanks so much for stopping by today I hope you enjoyed my project.    I hope to see you again real soon.  

Happy Crafting! Eva Scraps


Saturday, October 1, 2016

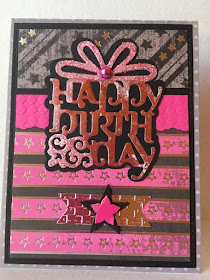
Pink Grunge Foiled Birthday

Todays card is based on Mary's Sketch #3 over at Cardz TV.  Today I was playing around with a new technique by foiling die-cuts with the Essential Glue Pad and using no heat and with no foiling machine.  I tried this on a designer paper that I realized it was too hard to make out the words with the sporadic prints all over it so I decided it would be better if I covered with foil so I could still use it as I hate to waste paper or cardstock lol. 
So I am not sure if the glossy finish on this pattern paper is what caused the foil not to stick everywhere but I am assuming so.  I thought it still looked cool in a sort of a grunge way so I thought I would try to make a card it would suit.  Here is what I came up with...
It is hard to tell in the photo but the foil is a rose gold and the places it didn't stick to are mostly the hot pink shining through so I kind of like it for this card.  I used a pencil to trace around the metal Happy Birthday Gift die so I could cut a shadow layer in black on my SNC2, came out perfect!  Down at the bottom of the card I didn't need a sentiment Banner since my Die-cut says it all, so I created a cool banner type embellishment with some of my dies.  I added foam tape under the top star and then placed a dew drop on top.  I also placed a dew drop on the center of the bow on the gift. 
Products I used:
Solid Card Stocks - Recollections
Pink Foil Star Stripe - DCWV, Glam Rock
Black & Grey Foil Star Stripe - Pressed Petals, Punk
Light Pink Card Base - Spellbinders Card Creator die
Black Rectangle Stitched layer - Simon Says Stamp dies - Bundle of Stitched Shapes
Happy Birthday Die-cut - Die-Versions Whispers - Birthday Present
The Essentials Glue Pad
Rose Gold Foil - Anna Griffin
Stitched Banner & Bottom Star - Simon Says Stamp dies - Bundle of Stitched Shapes
Top Star - Spellbinders Shapeabilities Die - Moroccan Accents
Pink Metallic Dew Drops - The Robin's Nest

I am entering into these fun challenges:
CARDZ TV DESIGNERS CARD SKETCH CHALLENGE #1 BIRTHDAY
Scrapy Land -  #50 Happy Birthday!
Simon Says Wed: Anything Goes

Such a fun simple Birthday card to add to my stash, as a matter of fact it was so simple I decided to throw another similar one together while I had out all of the supplies.  This time adding some cool glitter effects on the Birthday die cut and changing up the banner a bit and rotating the stripe paper.  Oh I also used Simply Charmed embossing folder for this one.
Thanks for stopping by my little crafty place!  I hope you have a wonderful and crafty weekend!  ~ Eva Scraps

Friday, September 30, 2016

If the shoe fits Witch Cut-Away Card

I am making up cards for my Friend Cheryl @ Creativekuts.com this week with her awesome Card files.  She will be offering a deal tomorrow on FB.  You can go check it out HERE if you are interested. (Please Tell Cheryl Eva Sent you)
This was such a fun card to paper piece together & make and I love how it went perfect with my sentiment stamp.  Also I don't know if you can tell very well that it is a cut-away card so the front edge of the card is that broom shape...so cute!

Card file - Creativekuts.com
Card base - Recollection's Black card stock
Pattern papers card layers - Unsure...Maybe K&Co
Papers embellishment Paper pieces - Recollections
Inking around edges of all pieces -  Martha Stewart Powder blue ink
Sentiment Stamp - HOTP Witch Small Stamps
White Embossing Powder - Ranger Super Fine Detail
Tree Embossing - Crafters Companion, Wood Grain texture folder
Foam tape - from my stash

Inside stamped witch - HOTP Witch Small Stamps
Inside stamped sentiment - Craftin' Desert Diva's, Frightfully Cute
Memento tuxedo black ink
Inside die-cut -  Spellbinder's Opulent Ovals die
Inked edges - Walnut Stain Distress Ink

I will be entering into these fun challenges:
CARDZ TV ANYTHING GOES DESIGNERS CHALLENGE #1
Simon Says Stamp Monday - Powder Power
HIMCR #268 - Any Holiday!
Jo's Scrap Shack - FFC #158 "Cut it up" With a Twist!
Little Scrap Pieces Show It Off Linky Party

I hope you enjoyed my Project today.  Thanks for stopping by!
Happy Crafting!  Eva Scraps


Thursday, September 29, 2016

Fall Pumpkin pop up card

What a cool card cut this is for Fall or Halloween from Cheryl over at Creative Kuts
What's more is it is just the card base cut and the 3-D pumpkins and a background layer in this  file everything else you decide what you want to add.   This will definitely be a go to card file in my stash for fall and Halloween.   As a matter of fact I think I will be making a Halloween version of this card later today.
In the far background I used a falling leaves die-cut from spellbinders that I had inked up with my distress inks as watercolors.   I also created the brown frame to go around that and I did a border strip in the same color with a Victorian edge cut at top and bottom.  The single leaves are from crafters companion also inked up with Distress inks.   The adorable bear with the pumpkins stamp are from Desert Craftin Divas that I colored with my Spectrum Noir markers  and cut out with my ScanNCut2. The sentiment is also from that same stamp set which I stamped in brown pigment ink onto a spellbinders labels 20 die-cut that I had inked up with old photo distress ink and walnut stain around the edges.  For the pumpkins that I inked the edges of each piece in walnut stain distress ink first, then I layered them up with no glue and ran them through my D'Vine  Swirls Cuttlebug folder layered exactly how I wanted them to be at the end.  I then added foam tape between the layers of each pumpkin lining up the swirl marks as I placed them.


I am entering into these fun challenges:
Die Cuttin' Diva's - Challenge #285 ~ Vegetables
Little Red Wagon - Challenge # 361 - Bear With Me
Simon Says Wed: Anything Goes
Mod Squad Challenge - Falling Leaves
DL.ART Thankful Thursday Challenge #189 "FALL"
Die-Cut Diva's - September Challenge - Fall
Work it Wednesday September 2016 - Fall Colors
Craftin Desert Diva's on FB - #CDDMONTHLY

Thanks for stopping by to see what I'm up to in my craft room today hopefully I'll have a couple more cards to share with you later this afternoon.

 Have a wonderful and crafty day!
 Eva Scraps

Ice Skate Cut-away Card

Another Christmas Card to share with you all but today it is a Beautiful Cut-Away Card.  I am in love with this Hot Off the Press die set to cut away a flap for the card.  It is actually called Card Flaps and Borders Cutting Dies.  I have a Stamp set that coordinates with it but it is not Christmas and I opted to not use it on this one.  This is only 1 of 4 in the set...Wowzers I can't wait to make some more cards with the other cuts!!!
So the inspiration for this entire card was the Pretty Ice Skate stamp which is also from HOTP.  After finding the Christmas papers I wanted to use I dug out some old lavender and blue paper scraps for the die cuts.   I stamped the skate in versamark Ink and used Dutch blue embossing powder and set it with my heating tool.  I love how that turned out!   I then took it to my scanNCut 2 not knowing if it would recognize the embossed image but much to my surprise it did so I set it to give a .08 outline and cut.  I then diecut some snowflakes in the coordinating papers although I couldn't find the right color blue for the top snowflakes, so I decided to completely cover those in the matching in Embossing powder and heat set them.  I added a foam dot in between the layers of snowflakes and then added an enamel glitter dot to each.  I diecut a fancy oval and then ran it through my Swiss dots embossing folder.   I added the diecut ice skate on foam tape in the center of the oval and then added a light lavender gem in the center of the snowflake on the boot. I added some similar lavender gems along the fancy cut off edge plus one large white glitter dot in the center.
For the inside I covered with the blue paper, I then added the cute pattern paper which I had first cut with a Victorian edge with my paper cutter.  I used 2 oval dies from that same die set.  The sentiment is my favorite for the inside of my Christmas cards.  the snowflake stamp is from the same Ice Skate Small stamp set on the front.

List of materials:
Designer Papers - OTC
Solid Cardstock - Recollection's
Fancy Card Flap - HOTP Card Flaps & Borders Cutting Dies
Ice Skate & inside Snowflake stamp - HOTP Small Ice Skate Stamp
Small Heat Embossed Snowflakes - My Craft Spot Die, Snowflake Border & Dies
Embossing Powder - Dutch Blue
Large lavender Snowflakes - Die-Versions Sweet Petites - Snowflake
Fancy Oval Die cut - Spellbinders Nestabilities Majestic Elements Die - Opulent Ovals
Dry Embossing - Cuttlebug Swiss Dots
Sentiment stamp (inside) - Inkadinkado Cool Christmas Stamp Set
Bling: Gems, Enamel Dots and Glitter dots - all from my stash

I am entering into these fun challenges:
MY SHERI CRAFTS CHALLENGE #191 - Christmas w/ 3 or more dimen embellies
Simon Says Stamp Monday - Powder Power
HIMCR #268 - Any Holiday!


Thanks for stopping by to have a look at what I am up to in my craft room, hope to see you again real soon.

Have a wonderful and crafty day!
Eva Scraps

Tuesday, September 27, 2016

Hohoho dryer sheet card

 OK I couldn't just do one as I knew of course so here is another dryer sheet card.

I wanted this one to have a vintage feel to it.  This time the stamping is done in brown pigment ink.   The red hohoho in the center is a rub on,  I am really trying to get those out and use them more.   That beautiful imagery stamp set is from Crafters Companion - Sheena Douglas Christmas.  Using my blending tool I used old paper distress inks to Ink around the edges. 
I again used the Elmers craft bond and spray adhesive to attach the used dryer sheet.   I then ran it through my big shot to cut the layers down with the rectangle from  Simon says stamp – bundle of stitched shapes.   Then I sprinkled with the extra fine crystal diamonds glitter.  To the left I added some cute green enamel glitter dots  and on the right a cute little tag that I heat embossed Merry Christmas on in an extra fine white  embossing powder.  The tag is from Simon says stamp bundle of stitched shapes.   The merry Christmas stamp is from my craft spot - tiny tags Christmas.


List of materials:
Nena white heavy weight card base
Green textured card stock from my stash
White recollections card stock
Trees stamped twice along the bottom - Crafters Companion - Sheena Douglas Christmas
Santa & Reindeer - Crafters Companion - Sheena Douglas Christmas Stamp set
Used dryer sheet
Stitched Rectangle Die – Simon says stamp bundle of stitched shapes
Elmers craft bond spray adhesive – to attach dryer sheet
Extra fine glitter – Sulyn brand, crystal diamond  (found at Walmart)
Three green enamel glitter dots 
Stitched Tag - Simon says stamp bundle of stitched shapes
Versamrk Ink
Ranger - Super Fine White Embossing powder
Merry Christmas Stamp - my craft spot - tiny tags Christmas


I am entering into these fun challenges:
MY SHERI CRAFTS CHALLENGE #191 - Christmas w/ 3 or more dimen embellies
Simon Says Stamp Monday - Powder Power
HIMCR #268 - Any Holiday!
Jo's Scrap Shack - FFC #157 "Anything Goes"


Thanks for stopping by to have a look, hope to see you again real soon.

Have a wonderful and crafty day!
Eva Scraps

Cardinal Christmas dryer sheet card

 I have only ever made a dryer sheet card once and I enjoyed the outcome so I thought I would make a few this year  for my Christmas card list.  

I started with an A2 size piece of white card stock knowing that I would be cutting it down later for my front card layer.   I used a few different stamp sets to create this one a little bit of coloring with my Spectrum Noir markers, some inking around the edges with walnut stain distress ink, the dryer sheet and lots of sparkle.  It is so hard to capture all of that beautiful glitter in a picture .... I sure wish you could see it in person, it's really something!


List of materials:
Nena white heavy weight card base
Red recollections card stock
White recollections card stock
Pine sprigs around the edges – InkaDinkado Cool Christmas  stamp set
Holly leaves branch - I kadinkado cool  Christmas stamp set
Bird - HOTP  Cardinal small stamp set
Used dryer sheet
Stitched Rectangle Die – Simon says stamp bundle of stitched shapes
Elmers craft bond spray adhesive – to attach dryer sheet
Extra fine glitter – Sulyn brand, crystal diamond  (found at Walmart)
Three red gems

 I am entering into these fun challenges:
MY SHERI CRAFTS CHALLENGE #191 - Christmas w/ 3 or more dimen embellies
HIMCR #268 - Any Holiday!
Jo's Scrap Shack - FFC #157 "Anything Goes"

 Thanks for stopping by to have a look Hope to see you again soon.
 Have a wonderful and crafty day!
 Crafty hugs, Eva Scraps

Monday, September 26, 2016

Harley Birthday Card

 Hello my crafty friends, back with another birthday card to share with you.   I have four guy birthdays coming up in December and I always struggle with masculine cards so I thought I better get started early this year.    This card is following Mary's card sketch #3 over at cardz TV. This one will be for my brother Sonny he just bought himself a Harley Davidson motorcycle last year and yet this is far from a Harley I thought it looked pretty cool after I added some cool details and tweaks.
The motorcycle is from Cricut - Happy Father's Day cartridge.   I cut the two layers it offered on the cartridge as normal... the top one being in recollections black and the layering layers that go behind I did in a different textured black card stock.   I then I added clear embossing powder to the tank and fenders layers,  it really came out with a cool Glossy textured effect because it was on textured card stock to begin with.   Then I cut a complete blackout layer to go behind everything in a reflective silver card stock  to add all the awesome chrome look to the bike.   I also cut the seat section out of the textured card stock but I didn't add the embossing powder to it.   And one last final touch I did to the bike is on the very front part of the headlight I added glossy accents to make it look like a glass lens.

 Both of the label and banner die-cuts are from spellbinders but on each one I hand drew the inner section of the die and hand cut to give it a layered look.   After I adhered the polka-dot one I put it back in the die and ran it through with the embossing Mat to really let it pop  and mold to the shape.
For the word banner I added an old happy birthday rub-on from my stash.  I have a trick for making rub-on's attach easier in case anyone doesn't know this:   I cut the rub-on to fit the gray piece of paper,  I layered my die-cutting machine up as if I would be embossing only instead of putting the grey paper with the rub-on on top of it inside the embossing folder I laid it underneath the embossing folder and ran it through.   In most cases this gives enough pressure that the rub-on sticks to whatever you're attaching it to .... sometimes however you still do have to do a little rubbing as I did with this one just on the very ends though.  My Rub-on's are very old,  not sure if that makes a difference.   So once I had the rub-on attached to the gray piece of paper I inked the edges with walnut stain distress ink and then I adhered it to the embossed banner.   Both the motorcycle and the word banner are popped up on foam tape.   Plus I added 3 Grey enamel dots to the left bottom corner.

Card Base Layer in a grey rivot paper -  cut with spellbinders card creator die
4 X 5.25 layer in black recollections – Simon says stamp, Bundle of stitched shapes
Top section silver reflective layer - embossed with Cuttlebug diamond plate folder
Bottom section  diagonal striped star card stock  - Pressed petals, punk paper stack
Gray polka-dot paper – from my stash
Motorcycle  - Cricut  father's Day cartridge
Label – spellbinders labels 20
Word banner – spellbinders ribbon banners


 I will be entering into these fun challenges:
CARDZ TV DESIGNERS CARD SKETCH CHALLENGE #1 BIRTHDAY
Cut It Up Challenge - Challenge #105 - Name Game  Eva= Letter E - Embossing & Enamel Dots
Scrapy Land -  #50 Happy Birthday!
Simon Says Stamp Monday - Powder Power  Embossing Powder on bike tank & Fenders

Thanks for stopping by to see what I'm up to in my craft room, hope to see you again soon!
Crafty hugs, Eva Scraps

Sunday, September 25, 2016

Birthday Wishes "That" folder

 Today I'm sharing another girly Birthday card.    I am finally getting the chance to use my All Occasion embossing folder also known as "that" folder that I ordered online from the UK.  What a fun easy card to make.
I started off with a piece of dark purple Recollection's card stock which I embossed with my All Occasion embossing folder.    I took my blending foam tool and added some picked raspberry distress ink onto the top portion of the card on the raised designs.    I then took my Simon says stamp bundle of stitched shapes rectangle and die-cut the embossed piece to make my card front.   The adorable cupcake is from Cricut Best of 2009 Cartridge.   I ran the top pink frosting Layer through my Cuttlebug Swiss dots folder.   I then used my spectrum Noir clear glitter pen to brush all over that piece.  I then took a spellbinders diecut tag from twisted metal and cut and then embossed the white layer.  I laid the same diecut on a light purple card stock and traced the inside opening with pencil.   I then took my scissors & hand cut around that piece so that I could layer it over the top with the stamping.  I used Birthday Wishes stamp from my Hot off the press Birthday Greetings stamp set,  which I stamped with Momento Tuxedo black ink.   Before adhering those two pieces together with foam tape I brushed the entire outer edge of the white piece with my Spectrum Noir Clear glitter pen and also lightly went around the edges of the light purple layer with the same pen.   I popped the cupcake up on foam tape and added some little purple flower Gems across the embossed center portion of the card.   This would make a great card to mass produce for either card swaps or just to add several to your card giving stash.

Cricut Best of 2009 cartridge
Craft stash All occasion embossing folder
Cuttlebug Swiss dots embossing folder
Spellbinders twisted metal cutting die
Hot off the press birthday greetings stamp set
Flower bling gems from my stash
Spectrum Noir clear glitter pen
Picked raspberry distress ink

 I am entering into these fun challenges:
Fantabulous Cricut Challenge - Wet or Dry Embossing - Dry
Die Cuttin' Diva's - Challenge #284 Birthday
Scrapy Land - Challenge #50 Happy Birthday


Thanks as always for stopping by to see what I'm up to in my craft room today.  I wish you a wonderful and crafty Weekend, hope to see you again soon.

Crafty hugs, Eva Scraps


Friday, September 23, 2016

Birthday Balloon card

I created this card today to go into some fun challenges this week.    And it will make a great girl's birthday card to stick in my stash .

I just love this awesome paper stack from DCWV, the bright colors and paint splatters are awesome.   The card layout is based on Mary's Sketch #2 over at Cardz TV.   The frames in the center are from Die-Versions whispers called nesting frame one.   The black card stock is from recollections and I cut the back layer with Simon Says stamp stitched bundle of shapes.   I added a cute pink balloon with the white shadow Layer cut from Cricut Artiste cartridge which I popped up on foam tape.   I added some pink and white bakers twine for the balloon string .  The saw tooth sentiment banner I also cut from Artiste Cartridge one in white and a larger shadow Layer in black which I also Popped up on foam tape.   The sentiment stamp is from Craftin Desert Divas - Celebrations stamp set.   I stamped that with Memento Black Tuxedo ink.  I also added two small pink gems on each end of the word banner.

 I am entering into these fun challenges:
CARDZ TV DESIGNERS CARD SKETCH CHALLENGE #1 BIRTHDAY
Hiding in my craft room -  designer paper X3
Die Cuttin' Diva's - Challenge #284 Birthday
Scrapy Land - Challenge #50 Happy Birthday
Mod squad - Celebrate Your Inner Splat
Jo's Scrap Shack - FFC #157 "Anything Goes"

Thanks for stopping by, Have a wonderful and crafty day!
Eva Scraps


Thursday, September 22, 2016

Happy birthday lattice hearts pop up card

This card was super simple  thanks to another fun pop up card file from over at Creative Kuts!

I put this card together using pink and purple card stocks from recollections.  The dark purple background layer I ran through my embossing machine in the cuttlebug Simply Charmed Squares  folder.
I used a Die-Versions Whispers die called Birthday Present in pink which I cut a light purple shadow layer for with my scanNcut 2.  Before assembling the two layers together I took some purple glitter paint that I just purchased and painted the bow and a little scroll design down in the bottom left corner .   However it was much more like glitter glue then glitter paint so I simply sprinkled some purple fine glitter over it.   I added some cute designer recollection's heart Brad's that I thought went well with this card to the top two corners.   I had also picked up some cute sticky puffy banners that I decided to color purple with my spectrum noir markers before attaching to the bottom of my card.   I thought the lattice one would go well on this card.  That is it! Simple Simple!!!  A pretty and girly birthday card to stick in my card stash.

I am entering into these fun challenges:
Die Cuttin' Diva's - Challenge #284 Birthday
Scrapy Land - Challenge #50 Happy Birthday
Jo's Scrap Shack - FFC #156 "Anything Goes"
Little Scrap Pieces - Show it Off Saturday Linky Party


Thanks for stopping by, have a wonderful and crafty day.
Eva Scraps

Fall Pumpkin Burst Card

 I decided to create a fun fall card this morning.   I started off with using the Center Sunrise card file from Cheryl over at Creative Kuts.  
I found the beautiful pumpkin that I popped up on foam tape from the Cricut Thanksgiving cartridge.    I used three designer papers for this project, the two in the Sunburst are from Paper Studio - The Classics paper pad and the orange on the pumpkin is from Cricut Animal Kingdom 6x12 paper pack.   The solid orange for the burst outline and tag are also from a Cricut 6X12 paper pad (Earthtones).  The Beautiful Pumpkin is from Cricut CM Cheerful Seasons Cartridge.  The tag itself is die cut from Simon says stamp - bundle of stitched shapes.   The sentiment Hey Pumpkin! is from Craftin' Desert Divas -  Hey pumpkin stamp set, which I stamped with versamark Ink and heat embossed with detail copper embossing powder.  I love how the copper blends so nicely with the deep Browns on this card.  I also added a couple of yellow gemstones I just picked up yesterday at the dollar store to set it off.... what a great find!  I grabbed up lots of colors.
For the inside I used the same orange paper as on the front of the card from Cricut which I die cut with the Simon says stamp bundle of stitched shapes.   Plus more stamping from the same adorable hey pumpkin stamp set from Craftin' Desert Divas.

 Thanks for stopping by to take a look at my project today I hope to see you around again soon.

I will be entering into these fun challenges:
Hiding in my craft room -  designer paper X3
Die Cut Divas - Fall
Fantabulous Cricut Challenge - Wet or Dry Embossing (Tag Wet Embossed)
Simon says stamp Monday -  Inspired by Music inspired by song - I'm a Little Pumpkin

(here is a link to the lyrics ... sung to the I'm a little teapot tune - http://www.dltk-holidays.com/fall/m-littlepumpkin.htm)

Have a wonderful and Crafty Day!
Eva Scraps

Monday, September 12, 2016

Lattice Pop out Heart Card

Good morning, Wow I have been staying so busy I have not been on here in awhile.  Today I want to share with you the card I have created for my Hubby for our Anniversary.  It will be 10 years this month and I still feel like the luckiest girl in the world. <3
So this card was actually inspired by the inside cut file.  The beautiful center pop out Design that my friend Cheryl over at Creative Kuts created for me.  Wow how stunning the trio  lattice pop out hearts are! 
So I searched through my supplies and decided I wanted to use my HOTP Lacy Things Stamp Set which I did a lot of detail work to achieve the final look.  I started by stamping the large heart on white card stock.  I ran it through my ScanNcut 2 and cut out the outside of the stamped heart.  I set that aside and added a shadow for the cut by sizing it up and cut that in black card stock to back it with.  I also stamped 3 small roses, two on a deep red card stock and the other (center) on white.  I used my craft knife to hand cut the center of the heart out.  I used my cricut to cut the lattice from another one of Cheryl's Pop out card files from white card stock.  I trimmed it to fit behind my stamped heart.  I used my Spectrum Noir markers to color the heart in different shades of red, I also colored the center rose and the lattice with some of those same shades.  I decided to add die cut swirl (Die-Versions Whispers - Leafy Swirl) behind the heart cut from white card stock that I also colored in with red Spectrum Noir Markers.  Also I used foam tape to pop the red stamped Heart with lattice on it over the black shadow layer to give it some added dimension.  The gorgeous mat that I layered all of this onto was created with an edge die on either end of my card front layer cut from the deep red cardstock.  I knew the pretty lattice in it would match up well with the heart I created.  This die is - Crafters Companion Edge'ables Lattice Flourish Die.  The floral striped Paper is from an old paper stack called Rosewood from Colorbok.  I hand cut it to fit over the center of the die cut front.  I also stamped With Love from the same stamp set - HOTP Lacy Things.  All layered onto a black card base to complete the front.
For the center of the card I just simply cut Cheryl's awesome Trio lattice heart pop out layer twice, once in the deep red and once in the Colorbok Rosewood Pattern paper that matches the front.  I then cut away the lattice hearts on the pattern paper one and layered it over the deep red layer with the lattice hearts popping out.  So stunning!  I used the mats from another one of her cards.  The Sentiments were from a CD I purchased from Paper wishes - HOTP 1000 Card Quotes CD and printed onto the ivory card stock.  I then took the top layer of my sentiment mat which I cut out on my cricut, I drew a pencil line around it and had my ScanNcut2 cut it out.  I erased the pencil line and then inked the edges with Walnut stain distress ink.  Layered it onto black mat and placed them onto the inside of card. 

Of course I needed an envelope so I used more of the ivory card stock and my WRMK 123 punchboard to create this envelope.  I did some stamping from the same stamp set,  HOTP Lacy Things.  Plus I added one more item printed from that quotes CD up in the right corner to be used for the stamp and had my SNC2 cut it out for me, I inked the edges and glued it down.

I will be entering into these fun challenges:
Simon Says Stamp Wednesday Challenge - STAMPtember Stamp It
Decorate to Celebrate Anything Goes Challenge #18 
Scrapy Land Challenge #49 Anything Goes  
DL.ART SEPTEMBER LINKY CHALLENGE - Anything Goes
Little Scrap Pieces - Show it off Saturday Linky Party


Thank you for stopping by to see what I am up to in my craft room today, I hope to see you back again soon as I create more fun projects to share with you.

Have a wonderful and crafty day, Eva Scraps

Thursday, August 4, 2016

Merry & Bright Christmas Page

Another 8X8 Scrapbook page for my Bestie's Friendship gift album. 

This this is my take based on the sketch over at Die Cuttin' Diva's for their Challenge this week.
I used my Cricut to cut the two rounded corner background layers.  the doily mat is from my WRMK Mini 8 Punch set called Doily.  the reindeer is from an old cardmaker kit in my stash, he is popped up on foam tape.  The back green polka-dot paper is just from my stash, the solid red is recollections card stock and all of the rest of the paper cuteness is from Pebbles - Welcome Christmas stack.  The 2003 I welded together and cut with my Cricut.  For the photo I used my WRMK corner rounder just on 2 corners to give it an interesting look.  The Ornament die-cuts are from Spellbinders Shapeabilities Die - Holiday Tags.  I popped the smaller white one up on foam tape and stamped it in red chalk ink with Merry & Bright from HOTP Christmas Collection Stamp Set.  The ribbon is saved from a gift to be re-used. 
Green & white bakers twine bow is from my Sew easy stash of twines. 

I added bling... red rhinestones to my ribbon and to two corners of my photo and a bigger one to the Reindeer Nose of course.  Then I sprinkled some cool shaped sequins in red and green all over, I just got this from an online Peachy cheap deal at a great buy.

I am entering into these fun challenges:
Die Cuttin' Diva's - Challenge #277 ~ August Sketch
DL.ART AUGUST LINKY CHALLENGE
HIMCR #261 - Freestyle with a Twist!

Six more pages to go by tomorrow... wish me luck!  Thanks so much for stopping by to see what I am up to.  Hope to see you again very soon!
~ Eva Scraps

Wednesday, August 3, 2016

Life's a Beach Luau Page

I have been working on an 8x8 Friendship album for my Bestie to give her for her upcoming Surprise party.  I have 6 more pages to go and only 2 more days to work on it so wish me luck my crafty friends, I am such a procrastinator!
 Such fun memories made at this Luau we threw in the Summer of 2000, I hope the one this weekend will be even better!!!   Ha ha ha I forgot I stole my Brothers until I looked at these pictures.  

I used some pretty purple corrugated paper to add some texture which I used my curved Fiskars ruler and a craft knife to create the curved border.  the rest of the papers I used are from a Neon stack by Craft Smith. The little Luau Girl tag is from an old Paper stack from my stash, I added some small purple gems to set her off.  She is also popped up on foam tape.   I also added some larger purple Gems to the Flower centers.  The 2000 I created in SCAL.

Flower die-cuts - Cricut Life's a Beach Cartridge
Crab Luau Title - Cricut Life's a Beach Cartridge

I am entering into these fun challenges:
Fantabulous Cricut -  Challenge #282-Summer Activities
BBTB2 -  Sea Animal Challenge
Simon Says: Celebrate  (Celebrating Summer)
Die Cut Diva's - August Vacation
DL.ART AUGUST LINKY CHALLENGE
Simon Says: Fabulous Florals

 
 Well I am off to work on more pages.  Thanks so much for stopping by to see what I am up to.  Hope to see you again very soon!
~ Eva Scraps


Wednesday, July 27, 2016

Rudolph Shaped Card

I am so enjoying making all of these Christmas in July cards, with my huge list it is always good to get a good jump on them early.  This adorable file is from Cheryl over at Creative Kuts.  There are also two star ornaments to accompany the candy cane and stocking and they can all hang from his antlers but I wasn't wanting all that bulk of ribbons for mailing this one later on.  I created the mouth myself in SCAL because I suck at drawing on faces lol.  All of the papers are Scraps from my stash.  I chalked the cheeks and added some white gel pen accents.  oh and I popped up his nose with a foam square.  I was looking for a fun simple card to create today with my limited time on this busy day and this fit the bill perfectly!!!  Thanks Cheryl :) file can be found here: http://creativekuts.com/Rudulph-Card-201650.htm


The cute inside stamps are from a card maker kit I got years ago.


I am entering into these fun challenges:
Cardz TV - CHRISTMAS IN JULY CHALLENGE #2
DL.ART JULY LINKY CHALLENGE
Hiding in my Craft Room - HIMCR #260 - Christmas in July!!
Little Red Wagon - Challenge #352 Christmas in July
Simon Says - Anything Goes
Mod Squad Challenge Blog - Christmas In July


Thanks for stopping by, have a wonderful and Crafty Day!

~ Eva Scraps

Tuesday, July 26, 2016

Gingerbread Swing Card

Another Christmas in July card complete.  This was supposed to be a simple fast card.... and would have been!  If I didn't always change my mind so dang much ha ha!  Happy with the outcome though.
Please don't mind the clip holding the card shut... really hard to take a good picture closed so I just finally clipped it closed
 
 The bulbs next to gingers are shimmery, I wish it showed in the pics.  I painted them with clear Wink of Stella.  The ones near the sentiment I painted also w/ Wink of Stella but only at the screw tops.

Swing card Base - Cricut Artiste
    (I created the layers for the swing card myself)
 Green Card stock - Recollections
Pattern Paper -  Pebbles ~ Welcome Christmas paper pad
Gingerbread - Cricut ~ Stretch Your Imagination
Face Stamp - Peachy Keen ~ Basic Paper Doll Faces
Chalked the cheeks - OTC Shimmer Chalk
Puffy green paint for the frosting lines
Glittery Green Enamel dots for buttons
Light Bulbs - Echo Park Joy Stamp Set
Sentiment Stamp - Inkadinkado Cool Christmas Stamp Set

I am entering into these fun challenges:
Cardz TV - CHRISTMAS IN JULY CHALLENGE #2
DL.ART JULY LINKY CHALLENGE
Simon Says Stamp Monday - Challenge: Add Some Texture
Hiding in my Craft Room - HIMCR #260 - Christmas in July!!


Thanks for stopping by, have a wonderful and Crafty Day!

~ Eva Scraps

Monday, July 25, 2016

Snowman Shaped Card

Hello crafty people!  I received my awesome new stamp set from Cardz TV called Merry Everything that I recently won... Woooo Hoooo!!!  So I just had to use it in the new Challenge Mary is hosting over there.
I cased this idea from https://www.youtube.com/watch?v=-uB-Uw3rqns  
I started by making a shaped card with my Cricut Snow Friends Cartridge.  I decided to do a shadow background for my card cut.  Then I layered my snowman on top in white.  I wish I would have done the shadow with the hat on, but oh well I still like it.  I used Authentique Cozy for my pattern and colored papers.  I love how it makes the vest and cap look like sweater material.  I used a peachy keen face stamp - Winter Faces Stamp Set.  I colored the nose in with spectrum noir #CR10.  The adorable sentiment stamp is from Cardz TV - Merry Everything!
I took this one outside on this scorching hot 106 degree Summer day!  def not snowman weather!  Ugh LOL
I added a second red fur edge to the cap and popped it up on foam tape.  I added the scarf with seam binding ribbon which I made crinkle by balling up and spraying with water and drying with my heat gun.  I also added some sparkly enamel dots for buttons and one on scarf and one more on hat pom.
For the inside a cut a blue card stock layer and cut just a bit off the top of the head so it would fit inside.  I simply stamped Merry Everything! from Cardz TV Merry Everything Stamp Set.  What a fun simple card that many would enjoy receiving for Christmas.  I could do several of these at one time for that super long Christmas card list.

I will be entering into these fun challenges:
Cardz TV - CHRISTMAS IN JULY CHALLENGE #2
Fantabulous Cricut - Challenge #281 Anything Goes!
Simon Says Stamp Monday - Challenge: Add Some Texture
Hiding in my Craft Room - HIMCR #260 - Christmas in July!!

Thanks for stopping by!  Crafty Hugs!  ~ Eva Scraps

Sunday, July 24, 2016

Luau Bottle Centerpiece

Hello my Crafty Friends.  I have been super busy making these Centerpieces for an upcoming Luau for my Bestie's 50th Birthday.  Her daughter and I have been planning this for over a year now.  This is set 1 of 6 Centerpieces I am making.  They are all similar but each one is a little different. 
 The bottle is first painted a metallic blue.  I wrapped jute twine around the neck and secured with hot glue.  I made a 4" high wrap for the bottle from Purple Card stock, I then punched the edges to make a cute seashell border.  I added a layer of this blue burlap ribbon I picked up somewhere on sale.  I layered some spellbinders die cuts in pink and purple for the center.  The purple one I pinched the tip of each section to make it pop out and create a cool 3-D frame for a designer bottle cap.  In the center I created a pretty artwork with her Name on it with my computer and an added a clear epoxy over it.
The stick art at the top are all from Cricut Life's a Beach Cartridge.  The Dolphin Splash title is just one cut so I cut it twice and trimmed off the words on my blue layer before attaching together.  I added some pretty rhinestones to each cut to add some depth and bling of course.  At the very top of the bottle, I used my 1" circle punch to cut a top out of fun foam.  I then poked three hole where I wanted my sticks to go in.  I hot glued it to the up rim of the bottle.  After placing the sticks through and arranging how I wanted, I added a little glob of glue at the base of each stick to hold in place.
 I created the square Tiki face lantern from the Cricut Luau Cartridge, I trimmed off the hanger piece since they were going on the table. I lined the inside with Colored vellum panels and added some sequins to the faces where their were tiny holes, we will just place battery tea lights in these for each table.  everything is placed on a store bought 8" doily.  I added a starfish to enhance it all.


 here is a closeup of the bottle cap center, I love how folding the tips of the purple die cut created a dimensional frame for the cap.

Materials:
Pink die-cut - Spellbinders Shapeabilities Die - Ironwork Accents
Purple die-cut - Spellbinders Shapeabilities Die - Moroccan Motifs
Tiki Lantern - Cricut Luau Cartridge
Dolphin Title - Cricut Life's a Beach Cartridge
Flower die-cut - Cricut Life's a Beach Cartridge
Seashell Border on wrap -  Martha Stewart Punch Around the Page Beach Shells
Designer Bottle cap - Bottle Cap Inc.
From my stash - Vellum, Rhinestones, sequins, doily, starfish, Bottle, Jute twine, Blue Burlap ribbon

I am entering into these fun challenges:
Die Cuttin Diva's - Challenge #275 ~ Anything 3D
Craftin Desert Diva's - Beach
Fantabulous Cricut - Challenge #281 Anything Goes!
Simon Says Stamp Monday - Challenge: Nautical/By The Sea
Little Scrap Pieces - Show it off Saturday Linky Party
DL.ART JULY LINKY CHALLENGE
Decorate to Celebrate Anything Goes Challenge #15


Thanks so much for stopping by to see what I am up to.  Hope to see you again very soon!
~ Eva Scraps